Changing your tripod head on a Peak Design Travel Tripod enhances stability and control. TRAVELS.EDU.VN offers expert guidance and seamless travel services to ensure your photography adventures in destinations like Napa Valley are unforgettable. This article provides a detailed guide on modifying your tripod, alongside insights into maximizing your travel photography experience.
1. Understanding the Peak Design Travel Tripod
The Peak Design Travel Tripod is known for its ultra-lightweight design and integrated inverted ball head. While the built-in head minimizes size and weight, some users prefer the functionality and stability of a standard ball head. The Peak Design Universal Head Adapter allows you to attach your preferred head to the Travel Tripod.
- Built-in Head: Great for portability.
- Universal Head Adapter: Offers flexibility to use other tripod heads.
2. What is the Universal Head Adapter?
The Universal Head Adapter replaces the tripod’s built-in head and the top part of its center column. You can also install it without the center column for an even lighter setup or to position your camera closer to the ground. Made from solid aluminum, this adapter ensures durability and reliable performance.
3. What are the Benefits of Using a Different Tripod Head?
Using a different tripod head offers several advantages, particularly for stability and control.
- Enhanced Stability: Standard ball heads often provide better stability.
- Precise Control: Easier positioning and adjustments.
- Panning Base: Many ball heads include a dedicated panning base, essential for panoramic photography.
4. What Tools Do I Need to Change the Tripod Head?
To change the tripod head, you will need:
- Tripod Tool or Hex Wrenches: Typically included with the tripod.
- Universal Head Adapter: Sold separately by Peak Design.
- New Tripod Head: Your preferred ball head or other head type.
5. Step-by-Step Guide: How to Remove the Existing Tripod Head
Removing the existing head involves a few simple steps.
- Locate the Hole: Flip the standard head to the side to reveal a hole.
- Insert the Wrench: Insert the appropriate hex wrench into the hole.
- Remove the Head: Rotate the wrench to detach the head and the top section of the center column in one piece.
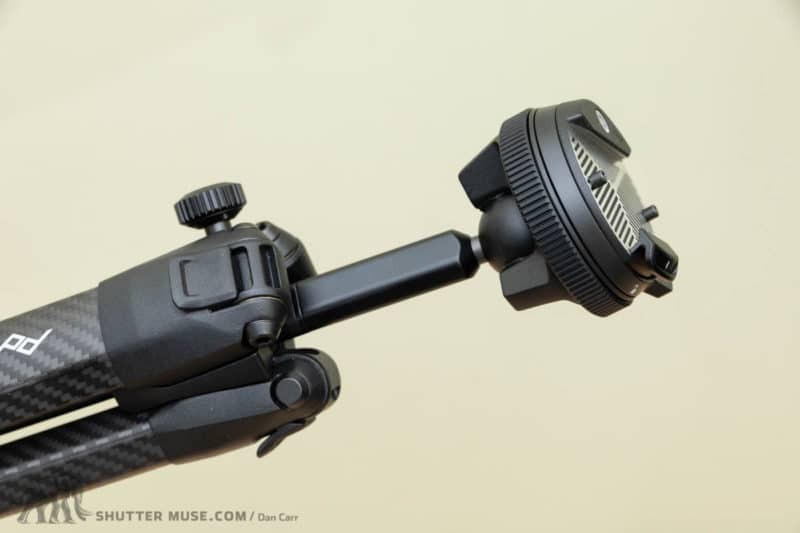 Peak Design Travel Tripod with built-in ball head
6. Step-by-Step Guide: How to Install the Universal Head Adapter
Installing the Universal Head Adapter is straightforward.
- Insert the Wrench: Insert the wrench into the center of the 3/8″ stud on the adapter.
- Tighten the Adapter: Ensure the adapter is securely tightened to prevent any wiggle during use.
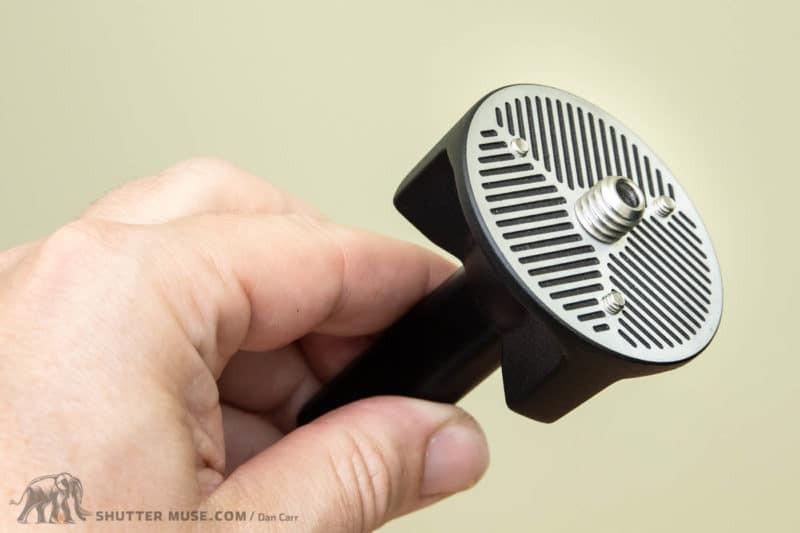 Close-up of the Peak Design Universal Head Adapter
7. Step-by-Step Guide: How to Attach the New Tripod Head
Once the adapter is installed, attach your new tripod head.
- Align the Threads: Align the threads of your new head with the adapter’s stud.
- Screw on the Head: Screw the head onto the adapter, ensuring it is firmly attached.
- Secure Set Screws: Use the set screws on the adapter to further secure the ball head, preventing loosening.
8. What is the Impact on Tripod Height and Weight?
Switching to the Universal Head Adapter can slightly reduce the tripod’s height and weight, but this is often offset by the size and weight of the new ball head.
- Height Reduction: The adapter shaves off about an inch of height.
- Weight Considerations: While the adapter itself is light, the added ball head may increase the overall weight.
9. Choosing the Right Tripod Head
Selecting the right tripod head depends on your specific needs. Consider these factors:
- Load Capacity: Ensure the head can support your camera and lens.
- Smoothness: Look for smooth panning and tilting movements.
- Locking Mechanism: Choose a reliable locking system to secure your camera.
10. Recommended Tripod Heads for the Peak Design Travel Tripod
Several tripod heads work well with the Peak Design Travel Tripod:
- Acratech GXP: Known for its 50lb load rating and precise control.
- Really Right Stuff BH-40: A compact and versatile ball head.
- Gitzo GH1382QD: Offers excellent stability and smooth movement.
11. Integrating the Universal Head Adapter into Your Travel Photography
The Universal Head Adapter is a valuable addition to your travel photography setup.
- Stability in Landscapes: Achieve sharper landscape photos with enhanced stability.
- Smooth Panoramas: Create seamless panoramic images with a dedicated panning base.
- Versatility in Different Environments: Adapt to various shooting conditions with greater control.
12. Essential Features of a Good Travel Tripod Head
When selecting a travel tripod head, consider these essential features:
- Lightweight Design: Minimizes the overall weight of your gear.
- Compact Size: Easy to pack and transport.
- Arca-Swiss Compatibility: Ensures compatibility with a wide range of plates and accessories.
13. Comparing Different Types of Tripod Heads
Different types of tripod heads cater to specific needs.
| Type | Advantages | Disadvantages | Best For |
|---|---|---|---|
| Ball Head | Versatile, quick adjustments | Can be less precise than other types | General photography, landscapes |
| Pan/Tilt Head | Precise control over each axis | Slower to adjust, bulkier | Video, architectural photography |
| Gimbal Head | Excellent balance for long, heavy lenses | Specialized, less versatile | Wildlife, sports photography |
| Fluid Head | Smooth, controlled movements for video | Limited for still photography | Video |
14. What Are Some Common Issues When Changing Tripod Heads?
Some common issues include:
- Loose Connections: Ensure all connections are properly tightened to prevent instability.
- Incompatible Threads: Verify that the threads of the head and adapter match.
- Over-Tightening: Avoid over-tightening screws, which can damage the components.
15. Tips for Maintaining Your Tripod Head
Proper maintenance ensures the longevity of your tripod head.
- Regular Cleaning: Remove dirt and debris with a soft cloth.
- Lubrication: Apply lubricant to moving parts to maintain smooth operation.
- Storage: Store the head in a protective case to prevent damage.
16. How Does This Upgrade Benefit Panoramic Photography?
A dedicated panning base is crucial for panoramic photography.
- Smooth Rotation: Ensures seamless stitching of images.
- Level Horizon: Maintains a level horizon throughout the panorama.
- Precise Alignment: Allows for accurate alignment of shots.
17. How to Ensure Compatibility with Arca-Swiss Plates
Arca-Swiss compatibility is essential for versatility.
- Check Specifications: Verify that the head and plate are Arca-Swiss compatible.
- Use Matching Plates: Use plates from reputable manufacturers to ensure a secure fit.
- Test the Connection: Before shooting, test the connection to ensure stability.
18. What Are the Best Practices for Securing Your Camera to the Tripod Head?
Properly securing your camera is vital for safety.
- Use a Secure Plate: Choose a high-quality plate that fits your camera snugly.
- Tighten the Plate: Ensure the plate is securely tightened to the camera.
- Double-Check the Connection: Before releasing your camera, double-check that the connection is secure.
19. How to Troubleshoot Common Tripod Head Problems
Common problems and solutions:
- Head Slipping: Tighten the locking mechanism or clean the ball.
- Stiff Movement: Lubricate moving parts.
- Loose Plate: Replace the plate or tighten the screw.
20. The Impact of a Quality Tripod Head on Image Sharpness
A quality tripod head significantly enhances image sharpness.
- Reduced Vibration: Minimizes camera shake, resulting in sharper images.
- Stable Platform: Provides a stable base for long exposures and telephoto lenses.
- Precise Adjustments: Allows for fine-tuning of camera position.
21. Maximizing Stability in Windy Conditions
Shooting in windy conditions requires extra precautions.
- Lower the Tripod: Reduce the tripod’s height to lower the center of gravity.
- Add Weight: Hang a weight bag from the center column to increase stability.
- Use a Remote Shutter Release: Avoid touching the camera during exposure.
22. How the Universal Head Adapter Enhances the Overall Tripod Experience
The Universal Head Adapter adds versatility to the Peak Design Travel Tripod.
- Customization: Allows you to tailor the tripod to your specific needs.
- Improved Performance: Enhances stability and control.
- Long-Term Investment: Extends the life of your tripod by allowing for upgrades.
23. Exploring the Napa Valley with Your Upgraded Tripod
Napa Valley offers stunning landscapes perfect for photography. With TRAVELS.EDU.VN, you can plan a seamless trip to capture the beauty of this region.
- Vineyard Views: Capture the rolling hills and lush vineyards.
- Golden Hour Photography: Take advantage of the warm light during sunrise and sunset.
- Architectural Details: Explore the charming wineries and estates.
24. Planning Your Napa Valley Photography Trip with TRAVELS.EDU.VN
TRAVELS.EDU.VN offers curated tours and services to enhance your Napa Valley experience.
- Custom Itineraries: Tailored to your photography interests.
- Local Expertise: Access insider tips and hidden gems.
- Hassle-Free Planning: Let us handle the details so you can focus on capturing stunning images.
25. Capturing the Perfect Shot in Napa Valley
Napa Valley’s diverse landscapes provide endless opportunities for photographers.
- Early Morning Light: Capture the mist rising over the vineyards.
- Sunset Silhouettes: Create dramatic silhouettes against the colorful sky.
- Wine Cellar Tours: Explore the atmospheric wine cellars.
26. Recommended Napa Valley Photography Locations
Some top photography locations in Napa Valley:
- Domaine Carneros: Known for its stunning chateau.
- Robert Mondavi Winery: Offers iconic architecture and vineyard views.
- Sterling Vineyards: Accessible by aerial tram, providing panoramic views.
27. Why Napa Valley is a Photographer’s Paradise
Napa Valley combines natural beauty with cultural richness.
- Picturesque Landscapes: Rolling hills, vineyards, and charming towns.
- World-Class Wineries: Unique architectural designs and photo opportunities.
- Culinary Delights: Capture the artistry of food and wine.
28. Utilizing the Peak Design Travel Tripod for Landscape Photography
The Peak Design Travel Tripod is ideal for landscape photography.
- Lightweight Portability: Easy to carry to remote locations.
- Stable Base: Provides a solid foundation for capturing sharp images.
- Versatile Adjustments: Allows for precise positioning in various terrains.
29. Understanding Tripod Leg Angle Adjustments
Adjusting tripod leg angles is crucial for stability.
- Wide Angle: Provides maximum stability on uneven terrain.
- Narrow Angle: Ideal for shooting at eye level on level surfaces.
- Independent Adjustment: Allows for precise positioning on challenging landscapes.
30. Securing Your Camera Gear While Traveling
Protecting your camera gear is essential during travel.
- Use a Secure Bag: Choose a camera bag with padded compartments and secure closures.
- Insure Your Gear: Protect against theft or damage.
- Keep Gear Close: Never leave your gear unattended.
31. Overcoming Common Photography Challenges in Napa Valley
Napa Valley presents unique challenges for photographers.
- Bright Sunlight: Use a polarizing filter to reduce glare and enhance colors.
- Crowded Locations: Arrive early to avoid crowds.
- Limited Access: Obtain necessary permits for private properties.
32. Creating Stunning Vineyard Panoramas with Your Upgraded Tripod
Vineyard panoramas capture the vastness of Napa Valley.
- Level the Tripod: Ensure the tripod is perfectly level.
- Use a Panning Clamp: Provides smooth, controlled rotation.
- Overlap Images: Overlap each shot by 30-50% for seamless stitching.
33. Understanding the Importance of a Bubble Level
A bubble level ensures accurate alignment.
- Precise Leveling: Guarantees a level horizon.
- Built-In Levels: Many tripod heads include built-in bubble levels.
- External Levels: Can be attached to the camera hot shoe for added accuracy.
34. How to Pack Your Tripod for Air Travel
Packing your tripod properly protects it during air travel.
- Check Airline Regulations: Ensure the tripod meets size and weight restrictions.
- Use a Padded Case: Provides cushioning and protection.
- Disassemble if Necessary: Remove the head to save space and reduce the risk of damage.
35. Maximizing Your Photography Time in Napa Valley
Efficient planning maximizes your photography time.
- Create a Shot List: Prioritize the locations and shots you want to capture.
- Check the Weather: Plan around optimal lighting conditions.
- Arrive Early: Avoid crowds and secure the best vantage points.
36. Essential Photography Accessories for Napa Valley
Key accessories to enhance your Napa Valley photography:
- Polarizing Filter: Reduces glare and enhances colors.
- Neutral Density Filter: Allows for long exposures in bright light.
- Remote Shutter Release: Minimizes camera shake.
37. The Role of a Good Tripod in Low-Light Photography
A stable tripod is crucial for low-light photography.
- Long Exposures: Allows for capturing detail in dark conditions.
- Reduced Noise: Minimizes digital noise by enabling lower ISO settings.
- Sharp Images: Prevents blur caused by camera shake.
38. Explore the Architectural Photography in Napa Valley
Napa Valley features stunning architectural designs.
- Winery Estates: Photograph the elegant facades and intricate details.
- Historic Buildings: Capture the charm of old-world architecture.
- Interior Shots: Explore the atmospheric interiors of wine cellars and tasting rooms.
39. How to Capture Stunning Golden Hour Photos in Napa Valley
Golden hour provides the perfect light for photography.
- Plan Ahead: Check sunrise and sunset times.
- Scout Locations: Find vantage points with unobstructed views.
- Use a Tripod: Ensures sharp images in low light.
40. Mastering Focus Techniques with Your Upgraded Tripod
Achieving sharp focus is essential.
- Manual Focus: Allows for precise control.
- Focus Peaking: Highlights areas in focus.
- Back-Button Focus: Separates focusing from the shutter release.
41. How to Enhance Your Travel Photography with Storytelling
Travel photography is about telling stories.
- Capture Local Life: Photograph people, culture, and traditions.
- Show the Environment: Include landscapes and surroundings.
- Create a Narrative: Tell a story through your images.
42. How to Create a Photography Portfolio of Your Napa Valley Trip
Creating a portfolio showcases your best work.
- Select Your Best Images: Choose a diverse range of high-quality photos.
- Organize Your Portfolio: Group images by theme or location.
- Tell a Story: Present your work in a compelling narrative.
43. Why Professional Guidance Matters
TRAVELS.EDU.VN offers expert guidance to elevate your travel photography.
- Personalized Itineraries: Tailored to your specific interests.
- Expert Advice: Learn from experienced photographers.
- Seamless Planning: Enjoy a stress-free travel experience.
44. Booking Your Napa Valley Photography Tour with TRAVELS.EDU.VN
TRAVELS.EDU.VN makes it easy to book your photography tour.
- Contact Us: Reach out to our team for personalized assistance.
- Customize Your Itinerary: Design a tour that meets your needs.
- Enjoy the Experience: Focus on capturing stunning images while we handle the logistics.
45. Maximizing the Value of Your Trip
TRAVELS.EDU.VN ensures you get the most out of your Napa Valley adventure.
- Insider Access: Discover hidden gems and unique experiences.
- Expert Knowledge: Benefit from our team’s expertise.
- Unforgettable Memories: Create lasting memories through exceptional photography.
Ready to elevate your travel photography in Napa Valley? Contact TRAVELS.EDU.VN today to plan your dream photography tour. Let us handle the details while you focus on capturing stunning images. Visit us at 123 Main St, Napa, CA 94559, United States, call us at +1 (707) 257-5400, or visit our website at travels.edu.vn. Contact us on Whatsapp for immediate assistance.
 Panoramic view of a Napa Valley vineyard
FAQ: Changing Tripod Heads on Peak Design Travel Tripod
1. Can I use any tripod head with the Peak Design Travel Tripod?
Yes, with the Universal Head Adapter, you can use most tripod heads that have a standard 3/8″ thread.
2. Is the Universal Head Adapter difficult to install?
No, the adapter is easy to install with the tripod tool or a set of hex wrenches. The process takes just a few seconds.
3. Does using the adapter affect the tripod’s stability?
Using the adapter with a quality ball head can enhance stability compared to the built-in head.
4. Will the adapter make my tripod heavier?
While the adapter itself is lightweight, the added ball head may increase the overall weight.
5. What are the benefits of using a separate ball head?
A separate ball head offers enhanced stability, precise control, and often includes a dedicated panning base.
6. Where can I purchase the Universal Head Adapter?
You can purchase the Universal Head Adapter directly from Peak Design or authorized retailers.
7. What should I do if the adapter feels loose after installation?
Ensure that you tighten the adapter securely during installation and use the set screws to prevent loosening.
8. Is Arca-Swiss compatibility important for a tripod head?
Yes, Arca-Swiss compatibility ensures that the head is compatible with a wide range of plates and accessories.
9. How do I maintain my tripod head for long-term use?
Regularly clean the head with a soft cloth, lubricate moving parts, and store it in a protective case.
10. What should I consider when choosing a ball head for travel photography?
Look for a lightweight design, compact size, Arca-Swiss compatibility, and smooth operation.