Travel planning should be exciting, the start of an adventure, not a source of stress. While travel guides and pre-made itineraries can be helpful, they often lack the personal touch needed for a truly memorable trip. Enter the Google Travel Planner, a powerful and intuitive tool (often referred to as Google Maps trip planner) that puts you in the driver’s seat of your vacation design. Whether you’re using the app on your phone or the web interface on your computer, Google’s trip planner empowers you to:
- Pinpoint must-see destinations
- Color-code your points of interest for easy organization
- Map out efficient routes between multiple locations
- Craft the perfect, personalized travel itinerary
This guide will provide you with a step-by-step walkthrough of how to leverage Google My Maps, a key component of the Google Travel Planner, to plan a fantastic 3-day Florence adventure. But first, let’s explore why Google Maps stands out as an exceptional tool for modern travel planning.
💡 Want to optimize your route for efficiency? Learn more about How To Route With Multiple Stops On Google Maps.
Why Google Maps Excels as Your Go-To Travel Planner
Studies show that having a trip planned boosts happiness – a significant 97% of people feel happier with a travel plan in place. That anticipation is wonderful, but without a solid itinerary, excitement can quickly morph into pre-trip jitters.
Here are four compelling reasons why the Google Travel Planner, powered by Google Maps, is your ideal travel companion:
1. Seamless Integration within the Google Ecosystem
Your Google account acts as a central hub, connecting you to a suite of products that work harmoniously to simplify your travel experience. With the Google Travel Planner, you can effortlessly:
- Design custom maps and save them directly to Google Drive for secure access.
- Schedule each day’s activities in Google Calendar, embedding precise locations and map links for easy navigation.
- Manage your vacation budget using Google Sheets, keeping your finances organized.
- Utilize location names in Google Photos to automatically categorize and easily retrieve your travel memories.
This deep integration within the Google ecosystem makes the Google Travel Planner incredibly efficient for planning both leisure trips and in-depth explorations of your chosen destinations.
2. Rich Reviews and In-Depth Location Insights
While the Google Maps mobile app offers fantastic on-the-go functionality, planning your trip on a desktop provides access to a wealth of information to enhance your itinerary. The Google Travel Planner allows you to seamlessly transition between desktop planning and mobile access, enabling you to explore:
- Genuine reviews from fellow travelers, offering invaluable firsthand perspectives.
- Essential details about locations, including website addresses, opening hours, and contact information.
- Suggestions for nearby attractions and activities, ensuring you don’t miss hidden gems.
Traveler reviews often contain golden nuggets of advice. For instance, when planning my Florence trip using the Google Travel Planner, reading reviews for the Uffizi Gallery highlighted the importance of pre-booking tickets to bypass long queues, even though same-day tickets are available.
3. Effortless Access to Your Personalized Trip Itinerary
While spreadsheets or documents can store itineraries, the combination of Google Calendar and the Google Travel Planner provides a visually dynamic and accessible approach. I love how the Google Travel Planner allows me to visualize my daily plans geographically, instantly understanding the proximity of locations. Creating routes in Google Maps is intuitive, and checking travel times – whether walking, driving, using public transport, or catching a taxi – becomes incredibly simple.
4. Personalized Notes and Custom Labels for Enhanced Organization
Concerned about forgetting crucial details? The Google Travel Planner lets you add personalized notes directly to your saved locations. For example, knowing I might forget to pre-purchase tickets, I create a Google Calendar event as a reminder, link the relevant location from my Google Travel Planner map to the event, and add all necessary notes within Maps for quick reference.
Step-by-Step Guide: How to Plan Your Trip with Google Maps
Now for the exciting part – crafting your personalized itinerary using the Google Travel Planner. Here’s my step-by-step method:
1. Initiate a New Custom Map in Google My Maps
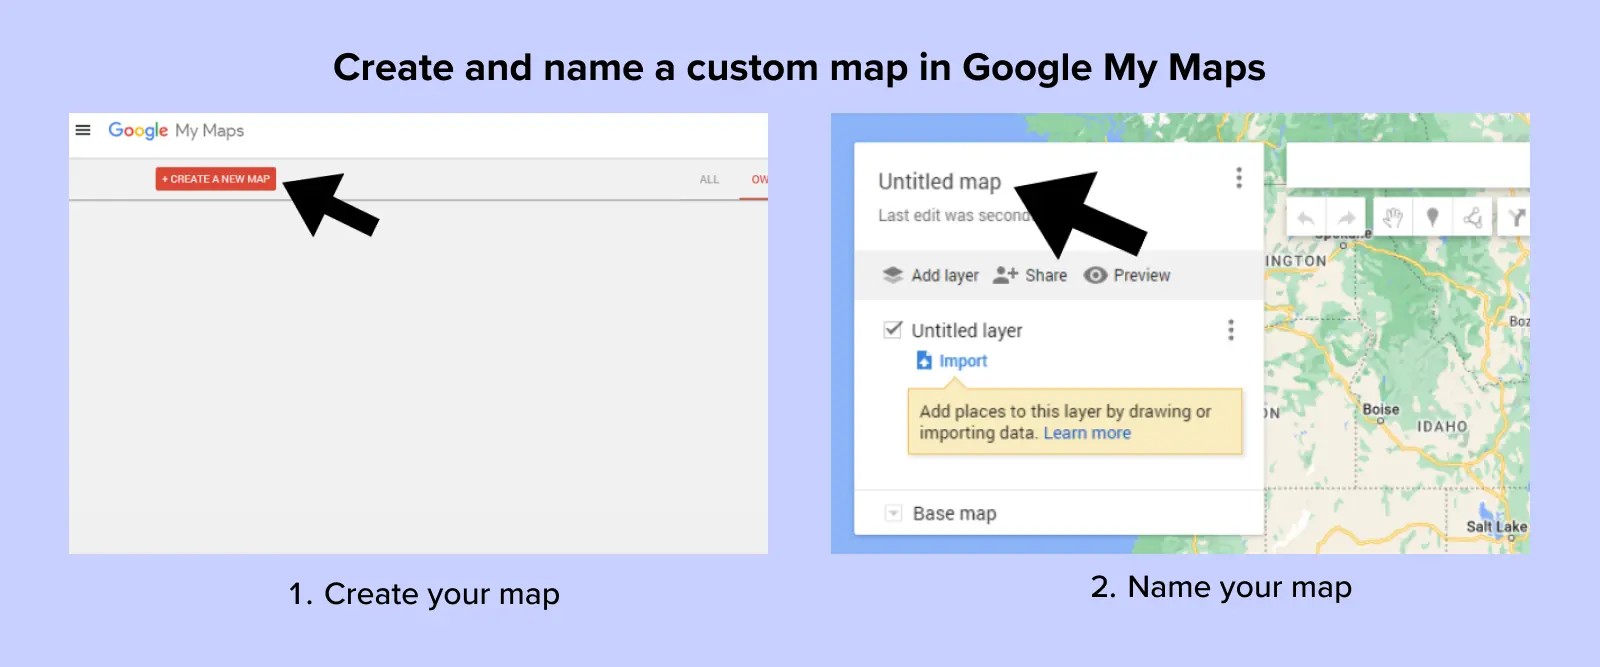 Screenshot of the "Create a new map" button and the map naming screen in Google My Maps, highlighting the initial steps to begin planning a trip.
To begin using the Google Travel Planner, navigate to https://www.google.com/mymaps. On your My Maps dashboard, click the prominent “+ Create a New Map” button.
A new map interface will open, offering a range of customization options. Begin by naming your map. Click on “Untitled map” in the top left corner; a dialog box will appear where you can input your map’s name and a brief description.
For this demonstration, we’re planning a 3-day trip to Florence, Italy. Let’s name our map “Florence in 3 Days.” Once named, you’re ready to start adding your desired locations.
2. Adding and Customizing Your Points of Interest
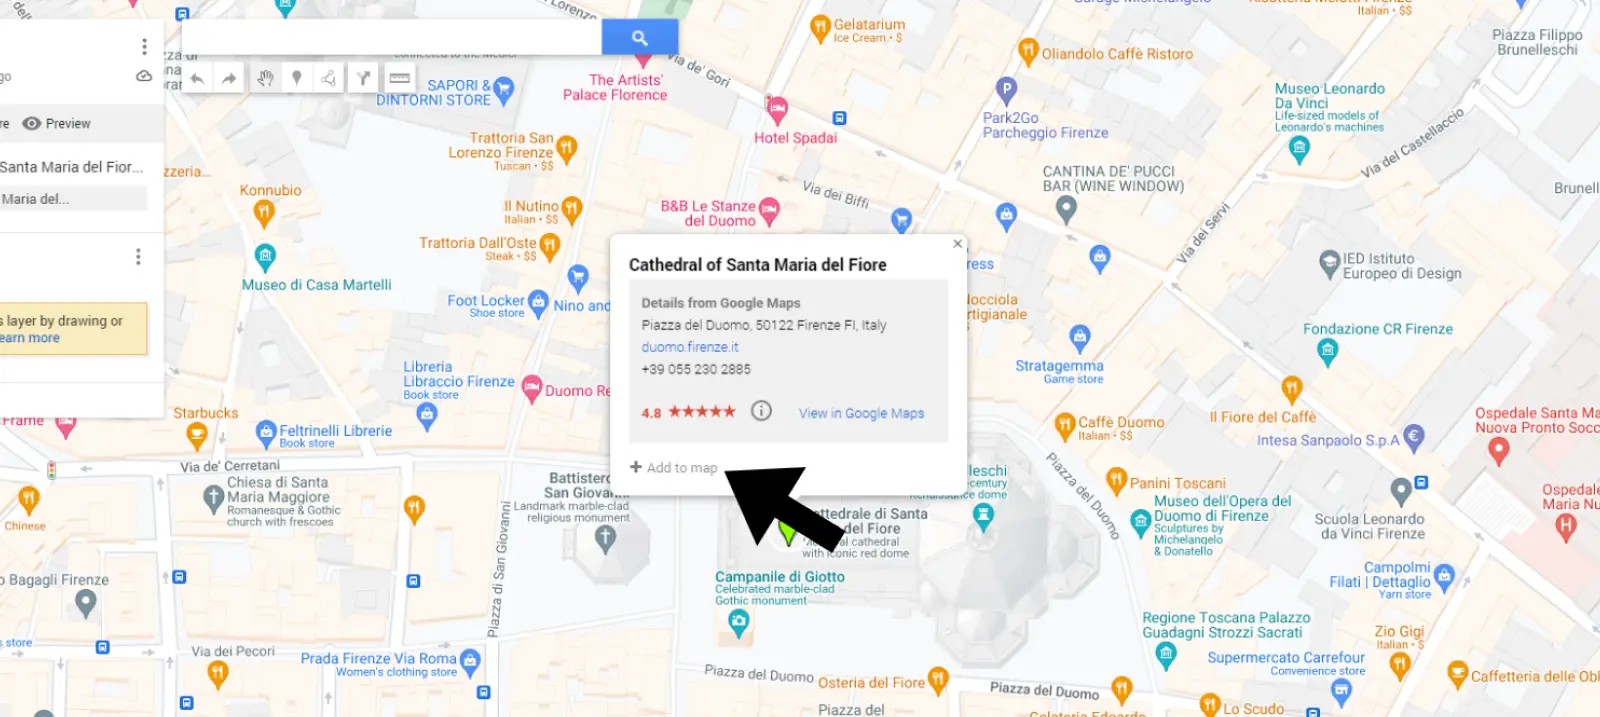 Screenshot demonstrating how to add a pin to Google Maps, illustrating the process of marking desired locations on your custom travel map.
This is where the Google Travel Planner truly comes to life – adding all the incredible places you intend to explore! Ideally, you’ll already have a list of attractions. If not, now’s the perfect time to research your destination and compile a list of must-see spots. Having a list prepared will streamline your planning significantly.
Within Google Maps, locations are represented as “pins.” To start pinning, use the search bar to find your first point of interest.
Let’s begin with one of Florence’s iconic landmarks: The Cathedral of Santa Maria del Fiore, famously known as the Duomo.
Google Maps will zoom into your searched location. Click the “Add to map” button that appears; the point of interest will be instantly added to your map layer as a pin.
![]() Screenshots showcasing how to customize pin colors and icons in Google Maps, enabling visual organization of your travel itinerary.
Screenshots showcasing how to customize pin colors and icons in Google Maps, enabling visual organization of your travel itinerary.
To enhance organization within your Google Travel Planner map, you can customize the color and icon of each pin. Hover over a location pin, and a paint can icon will appear. Click it to access customization options. Google Maps provides a wide selection of icons, including categories for monuments, museums, gardens, and more.
These visual cues make it easier to quickly identify the type of each destination at a glance, simplifying the next organizational step.
3. Organizing Your Trip with Layers (Categories)
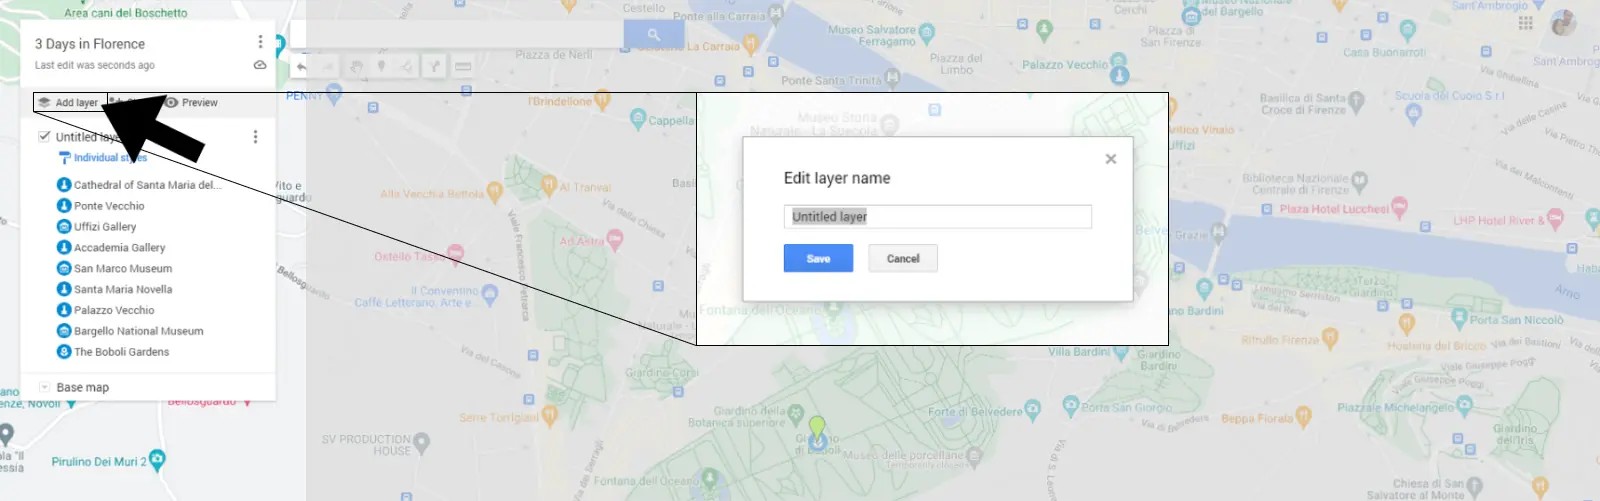 Screenshot illustrating how to add a layer in Google Maps, demonstrating the feature for categorizing and structuring your travel plan within the Google Travel Planner.
While travel planning is exciting, it can become overwhelming without structure. The Google Travel Planner’s layer feature helps you maintain order by categorizing your trip elements.
For our Florence example, dividing the trip into “Days” makes sense, allowing us to allocate specific points of interest to each day. In this scenario, each day becomes a distinct layer or category.
To create layers, click on “Add layer” in the left-hand panel. Each layer represents a new category.
After clicking “Add layer,” you can rename it. Delete “Untitled layer” and enter your desired name. For our Florence plan, we’ll create three layers named “Day 1,” “Day 2,” and “Day 3.”
Once layers are set up, start organizing your pinned points of interest into their respective daily layers. When planning your own trips with the Google Travel Planner, you can create categories that best suit your needs and travel style.
For a road trip itinerary, you might categorize layers by cities, adding points of interest within each city layer. Or, you could categorize by themes like “Food,” “Historical Sites,” or “Outdoor Activities.” The beauty of the Google Travel Planner is its adaptability to your personal travel preferences.
Layer Limits in Google My Maps
Layers are fantastic for organization, but avoid excessive layering. Google My Maps has a limit of 10 layers per map. For extensive or complex trips, careful layer planning is essential.
Location Pin Limits per Layer
Within each map created using the Google Travel Planner, you can add up to 2,000 individual pins per map, providing ample space for detailed itineraries.
4. Crafting Your Daily Itinerary
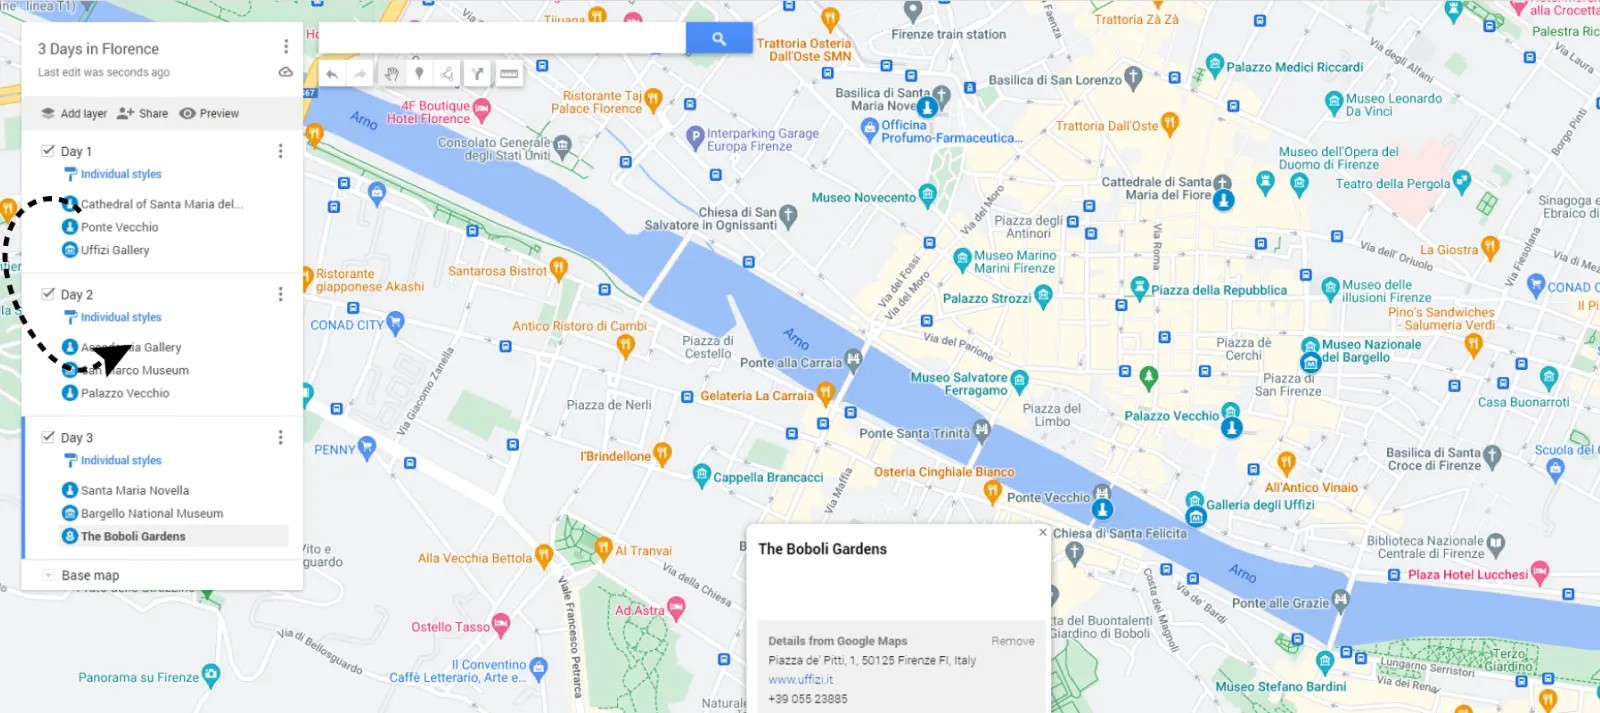 Screenshot demonstrating how to move layers on Google Maps, illustrating the drag-and-drop functionality for organizing your daily itinerary within the Google Travel Planner.
With your categories (layers) established, it’s time to structure your itinerary within the Google Travel Planner. Moving points of interest between layers is simple – just click and drag a pin to its desired layer.
In our Florence example, with “Day 1,” “Day 2,” and “Day 3” layers, we drag each point of interest into its corresponding day’s layer.
If you’re not categorizing by days, perhaps by city or activity type, the process remains the same. The core benefit of the Google Travel Planner is its visual representation of your trip. You can quickly see geographically clustered points of interest, making itinerary creation on paper or in a digital planner much easier.
5. Secure Your Bookings
With your itinerary mapped out in the Google Travel Planner, you can confidently proceed with bookings:
- Reserve your hotels, ensuring convenient locations within your planned routes.
- Schedule car rentals if needed for transportation between destinations.
- Pre-book tickets for events or museums, especially popular attractions, to avoid disappointment.
Booking in advance is highly recommended, particularly for peak seasons, to secure availability and potentially benefit from early-bird discounts.
6. Sharing Your Travel Map
Traveling with companions? The Google Travel Planner allows for easy map sharing, keeping everyone informed and on the same page.
Here’s how to share your map:
- Return to your main Google My Maps dashboard.
- Click the share button (arrow icon) located on the map you created.
You can share via Facebook, email, or Twitter. Embedding your map on a personal website is also an option.
7. Accessing Your Map on Your Mobile Device
You’ve created and shared your map, but to utilize it on your phone while traveling, ensure you have the Google Maps app installed.
Access your maps on your mobile device with these steps:
- Open the Google Maps app.
- Tap “Saved” at the bottom of the screen.
- Scroll down and tap “Maps.”
- Select your trip’s map from the list.
Mobile Map Creation and Editing Capabilities
While technically possible to create or edit maps on your phone, it’s important to note that this is done via your mobile browser, not directly within the Google Maps app itself. For full functionality and ease of use, desktop planning with the Google Travel Planner is generally recommended.
Road Trip Planning vs. City Trip Planning with Google Maps
The Google Travel Planner in Google Maps is versatile, but planning road trips versus city trips requires slightly different approaches.
Road trips, often involving multiple destinations and longer distances, tend to be more complex to plan. City trips, focused within a single urban area, are generally simpler.
Road Trip Planning Tips with Google Travel Planner
- Create a layer for each major stop along your road trip route.
- Within each stop’s layer, add pins for all desired points of interest.
- Include hotel locations directly on your map, ideally along your route, allowing for flexible overnight stops if needed.
City Trip Planning Tips with Google Travel Planner
- For multi-day city explorations, create a layer for each day, assigning points of interest to their respective days (as demonstrated in our Florence example).
- For single-day city visits, consider layering by activity type (e.g., “Morning Activities,” “Lunch Spots,” “Afternoon Sightseeing”) for a structured daily flow.
Using Your Google Maps Itinerary On-the-Go
Your map is created, shared, and the Google Maps app is ready. Now, how do you effectively use your Google Travel Planner itinerary while exploring?
Here’s your on-the-go guide:
- Open Google Maps and access your saved map.
- Tap “View map legend” to see a list of all your pinned locations and layers.
- Direct interaction with pins is limited in this view; it’s primarily for itinerary overview.
- To get directions, return to the main map view. Tap a point of interest, then tap the “Directions” button at the bottom.
- The route planning screen will appear. Enter your next destination; Google Maps will calculate the optimal route.
By default, driving directions are shown. Change your transport mode (walking, biking, public transport) at the top of the screen, and Google Maps will dynamically adjust the step-by-step directions accordingly.
Now, all that’s left is to immerse yourself in your adventure!
Experience the Google Travel Planner Yourself
Ready to test out the Google Travel Planner?
We’ve created a sample map featuring some highlights of Vancouver, our home city – view it here. Feel free to copy it and experiment with the steps outlined. Change pin colors, add your own locations – explore the possibilities!
Here are a few more interesting maps to inspire you:
Once you become comfortable with the Google Travel Planner, start designing your own travel maps. Pin your must-see attractions, create maps of your bucket-list cafes, museums, shops, and restaurants – discover just how simple and rewarding planning your next trip can be with the Google Travel Planner.