Is your travel trailer slide out giving you trouble? Don’t let misalignment ruin your adventure; this comprehensive guide teaches you How To Adjust A Slide Out On A Travel Trailer effectively. With step-by-step instructions and expert tips, you can ensure a smooth and worry-free travel experience, or let TRAVELS.EDU.VN handle all the maintenance.
1. Understanding Travel Trailer Slide Out Systems
Before diving into the adjustment process, it’s vital to understand the different types of slide out systems commonly found in travel trailers. This knowledge will help you diagnose the issue and apply the appropriate solution. Slide outs enhance living space, but their complex mechanisms require regular maintenance.
- Cable Slide Systems: These systems use cables connected to a central motor to pull the slide room in and out. They are known for their lightweight design.
- Rack and Pinion Systems: Relying on a gear and track mechanism, these systems offer robustness and stability, ideal for larger slide outs.
- Electric Motor Systems: Utilizing electric motors on each side of the slide out, these systems provide synchronized movement and precise control.
- Hydraulic Systems: Designed for heavy-duty slide outs, hydraulic systems use fluid pressure to extend and retract the room, offering significant power.
2. Identifying Common Slide Out Problems
Recognizing the symptoms of a misaligned slide out is the first step toward fixing it. Addressing these issues promptly can prevent further damage and costly repairs. Keep an eye out for these common signs:
- Uneven Movement: The slide out moves jerkily or unevenly, indicating a problem with the synchronization of the system.
- Binding or Sticking: The slide out gets stuck during operation, requiring excessive force to move it.
- Leaks: Water or air leaks around the slide out seal suggest a misalignment or damaged seal.
- Noises: Unusual grinding, popping, or scraping noises during slide out operation point to mechanical issues.
- Visible Gaps: Gaps between the slide out and the trailer wall are clear signs of misalignment.
- Difficulty Latching: The slide out struggles to latch securely in the open or closed position.
If you’re unsure how to diagnose the problem yourself, TRAVELS.EDU.VN is here to help. Contact us at +1 (707) 257-5400 for expert guidance.
3. Essential Tools and Materials
Before you begin, gather the necessary tools and materials to ensure a smooth and efficient adjustment process. Having everything on hand will save you time and frustration. Here’s a comprehensive list:
| Tool/Material | Description |
|---|---|
| Socket Wrench Set | A variety of socket sizes to fit different bolts and nuts in the slide out mechanism. |
| Open-End Wrench Set | Essential for tightening or loosening bolts in tight spaces where a socket wrench may not fit. |
| Screwdrivers (Phillips and Flathead) | Needed for removing and installing screws in the slide out components. |
| Level | To ensure the slide out is level when extended, preventing uneven wear and tear on the mechanism. |
| Measuring Tape | Accurate measurements are crucial for aligning the slide out properly. |
| WD-40 or Lubricant | To lubricate moving parts, reducing friction and improving slide out operation. |
| Seal Conditioner | To maintain the flexibility and sealing properties of the slide out seals, preventing leaks. |
| Cotter Pins | Replacement cotter pins to secure various components in the slide out mechanism. |
| Work Gloves | Protect your hands from dirt, grease, and sharp edges while working on the slide out. |
| Safety Glasses | Protect your eyes from debris and potential hazards during the adjustment process. |
| Multimeter | Useful for diagnosing electrical issues in electric slide out systems. |
| Hydraulic Fluid | For hydraulic slide out systems, to top off or replace fluid as needed. Refer to your owner’s manual for the correct type. |
| Manual Override Tool | In case of motor failure, this tool allows you to manually operate the slide out. Check your owner’s manual for the specific tool required for your system. |
| Wheel Chocks | Secure the travel trailer in place before working on the slide out to prevent accidental movement. |
| Jack Stands | To provide additional support and stability to the slide out during the adjustment process, especially for heavier slide outs. |
| Cleaning Supplies | To clean the slide out tracks and seals, removing dirt and debris that can hinder smooth operation. |
| Camera/Smartphone | Take pictures before and during disassembly to help you remember how parts fit together. |
4. Step-by-Step Guide to Adjusting a Power Gear Slide Out System
The Power Gear slide out system is a popular choice for travel trailers, and adjusting it requires careful attention to detail. Follow these steps to synchronize your RV slide out rails and prevent leaks caused by a misaligned flap seal. TRAVELS.EDU.VN recommends consulting your owner’s manual for specific instructions related to your model.
4.1. Preparing for the Adjustment
- Park on a Level Surface: Ensure your travel trailer is parked on a level surface to prevent any additional stress on the slide out mechanism.
- Stabilize the Trailer: Use leveling blocks and stabilizers to prevent movement during the adjustment process.
- Disconnect Power: Disconnect the travel trailer from shore power and turn off the battery to prevent electrical accidents.
- Extend the Slide Out: Extend the slide out partially to access the adjustment points.
4.2. Identifying the Adjustment Points
- Locate the Drive Shaft: Find the drive shaft that connects the motor to the slide out rails. This shaft is typically located underneath the slide out.
- Find the Idler Shaft: Identify the idler shaft on the opposite side of the slide out. This shaft does not have a motor but is essential for synchronization.
- Inspect the Gears: Examine the gears on both the drive and idler shafts for any signs of wear or damage.
4.3. Adjusting the Slide Out Timing
- Remove the Cotter Pin: Remove the cotter pin from the idler drive shaft.
- Disengage the Gear: Push the idler drive shaft toward the opposite rail to disengage the gear from the gear rack.
- Measure the Extension: Measure the distance on each side of the slide out from the frame to ensure accurate alignment.
- Manually Adjust the Slide: Manually slide the idler rail side of the room to the proper position, matching the measurement on the drive rail side.
- Engage the Gear: Push the idler drive shaft back into position, engaging the gear onto the gear rack.
- Reinstall the Cotter Pin: Reinstall the cotter pin into the idler drive shaft.
4.4. Testing the Adjustment
- Extend and Retract: Extend and retract the slide out a few times to check for smooth and even movement.
- Inspect the Seals: Examine the seals for proper contact and sealing against the trailer wall.
- Measure Again: Remeasure the extension on both sides to confirm the alignment is correct.
4.5. Finalizing the Adjustment
- Lubricate the Gears: Apply lubricant to the gears and moving parts to ensure smooth operation.
- Condition the Seals: Apply seal conditioner to the slide out seals to maintain their flexibility and prevent leaks.
- Recheck All Connections: Double-check all connections and fasteners to ensure they are secure.
Table: Power Gear Slide Out Adjustment Checklist
| Step | Action | Notes |
|---|---|---|
| 1. Preparation | Park, stabilize, disconnect power, extend slide out | Ensure level surface, use stabilizers, turn off power |
| 2. Identify Adjustment Points | Locate drive shaft, idler shaft, and inspect gears | Check for wear or damage on gears |
| 3. Adjust Timing | Remove cotter pin, disengage gear, measure extension, manually adjust | Ensure accurate measurements, slide idler rail to match drive rail |
| 4. Testing | Extend and retract, inspect seals, remeasure | Check for smooth movement, proper sealing, and correct alignment |
| 5. Finalizing | Lubricate gears, condition seals, recheck connections | Apply lubricant to gears, seal conditioner to seals, and ensure all connections are secure |
5. Adjusting Other Slide Out Systems
While the Power Gear system is common, other types of slide out systems require different adjustment procedures. Here’s a brief overview of how to approach these systems.
5.1. Cable Slide Systems
- Locate Cable Tensioners: Find the cable tensioners, typically located near the motor or on the slide out frame.
- Adjust Cable Tension: Use a wrench to adjust the tension on the cables, ensuring they are evenly tightened.
- Test the Movement: Extend and retract the slide out, checking for smooth and even movement.
5.2. Rack and Pinion Systems
- Inspect the Rack and Pinion: Examine the rack and pinion gears for any signs of wear or damage.
- Loosen Mounting Bolts: Loosen the mounting bolts on the rack and pinion assembly.
- Adjust the Alignment: Adjust the alignment of the rack and pinion, ensuring they are properly aligned with each other.
- Tighten Mounting Bolts: Tighten the mounting bolts and test the movement of the slide out.
5.3. Electric Motor Systems
- Check Motor Synchronization: Ensure that both motors are synchronized and operating at the same speed.
- Adjust Motor Settings: Use a multimeter to check the voltage and current to each motor, adjusting the settings as needed.
- Test the Movement: Extend and retract the slide out, checking for smooth and even movement.
5.4. Hydraulic Systems
- Check Hydraulic Fluid Level: Ensure the hydraulic fluid level is adequate.
- Bleed the System: Bleed the hydraulic system to remove any air bubbles.
- Adjust Valve Settings: Adjust the valve settings to control the flow of hydraulic fluid to the slide out cylinders.
- Test the Movement: Extend and retract the slide out, checking for smooth and even movement.
Table: Troubleshooting Guide for Various Slide Out Systems
| System Type | Problem | Possible Cause | Solution |
|---|---|---|---|
| Cable Slide | Uneven movement | Uneven cable tension | Adjust cable tensioners to ensure even tension |
| Rack and Pinion | Binding or sticking | Misaligned rack and pinion gears | Loosen mounting bolts, realign gears, and retighten bolts |
| Electric Motor | Jerky movement | Motor synchronization issues | Check motor synchronization and adjust motor settings |
| Hydraulic | Slow or weak movement | Low hydraulic fluid level or air in the system | Check fluid level, bleed the system to remove air |
6. Maintaining Your Travel Trailer Slide Out
Regular maintenance is crucial for keeping your travel trailer slide out in good working condition. Here are some essential maintenance tips:
- Clean the Tracks and Seals: Regularly clean the slide out tracks and seals to remove dirt and debris.
- Lubricate Moving Parts: Lubricate the moving parts with a high-quality lubricant to reduce friction and wear.
- Condition the Seals: Apply seal conditioner to the slide out seals to maintain their flexibility and prevent leaks.
- Inspect for Damage: Regularly inspect the slide out for any signs of damage, such as cracks, bends, or corrosion.
- Tighten Fasteners: Check and tighten all fasteners, such as bolts and screws, to ensure they are secure.
- Follow Manufacturer’s Recommendations: Follow the manufacturer’s recommendations for maintenance and adjustment.
By following these tips, you can extend the life of your travel trailer slide out and prevent costly repairs.
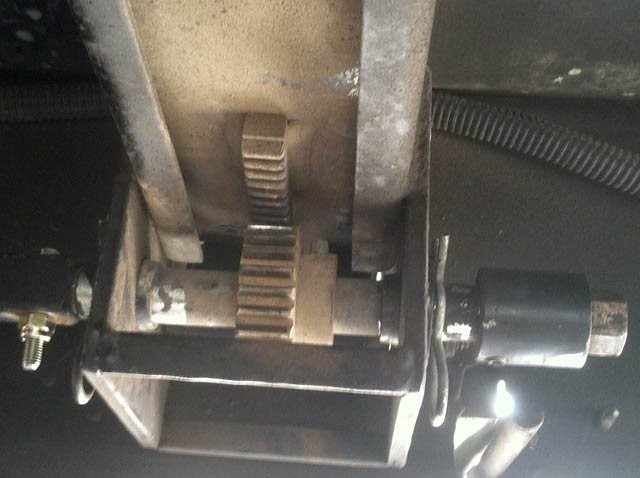 RV Slideout Rails Timing Gear Adjustment
7. Troubleshooting Common Issues
Even with regular maintenance, you may encounter issues with your travel trailer slide out. Here are some common problems and their solutions:
- Slide Out Won’t Extend or Retract: Check the power supply, fuses, and circuit breakers. Ensure the motor is functioning correctly.
- Slide Out Moves Slowly: Lubricate the moving parts and check for any obstructions in the tracks.
- Slide Out Leaks: Inspect the seals for damage and replace them if necessary. Apply seal conditioner to maintain their flexibility.
- Slide Out Makes Noise: Lubricate the moving parts and check for any loose or worn components.
Table: Common Slide Out Issues and Solutions
| Issue | Possible Cause | Solution |
|---|---|---|
| Slide out won’t extend or retract | Power supply issues, blown fuses, motor failure | Check power, replace fuses, test motor |
| Slide out moves slowly | Lack of lubrication, obstructions in tracks | Lubricate moving parts, clear obstructions |
| Slide out leaks | Damaged seals, lack of seal conditioning | Inspect and replace seals, apply seal conditioner |
| Slide out makes noise | Lack of lubrication, loose or worn components | Lubricate moving parts, check and replace worn components |
8. When to Seek Professional Help
While many slide out adjustments and repairs can be done yourself, there are times when it’s best to seek professional help. Contact a qualified RV technician if you encounter any of the following:
- Complex Mechanical Issues: If you’re not comfortable working with the slide out mechanism or if the problem is beyond your skill level.
- Electrical Problems: If you suspect electrical issues, such as wiring problems or motor malfunctions.
- Hydraulic System Issues: If you’re not familiar with hydraulic systems, it’s best to leave repairs to a professional.
- Structural Damage: If you notice any structural damage to the slide out or the trailer frame.
Attempting to repair complex issues yourself can lead to further damage and potentially dangerous situations. TRAVELS.EDU.VN can connect you with trusted RV technicians in the Napa Valley area. Call us at +1 (707) 257-5400 for a consultation.
9. Understanding Slide Out Seal Maintenance
Maintaining the seals on your travel trailer slide out is crucial for preventing leaks and protecting your RV’s interior from water damage. Here’s what you need to know about slide out seal maintenance:
- Types of Seals: Understand the different types of seals used on slide outs, such as wiper seals, compression seals, and bulb seals.
- Cleaning the Seals: Regularly clean the seals with a mild soap and water solution to remove dirt and debris.
- Conditioning the Seals: Apply a seal conditioner specifically designed for RV slide out seals to keep them flexible and prevent cracking.
- Inspecting the Seals: Regularly inspect the seals for any signs of damage, such as tears, cracks, or dry rot.
- Replacing the Seals: Replace damaged seals as soon as possible to prevent leaks and further damage.
 Fixed RV Slide Out Flap Seal
Table: Slide Out Seal Maintenance Schedule
| Task | Frequency | Description |
|---|---|---|
| Cleaning | Monthly | Clean seals with mild soap and water to remove dirt and debris. |
| Conditioning | Every 3 Months | Apply seal conditioner to keep seals flexible and prevent cracking. |
| Inspection | Every 6 Months | Inspect seals for damage, such as tears, cracks, or dry rot. |
| Replacement | As Needed | Replace damaged seals as soon as possible to prevent leaks. |
10. Enhancing Your Napa Valley RV Experience with TRAVELS.EDU.VN
While maintaining your RV is important, so is enjoying your travel experiences. TRAVELS.EDU.VN offers unparalleled tour packages and services in Napa Valley, ensuring a memorable and hassle-free vacation.
- Customized Napa Valley Tours: From wine tasting to scenic drives, we tailor tours to your preferences.
- Luxury Accommodations: Stay in the finest hotels and resorts in Napa Valley.
- Exclusive Experiences: Gain access to private vineyards and gourmet dining experiences.
- RV Maintenance and Repair Services: Partnering with local experts, TRAVELS.EDU.VN helps ensure that your RV is always in top condition.
- 24/7 Customer Support: Our dedicated team is available around the clock to assist you with any needs.
Let TRAVELS.EDU.VN take care of the details so you can focus on creating unforgettable memories.
Why Choose TRAVELS.EDU.VN for Your Napa Valley RV Adventure?
| Benefit | Description |
|---|---|
| Expert Planning | Our team of travel experts meticulously plans every aspect of your trip, ensuring a seamless and enjoyable experience. |
| Unmatched Convenience | We handle all the logistics, from booking accommodations to arranging transportation, so you can relax and focus on enjoying your vacation. |
| Exclusive Access | Gain access to private vineyards, gourmet restaurants, and unique experiences that are not available to the general public. |
| Personalized Service | We tailor our services to your individual needs and preferences, ensuring that your Napa Valley RV adventure is everything you’ve dreamed of. |
| Peace of Mind | With our 24/7 customer support and partnerships with trusted RV maintenance providers, you can rest assured that you’re in good hands throughout your trip. |
Don’t let slide out issues or trip planning stress you out. Contact TRAVELS.EDU.VN today at +1 (707) 257-5400 or visit our website at TRAVELS.EDU.VN to start planning your dream Napa Valley RV getaway. Our office is located at 123 Main St, Napa, CA 94559, United States.
FAQ: Adjusting Travel Trailer Slide Outs
- How often should I adjust my travel trailer slide out?
- It depends on usage, but a good rule of thumb is to inspect and adjust your slide out at least twice a year or before any long trips.
- What are the signs of a misaligned slide out?
- Common signs include uneven movement, binding, leaks, unusual noises, and visible gaps.
- Can I adjust my slide out myself, or should I hire a professional?
- Simple adjustments can be done yourself, but complex issues or electrical/hydraulic problems should be handled by a professional.
- What tools do I need to adjust a slide out?
- Essential tools include a socket wrench set, open-end wrench set, screwdrivers, a level, and measuring tape.
- How do I maintain the seals on my slide out?
- Regularly clean the seals with mild soap and water and apply a seal conditioner to keep them flexible.
- What type of lubricant should I use on my slide out mechanism?
- Use a high-quality lubricant specifically designed for RV slide out mechanisms.
- What should I do if my slide out won’t extend or retract?
- Check the power supply, fuses, and circuit breakers. Ensure the motor is functioning correctly.
- How can I prevent leaks around my slide out?
- Regularly inspect and maintain the seals, and ensure the slide out is properly aligned.
- What are the different types of slide out systems?
- Common types include cable slide systems, rack and pinion systems, electric motor systems, and hydraulic systems.
- Where can I get professional help with my travel trailer slide out in Napa Valley?
- Contact TRAVELS.EDU.VN at +1 (707) 257-5400 for assistance and recommendations for trusted RV technicians in the area.
Ready for a stress-free Napa Valley RV adventure? Let travels.edu.vn handle all the details. Contact us today and experience the difference!