Planning a trip is exciting, but organizing the details can be overwhelming. Discover How To Create A Travel Map In Google Maps and transform your travel planning with this powerful, free tool. TRAVELS.EDU.VN shows you how to effortlessly create custom travel maps, stay organized, and enjoy stress-free adventures. Learn how to leverage Google Maps for travel planning, route optimization, and personalized trip itineraries.
1. Why Use Google Maps for Travel Planning?
Google Maps offers a user-friendly platform for visualizing and organizing your travel plans. A well-planned itinerary significantly enhances travel experiences, as highlighted by a study indicating that 97% of travelers report increased happiness when their trip is meticulously planned. Using Google Maps for trip planning offers numerous advantages:
1.1. Seamless Integration with Google Ecosystem
Google Maps works seamlessly with other Google products, streamlining your travel planning process.
| Feature | Benefit |
|---|---|
| Google Drive | Store and access your custom maps from any device. |
| Google Calendar | Schedule daily activities with exact locations and map links. |
| Google Sheets | Budget your vacation expenses. |
| Google Photos | Organize photos by location using names from your maps. |
The integration simplifies planning and enhances your overall travel experience.
1.2. Access to Extensive Reviews and Location Data
The Google Maps app provides comprehensive information about your destinations, including:
- Reviews from other travelers
- Website URLs and contact details
- Opening and closing times
- Nearby attractions and activities
Real user reviews offer valuable insights, helping you make informed decisions. For example, reviews of Napa Valley wineries often suggest booking tours in advance to avoid disappointment, a tip that can save you time and enhance your visit.
1.3. Easy Access to Trip Itinerary
Combining Google Calendar with Google Maps allows for easy visualization of your daily plans. Creating routes is simple, ensuring you can easily check travel times whether walking, driving, using public transport, or taking a taxi.
1.4. Personalized Notes and Labels
Add personalized notes directly to your map locations to remember important details. For example, note down reservation numbers, specific tour meeting points, or personal reminders. This ensures you don’t forget critical information.
2. Step-by-Step Guide: How to Create a Travel Map in Google Maps
Follow these detailed steps to create your custom travel map using Google Maps.
2.1. Create a New Custom Map
- Visit Google My Maps: Go to https://www.google.com/mymaps.
- Create a New Map: Click the “Create a New Map” button.
- Name Your Map: Click “Untitled Map” and enter a name and description.
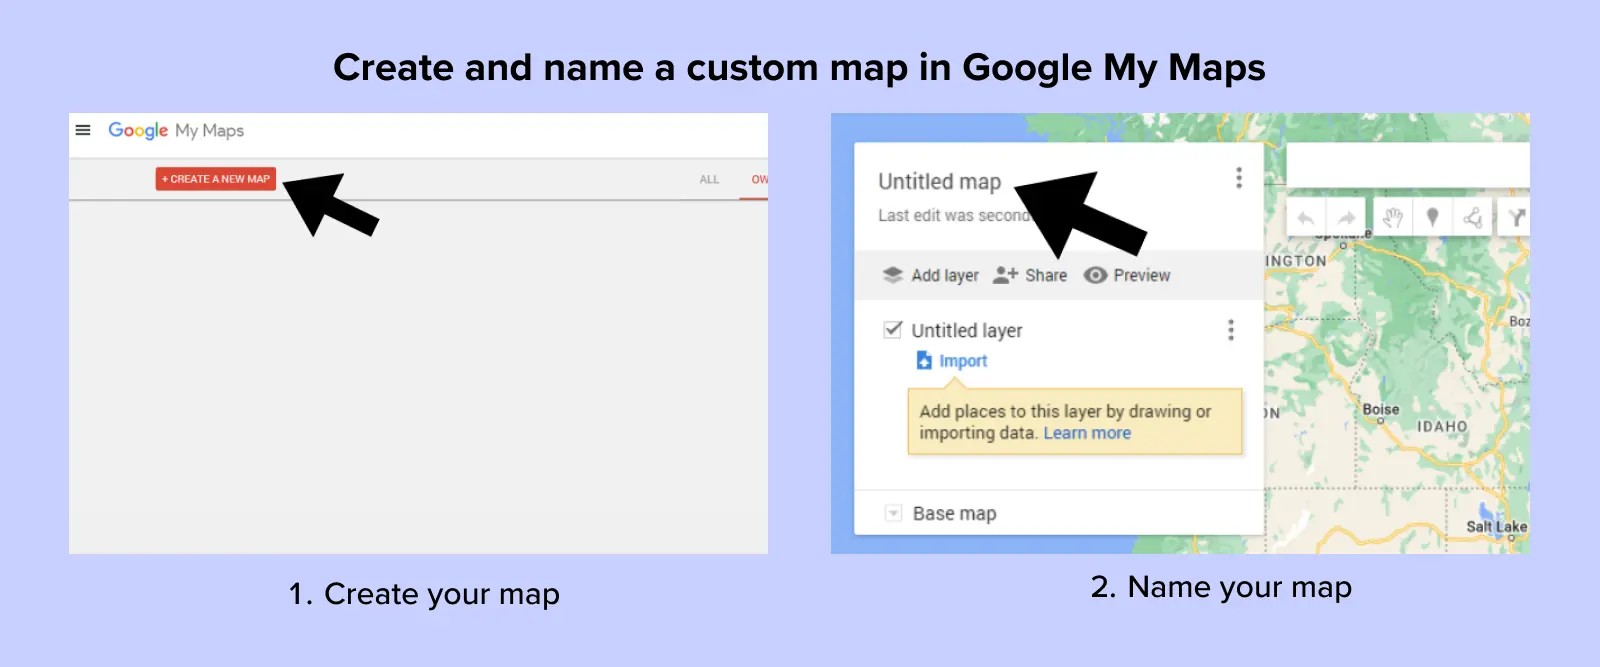 Screenshot of “create a map” button and the map naming screen.
For example, if you’re planning a wine tour in Napa Valley, name your map “Napa Valley Wine Tour.”
2.2. Add and Customize Your Locations
- Search for Locations: Use the search bar to find points of interest. For example, search for “Domaine Carneros, Napa Valley.”
- Add to Map: Click the “Add to Map” button to add the location to your map layer.
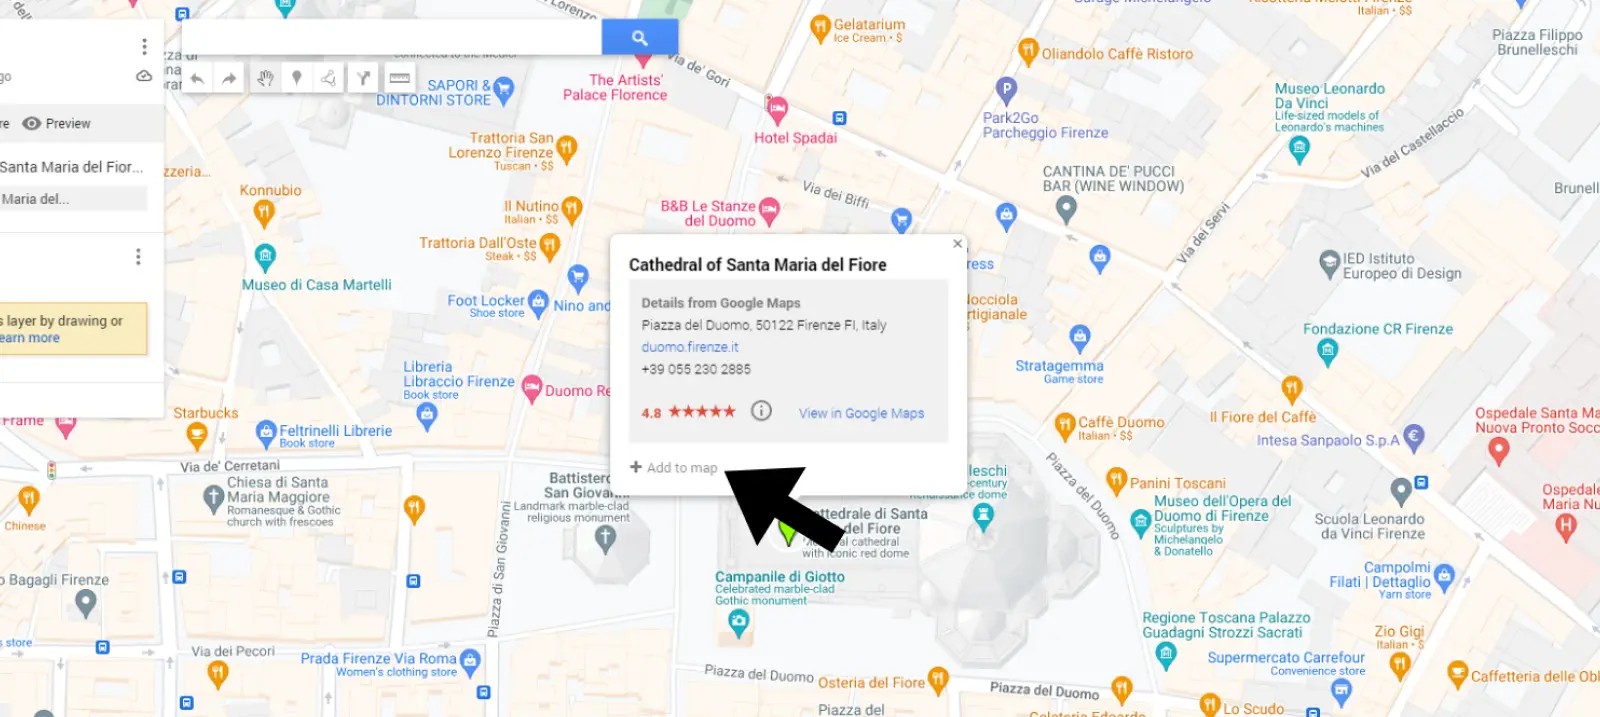 Screenshot of how to add a pin to google maps.
- Customize Pins: Hover over the location and click the paint can icon to change the color and icon. Choose icons that represent the type of location, such as wineries, restaurants, or landmarks.
![]() Screenshots of how to change pin colors and icons in google maps.
Screenshots of how to change pin colors and icons in google maps.
Customizing pins helps you quickly identify different types of destinations at a glance.
2.3. Organize Your Trip into Layers (Categories)
- Add Layers: Click “Add layer” to create new categories.
- Name Layers: Name each layer according to your itinerary. For a Napa Valley trip, you might create layers for “Day 1 Wineries,” “Day 2 Restaurants,” and “Day 3 Activities.”
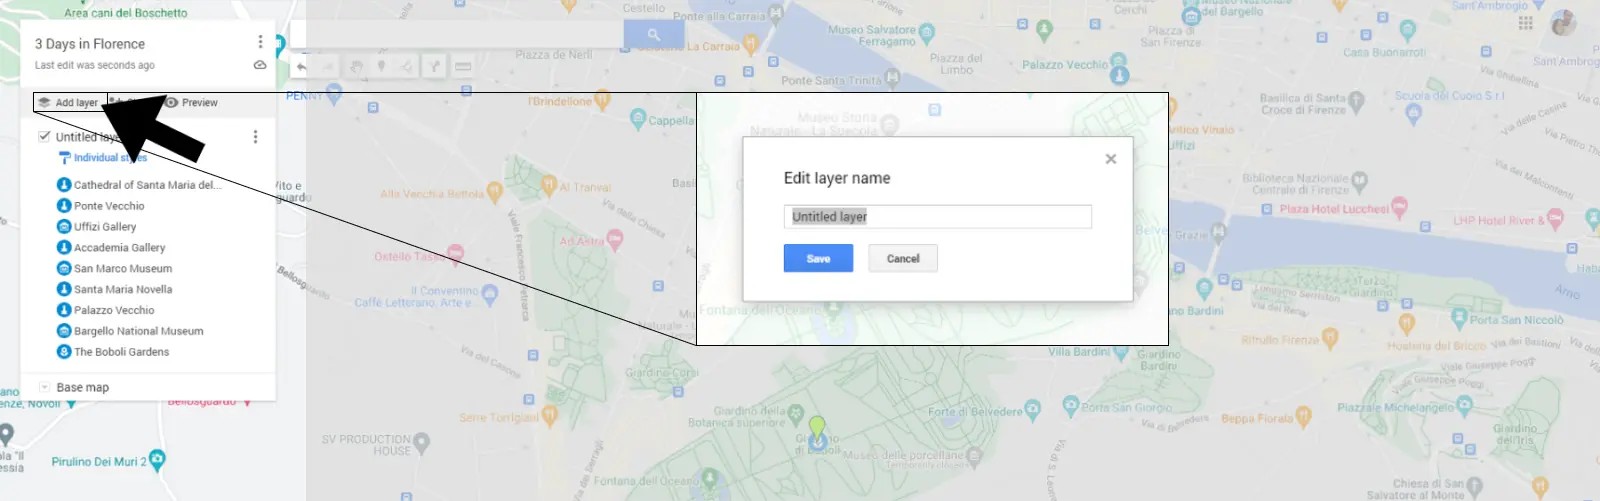 Screenshot of how to add a layer to google maps
- Move Locations to Layers: Click and drag each pin to its respective layer to organize your itinerary.
Layer Limits: Google Maps allows up to 10 layers per map.
Pin Limits: You can add up to 2,000 separate pins to each map.
2.4. Plan Your Detailed Itinerary
Organize your itinerary by moving points of interest into different layers. This helps you visualize your trip and plan your days efficiently.
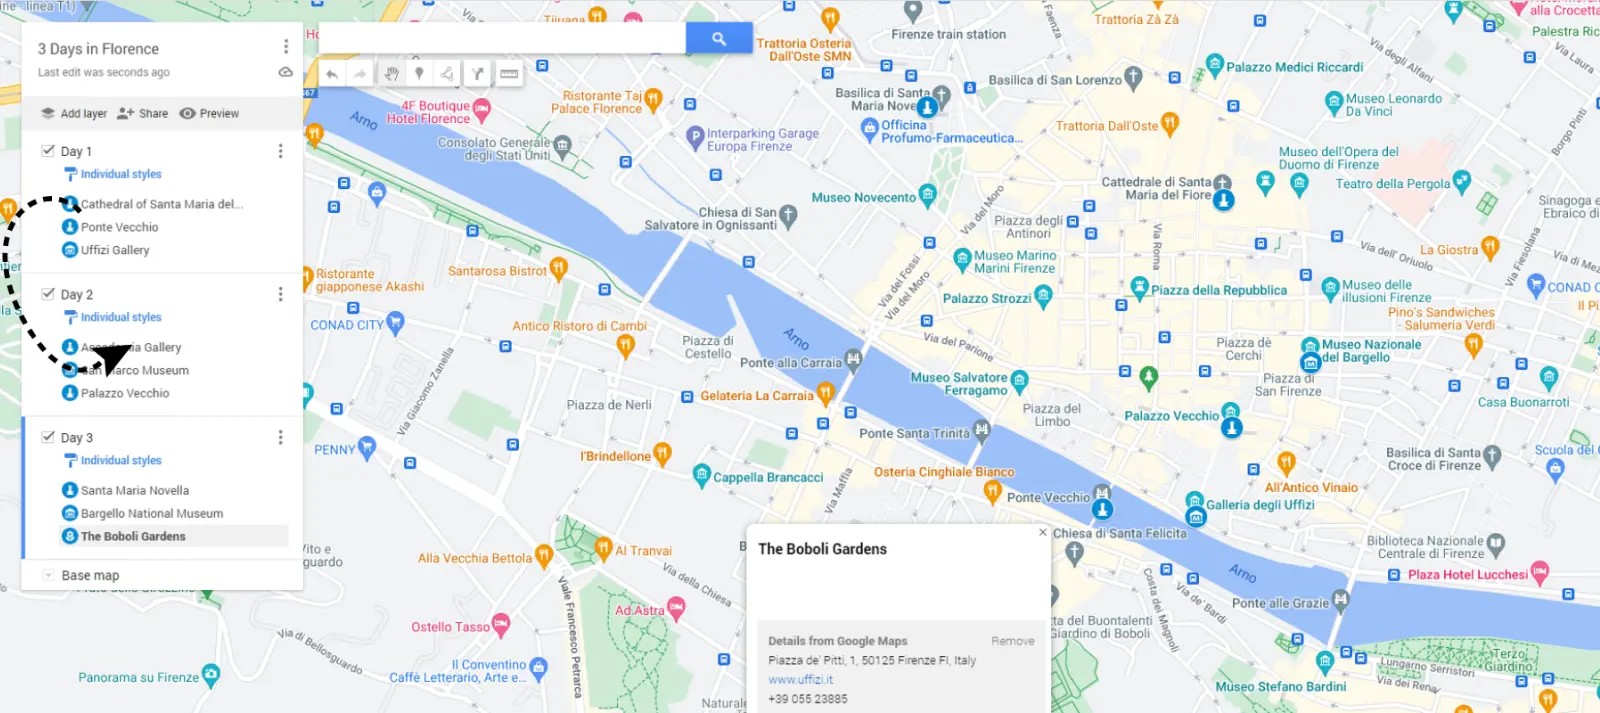 Screenshot of moving layers on maps
For example, drag wineries like “Robert Mondavi Winery” and “Opus One Winery” into the “Day 1 Wineries” layer.
2.5. Start Booking and Making Reservations
With your itinerary planned, book your hotels, car rentals, and make reservations for tours, tastings, and dining. Booking in advance is essential, especially for popular destinations like Napa Valley, to secure your preferred dates and times.
2.6. Share Your Map with Travel Companions
Share your map with friends and family traveling with you.
- Go to Google My Maps Dashboard: Return to the main dashboard.
- Click the Share Button: Select the map you created and click the share button (arrow icon).
- Share Options: Share via Facebook, email, or Twitter. You can also embed the map on a website.
2.7. Access Your Map on Your Mobile Device
- Install Google Maps App: Ensure you have the Google Maps app installed on your phone.
- Open Google Maps App: Open the app and tap “Saved” at the bottom.
- Tap Maps: Choose your trip’s map from the list.
Editing Maps on Mobile: While you can view your maps on the mobile app, editing requires using your browser.
3. Planning Road Trips vs. City Trips with Google Maps
Google Maps is versatile but requires different approaches for road trips and city trips.
3.1. Road Trip Planning
Road trips involve driving between multiple locations, each with several points of interest.
Tips for Road Trip Planning:
- Create Layers for Each Stop: Each city or major point along your route gets its own layer.
- Add Pins to Each Layer: Include all attractions, hotels, and restaurants in that stop’s layer.
- Include Hotels Along the Route: Add hotels as pins to allow for impromptu stops if needed.
3.2. City Trip Planning
City trips focus on a single location, making planning simpler.
Tips for City Trip Planning:
- Create Layers for Each Day: If staying multiple days, dedicate a layer to each day.
- Categorize Activities: If staying one day, create layers for different types of activities like “Museums,” “Restaurants,” and “Parks.”
4. Using Your Google Maps Itinerary On-the-Go
Once your map is created, accessing and using it while traveling is straightforward.
- Open Google Maps and Tap Your Map.
- View Pinned Locations: Tap “View map legend” to see all pinned locations.
- Navigate to Locations: Return to the main map, tap a point of interest, and select “Directions.”
- Choose Mode of Transport: Select your preferred mode of transport (driving, walking, biking, public transport).
Google Maps will automatically adjust the directions based on your selected mode of transport.
5. Practical Examples: Creating a Napa Valley Travel Map
Let’s create a sample Napa Valley travel map to illustrate the process.
5.1. Day 1: Napa Valley Wine Tour
- Layer Name: Day 1 – Napa Valley Wineries
- Wineries to Include:
- Domaine Carneros: Known for its sparkling wines and picturesque views.
- Robert Mondavi Winery: Offers tours and tastings of their renowned Cabernet Sauvignon.
- Opus One: A prestigious winery with a focus on Bordeaux-style blends.
- Castello di Amorosa: An authentically styled 13th-century Tuscan castle and winery.
5.2. Day 2: Culinary Delights
- Layer Name: Day 2 – Napa Valley Restaurants
- Restaurants to Include:
- The French Laundry: A Michelin-starred restaurant offering an exquisite tasting menu (reservations essential).
- Bottega Napa Valley: Chef Michael Chiarello’s restaurant featuring Italian-inspired cuisine.
- Gott’s Roadside: A casual spot known for its burgers and shakes.
- Oxbow Public Market: A marketplace with a variety of food vendors and artisanal products.
5.3. Day 3: Activities and Exploration
- Layer Name: Day 3 – Napa Valley Activities
- Activities to Include:
- Napa Valley Wine Train: A scenic train ride through the valley with dining options.
- Hot Air Balloon Ride: Enjoy breathtaking views of Napa Valley from above.
- Calistoga Mud Baths: Relax and rejuvenate with a mud bath treatment.
- di Rosa Center for Contemporary Art: Explore a collection of contemporary art in a beautiful setting.
6. Advanced Tips for Creating a Travel Map in Google Maps
Enhance your Google Maps travel planning with these advanced tips:
- Use Custom Icons: Upload custom icons to make your map more visually appealing and easier to navigate.
- Add Detailed Descriptions: Include notes about each location, such as reservation details, dress codes, or specific recommendations.
- Incorporate Public Transport Options: Use Google Maps to find public transport routes and schedules to incorporate into your itinerary.
- Utilize Street View: Explore locations virtually using Street View to get a better sense of the area before you visit.
- Download Offline Maps: Download maps for offline use in case you don’t have internet access.
7. SEO Optimization for Your Travel Map
To make your travel map more accessible and useful to others, optimize it for search engines:
- Use Relevant Keywords: Include keywords like “Napa Valley wine tour,” “best Napa Valley restaurants,” and “Napa Valley attractions” in your map name and descriptions.
- Share Your Map Publicly: Make your map public and share the link on social media, travel forums, and your blog.
- Encourage Reviews: Ask friends and family to leave reviews on your map to increase its visibility and credibility.
8. Why Book Your Napa Valley Tour with TRAVELS.EDU.VN?
Planning a trip to Napa Valley can be exciting, but it also requires careful coordination of various elements to ensure a seamless and memorable experience. TRAVELS.EDU.VN offers expertly curated travel packages that save you time and stress, providing unparalleled benefits:
8.1. Save Time and Effort
Our travel experts handle all the details, from booking accommodations and transportation to securing reservations at top-rated wineries and restaurants. This allows you to focus on enjoying your vacation without the hassle of planning.
8.2. Access Exclusive Deals and Packages
TRAVELS.EDU.VN has established strong relationships with local partners, enabling us to offer exclusive deals and packages that you won’t find anywhere else. These include discounted rates on accommodations, wine tastings, and activities.
8.3. Personalized Itineraries
We understand that every traveler is unique. Our team creates personalized itineraries tailored to your interests, preferences, and budget, ensuring you get the most out of your Napa Valley experience.
8.4. Expert Guidance and Support
Our knowledgeable travel consultants are available to provide expert guidance and support throughout your trip, answering your questions and addressing any concerns that may arise.
8.5. Stress-Free Travel
By entrusting your travel arrangements to TRAVELS.EDU.VN, you can relax and enjoy a stress-free vacation, knowing that all the details are taken care of.
9. Call to Action: Plan Your Dream Napa Valley Getaway Today
Ready to experience the best of Napa Valley without the stress of planning? Contact TRAVELS.EDU.VN today for a consultation and let us create the perfect itinerary for your dream getaway. Our expert team is ready to answer your questions, provide personalized recommendations, and ensure your trip is seamless, unforgettable, and tailored to your desires.
Don’t miss out on the opportunity to indulge in world-class wines, gourmet cuisine, and breathtaking scenery. Call us at +1 (707) 257-5400 or visit our website at travels.edu.vn to learn more and start planning your Napa Valley adventure. We’re located at 123 Main St, Napa, CA 94559, United States, and we can’t wait to help you create lasting memories in Napa Valley.
10. Frequently Asked Questions (FAQs) About Creating Travel Maps in Google Maps
1. What is Google My Maps?
Google My Maps is a feature within Google Maps that allows you to create custom maps with personalized points of interest, routes, and annotations for trip planning and other purposes.
2. How do I access Google My Maps?
You can access Google My Maps by visiting https://www.google.com/mymaps in your web browser.
3. Can I use Google My Maps on my mobile device?
Yes, you can view your created maps on the Google Maps app on your mobile device, but editing requires using a web browser.
4. How many layers can I add to a Google My Map?
You can add up to 10 layers to a Google My Map.
5. How many location pins can I add to each layer?
You can add up to 2,000 separate pins to each map you create in My Maps.
6. Can I share my Google My Map with others?
Yes, you can share your map via Facebook, email, or Twitter, or embed it on a website.
7. Can I download Google My Maps for offline use?
Yes, you can download maps for offline use in case you don’t have internet access.
8. How can I customize the appearance of my Google My Map?
You can customize the appearance by changing pin colors and icons, adding descriptions, and using custom icons.
9. Is Google My Maps free to use?
Yes, Google My Maps is a free tool available to anyone with a Google account.
10. How do I add directions to my Google My Map itinerary?
You can add directions by tapping a point of interest on the map and selecting “Directions.” Then, enter your starting point and choose your mode of transport.