Are you experiencing leaks or damage to your travel trailer roof? Don’t panic! TRAVELS.EDU.VN is here to guide you through the process of repairing your travel trailer roof, ensuring a safe and enjoyable journey. With the right materials and techniques, you can effectively fix minor damages and prevent further deterioration. Discover the essential steps, from assessing the damage to applying protective sealants, and regain peace of mind knowing your RV is protected from the elements with practical DIY repair solutions. Consider EPDM roof repair options for cost-effective and long-lasting protection.
1. Understanding the Importance of Travel Trailer Roof Maintenance
Maintaining your travel trailer roof is crucial for preventing costly repairs and ensuring the longevity of your RV. Neglecting roof maintenance can lead to water damage, mold growth, and structural issues. Regularly inspecting and addressing minor repairs promptly can save you from major headaches down the road. According to the RV Roof Repair Guide, proactive maintenance not only extends the life of your RV but also preserves its resale value.
1.1. Identifying Potential Problems Early
Early detection of roof issues is key to preventing extensive damage. Look for signs such as:
- Cracks or tears: Inspect the roof surface for any visible cracks or tears in the roofing material.
- Leaks: Check for water stains, discoloration, or dampness inside the RV, particularly around the ceiling and walls.
- Soft spots: Walk on the roof to identify any soft or spongy areas, which may indicate underlying damage.
- Damaged sealant: Examine the sealant around vents, skylights, and other roof penetrations for cracks or deterioration.
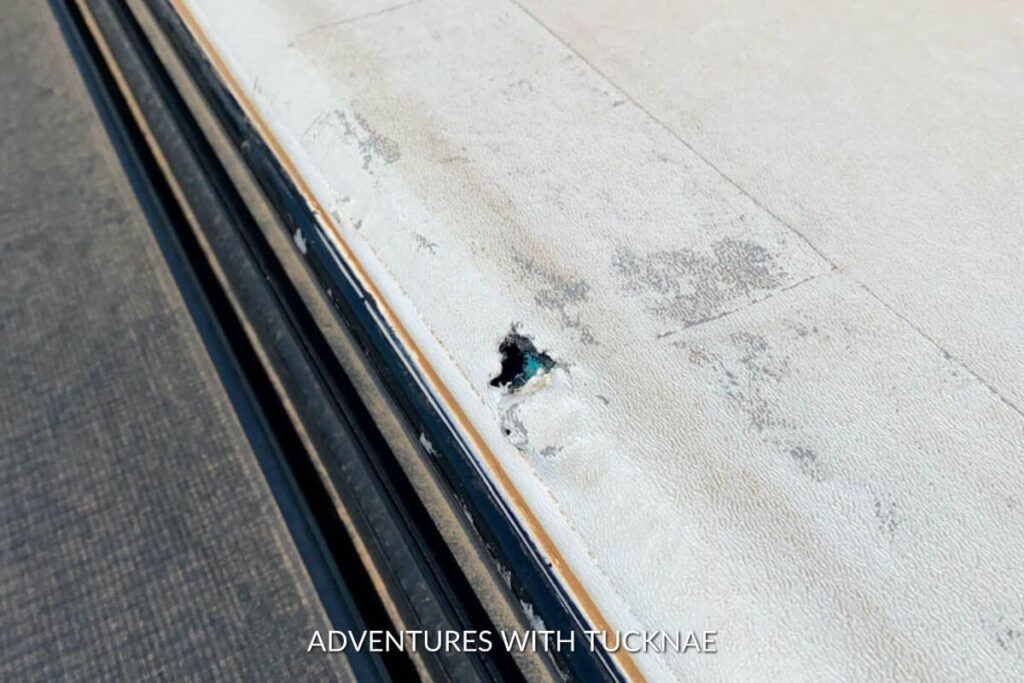 Close-up of a crack in a travel trailer roof
1.2. Factors That Contribute to Roof Damage
Several factors can contribute to damage to your travel trailer roof:
- Weather: Exposure to extreme weather conditions such as sun, rain, snow, and wind can accelerate roof deterioration.
- Tree branches: Low-hanging tree branches can scratch, puncture, or tear the roof membrane.
- Lack of maintenance: Neglecting regular cleaning and inspections can allow minor issues to escalate into major problems.
- UV exposure: Prolonged exposure to ultraviolet (UV) rays can degrade the roofing material, causing it to become brittle and crack.
2. Assessing the Damage to Your Travel Trailer Roof
Before you begin any repairs, it’s important to thoroughly assess the extent of the damage to your travel trailer roof. This will help you determine the appropriate repair methods and materials needed.
2.1. Performing a Visual Inspection
Start by conducting a visual inspection of the entire roof surface. Look for any obvious signs of damage, such as:
- Tears or punctures: Identify any tears or punctures in the roofing membrane, paying close attention to areas around vents, skylights, and other roof penetrations.
- Cracks or blisters: Check for cracks or blisters in the roofing material, which may indicate underlying moisture damage.
- Loose or missing sealant: Examine the sealant around roof fixtures for any signs of cracking, peeling, or missing sealant.
- Rust or corrosion: Inspect metal components such as roof racks and antennas for rust or corrosion.
2.2. Identifying the Type of Roofing Material
Determining the type of roofing material used on your travel trailer is essential for selecting the correct repair products. Common RV roofing materials include:
- EPDM rubber: EPDM (ethylene propylene diene monomer) rubber is a durable and flexible roofing material that is commonly used on RVs. It is resistant to UV damage and weathering.
- TPO: TPO (thermoplastic olefin) is another popular roofing material known for its durability and reflective properties. It is also resistant to UV damage and chemical degradation.
- Fiberglass: Fiberglass roofs are lightweight and strong but can be prone to cracking and delamination over time.
- Aluminum: Aluminum roofs are durable and corrosion-resistant but can be susceptible to dents and punctures.
2.3. Determining the Severity of the Damage
Once you’ve identified the type of roofing material, assess the severity of the damage. Minor damage, such as small cracks or punctures, can often be repaired with simple patching techniques. More extensive damage may require professional repairs or even roof replacement.
3. Essential Tools and Materials for Travel Trailer Roof Repair
Before you start repairing your travel trailer roof, gather the necessary tools and materials. Having everything on hand will make the repair process smoother and more efficient.
3.1. Safety Gear
- Safety glasses: Protect your eyes from debris and chemicals.
- Gloves: Protect your hands from sharp objects and harsh chemicals.
- Non-slip shoes: Prevent slips and falls on the roof.
- Harness: Use a harness to prevent falls and ensure you stay safe during your repair.
3.2. Cleaning Supplies
- Soft-bristled brush: Use a soft-bristled brush to gently remove dirt and debris from the roof surface.
- RV roof cleaner: Choose an RV-specific roof cleaner that is compatible with your roofing material.
- Rubbing alcohol: Use rubbing alcohol to clean the area around the damage and prepare it for patching.
- Rags or paper towels: Use clean rags or paper towels to wipe down the roof surface.
3.3. Repair Materials
- RV roof repair tape: RV roof repair tape, such as Eternabond tape, is a self-adhesive tape that can be used to seal cracks, tears, and punctures in the roofing membrane.
- Lap sealant: Lap sealant is a flexible sealant that is used to seal around vents, skylights, and other roof penetrations.
- EPDM patch: If you have an EPDM rubber roof, you may need an EPDM patch to repair larger tears or punctures.
- Caulk gun: A caulk gun is used to apply lap sealant and other sealants.
3.4. Other Tools
- Scissors: Use scissors to cut repair tape and patches to the desired size.
- Utility knife: A utility knife can be used to trim excess sealant or roofing material.
- Measuring tape: Use a measuring tape to accurately measure the area to be repaired.
- Putty knife: A putty knife can be used to remove old sealant or adhesive.
- Heat gun (optional): A heat gun can be used to soften old sealant or adhesive for easier removal.
 Materials for RV roof repair, including sealant, tape, and cleaning supplies
4. Step-by-Step Guide to Repairing Your Travel Trailer Roof
Once you have gathered the necessary tools and materials, follow these step-by-step instructions to repair your travel trailer roof.
4.1. Cleaning the Roof Surface
Before you begin any repairs, it’s important to thoroughly clean the roof surface.
- Remove loose debris: Use a soft-bristled brush to sweep away any loose dirt, leaves, or other debris from the roof.
- Wash the roof: Apply RV roof cleaner to the roof surface and scrub gently with the soft-bristled brush.
- Rinse thoroughly: Rinse the roof with clean water to remove all traces of the cleaner.
- Dry the roof: Allow the roof to air dry completely before proceeding with repairs.
4.2. Patching Small Tears and Punctures
For small tears and punctures, RV roof repair tape is an effective solution.
- Clean the area: Use rubbing alcohol to clean the area around the tear or puncture.
- Cut the tape: Cut a piece of RV roof repair tape that is slightly larger than the damaged area.
- Apply the tape: Remove the backing from the tape and carefully apply it over the tear or puncture, pressing firmly to ensure good adhesion.
- Smooth the edges: Use your fingers or a roller to smooth the edges of the tape and remove any air bubbles.
4.3. Sealing Around Vents and Skylights
Sealing around vents and skylights is essential for preventing water leaks.
- Remove old sealant: Use a putty knife or heat gun to remove any old or damaged sealant around the vent or skylight.
- Clean the area: Clean the area with rubbing alcohol to remove any residue.
- Apply lap sealant: Use a caulk gun to apply a bead of lap sealant around the perimeter of the vent or skylight, ensuring that all gaps are filled.
- Smooth the sealant: Use your finger or a tool to smooth the sealant and create a watertight seal.
4.4. Repairing Larger Tears with Patches
For larger tears, you may need to use a patch made of the same material as your roofing membrane.
- Cut a patch: Cut a patch that is slightly larger than the tear.
- Clean the area: Clean the area around the tear with rubbing alcohol.
- Apply adhesive: Apply RV roof adhesive to the back of the patch and to the area around the tear.
- Position the patch: Carefully position the patch over the tear and press firmly to ensure good adhesion.
- Seal the edges: Apply lap sealant around the edges of the patch to create a watertight seal.
5. Preventing Future Damage to Your Travel Trailer Roof
After you have repaired your travel trailer roof, take steps to prevent future damage.
5.1. Regular Inspections
Inspect your roof regularly, ideally every few months, to identify and address any potential problems early.
5.2. Cleaning and Maintenance
Clean your roof regularly to remove dirt, debris, and mold. Use an RV-specific roof cleaner and a soft-bristled brush.
5.3. Protecting from the Elements
- Cover your RV: When storing your RV for extended periods, use a cover to protect it from the sun, rain, and snow.
- Park in shaded areas: When possible, park your RV in shaded areas to reduce exposure to UV rays.
- Trim tree branches: Trim any tree branches that could potentially scratch or puncture your roof.
5.4. Applying a Protective Coating
Consider applying a protective coating to your roof to extend its lifespan and protect it from the elements. There are several types of RV roof coatings available, including:
- Acrylic coatings: Acrylic coatings are water-based and provide good UV protection and reflectivity.
- Elastomeric coatings: Elastomeric coatings are flexible and durable, providing excellent waterproofing and UV protection.
- Silicone coatings: Silicone coatings are highly resistant to water and UV damage and can provide long-lasting protection.
6. When to Call a Professional
While many travel trailer roof repairs can be done DIY, there are some situations where it’s best to call a professional.
6.1. Extensive Damage
If your roof has extensive damage, such as large tears, soft spots, or structural issues, it’s best to consult with a professional RV repair technician.
6.2. Water Damage
If you suspect water damage to the underlying structure of your roof, it’s important to have it inspected by a professional to prevent further damage and mold growth.
6.3. Lack of Experience
If you are not comfortable working on your roof or lack the necessary skills and experience, it’s best to leave the repairs to a professional.
6.4. Warranty Concerns
If your RV is still under warranty, check with the manufacturer before attempting any repairs yourself, as this could void your warranty.
7. Choosing the Right RV Roof Repair Products
Selecting the right RV roof repair products is crucial for ensuring a successful and long-lasting repair.
7.1. EPDM Roof Repair Products
For EPDM rubber roofs, choose products that are specifically designed for use with EPDM rubber.
- EPDM patches: Use EPDM patches to repair tears and punctures in the roofing membrane.
- EPDM sealant: Use EPDM sealant to seal around vents, skylights, and other roof penetrations.
- EPDM cleaner: Use EPDM cleaner to clean the roof surface without damaging the rubber.
7.2. TPO Roof Repair Products
For TPO roofs, choose products that are specifically designed for use with TPO roofing material.
- TPO patches: Use TPO patches to repair tears and punctures in the roofing membrane.
- TPO sealant: Use TPO sealant to seal around vents, skylights, and other roof penetrations.
- TPO cleaner: Use TPO cleaner to clean the roof surface without damaging the TPO material.
7.3. Compatibility
Always ensure that the repair products you choose are compatible with your roofing material. Using the wrong products can damage your roof and void your warranty.
7.4. Quality
Choose high-quality repair products from reputable brands to ensure long-lasting performance.
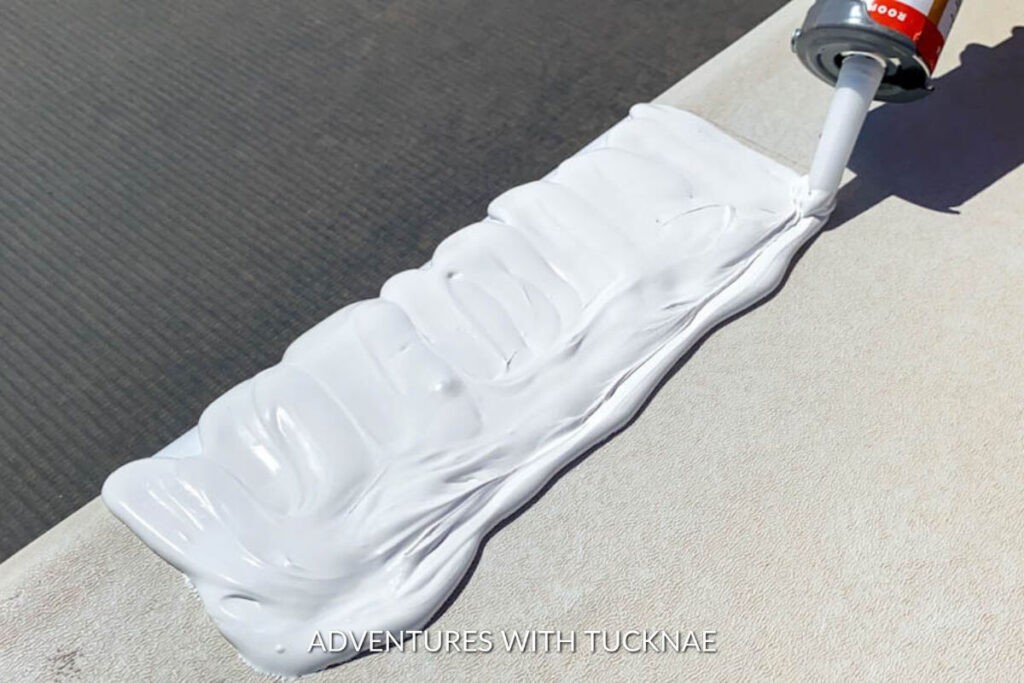 Finished RV roof repair with Dicor lap sealant
8. Cost Considerations for Travel Trailer Roof Repair
The cost of repairing a travel trailer roof can vary depending on the extent of the damage, the type of roofing material, and whether you choose to do the repairs yourself or hire a professional.
8.1. DIY Repairs
DIY repairs can be a cost-effective option for minor damage. The cost of materials such as RV roof repair tape, sealant, and cleaning supplies typically ranges from $50 to $200.
8.2. Professional Repairs
Professional repairs can be more expensive, but they may be necessary for extensive damage or when you lack the necessary skills and experience. The cost of professional repairs can range from $500 to $5,000 or more, depending on the scope of the work.
8.3. Factors Affecting Cost
Several factors can affect the cost of travel trailer roof repair, including:
- Extent of the damage: More extensive damage will require more time and materials, increasing the cost.
- Type of roofing material: Some roofing materials are more expensive to repair than others.
- Labor rates: Labor rates can vary depending on the location and the experience of the repair technician.
- Additional repairs: If the roof damage has caused water damage to other parts of the RV, such as the walls or ceiling, this will add to the cost of the repairs.
9. RV Roof Repair FAQs
9.1. What is the best way of repairing the RV roof leak? Do it yourself or hire some professionals?
If the leak in your RV roof is a small area, the best way to repair it is to follow our step-by-step guide and repair the damaged area yourself to fix the small leak. If there is extensive damage, then the problem area might need to be assessed by professional repair services. TRAVELS.EDU.VN recommends assessing the damage first and then making an informed decision.
9.2. How much does an RV roof repair cost?
A simple RV roof repair, as we did on our repair job, is relatively inexpensive and should cost less than $50 for DIY RV owners. To replace an entire RV roof with significant damage would result in much more costly repairs. Contact TRAVELS.EDU.VN for a personalized quote on professional repair services.
9.3. How often should I inspect my RV roof?
It’s recommended to inspect your RV roof at least twice a year, ideally before and after the camping season. Regular inspections can help you identify and address any potential problems early, preventing them from escalating into major repairs.
9.4. Can I walk on my RV roof?
Whether or not you can walk on your RV roof depends on the construction of the roof. Some RV roofs are designed to be walkable, while others are not. Consult your RV’s owner’s manual to determine whether your roof is walkable. If you are unsure, it’s best to avoid walking on the roof to prevent damage.
9.5. What is the best RV roof sealant?
The best RV roof sealant depends on the type of roofing material you have. For EPDM rubber roofs, use an EPDM-specific sealant. For TPO roofs, use a TPO-specific sealant. Dicor lap sealant is a popular choice for both EPDM and TPO roofs.
9.6. How do I clean my RV roof?
To clean your RV roof, use an RV-specific roof cleaner and a soft-bristled brush. Avoid using harsh chemicals or abrasive cleaners, as these can damage the roofing material. Rinse the roof thoroughly with clean water after cleaning.
9.7. Can I use regular tape to repair my RV roof?
No, you should not use regular tape to repair your RV roof. Regular tape is not designed to withstand the harsh conditions that RV roofs are exposed to, such as sun, rain, and extreme temperatures. Use RV roof repair tape, such as Eternabond tape, which is specifically designed for RV roof repairs.
9.8. How long does RV roof repair tape last?
RV roof repair tape, such as Eternabond tape, can last for many years if properly applied. However, it’s important to inspect the tape regularly and replace it if it shows any signs of damage or deterioration.
9.9. What is the difference between lap sealant and caulk?
Lap sealant is a self-leveling sealant that is designed to create a watertight seal around vents, skylights, and other roof penetrations. Caulk is a general-purpose sealant that is used to fill gaps and cracks. Lap sealant is more flexible and durable than caulk, making it a better choice for RV roof repairs.
9.10. Can I apply a new roof over my existing RV roof?
In some cases, it may be possible to apply a new roof over your existing RV roof. However, this is not always recommended, as it can add weight to the RV and may not be compatible with the existing roof structure. Consult with a professional RV repair technician to determine whether this is a viable option for your RV.
10. TRAVELS.EDU.VN: Your Partner in Travel Trailer Roof Repair and Maintenance
At TRAVELS.EDU.VN, we understand the importance of maintaining your travel trailer roof. That’s why we offer a wide range of resources and services to help you keep your RV in top condition.
10.1. Expert Advice and Guidance
Our team of RV experts can provide you with expert advice and guidance on all aspects of travel trailer roof repair and maintenance. Whether you need help diagnosing a problem, choosing the right repair products, or finding a qualified repair technician, we’re here to help.
10.2. Comprehensive Repair Services
We offer comprehensive RV roof repair services to address all types of damage, from minor leaks to major structural issues. Our experienced technicians use only the highest-quality materials and techniques to ensure that your roof is properly repaired and protected.
10.3. Preventive Maintenance Programs
We offer preventive maintenance programs to help you keep your RV roof in top condition and prevent costly repairs. Our programs include regular inspections, cleaning, and sealing to protect your roof from the elements.
10.4. Contact Us Today
Don’t let a damaged travel trailer roof ruin your next adventure. Contact TRAVELS.EDU.VN today for expert advice, comprehensive repair services, and preventive maintenance programs.
TRAVELS.EDU.VN
- Address: 123 Main St, Napa, CA 94559, United States
- WhatsApp: +1 (707) 257-5400
- Website: TRAVELS.EDU.VN
Let travels.edu.vn take the worry out of RV roof repair so you can focus on enjoying the open road and exploring the beautiful landscapes that Napa Valley and beyond have to offer. Get in touch with us now to discuss your needs and let us craft a customized solution tailored to your specific requirements and budget.