Dreaming of your next getaway? The excitement of travel planning is undeniable, but it can quickly turn overwhelming. Instead of relying on generic travel guides or simply copying someone else’s itinerary, leverage the power of Google Maps trip planner to craft your perfect personalized adventure. Whether you prefer the Google Maps app or the web interface, you have the tools to:
- Pinpoint your dream destinations
- Organize locations with color-coded markers
- Effortlessly get travel directions to multiple destinations
- Plan every detail of your ideal trip
This comprehensive guide will provide you with step-by-step instructions on using Google My Maps to create a detailed itinerary, focusing on a 3-day exploration of Florence as an example. But first, let’s delve into why Google Maps stands out as an exceptional tool for planning your journeys and getting accurate travel directions.
💡Want to optimize your route for efficiency? Discover How To Route With Multiple Stops On Google Maps.
Why Google Maps Excels as Your Travel Directions and Trip Planner
Studies show that a staggering 97% of people experience greater happiness when they have a trip meticulously planned. The anticipation and excitement build when you have something to look forward to. However, without a solid itinerary and clear travel directions, this anticipation can easily morph into stress and anxiety.
Here are four compelling reasons why Google Maps should be your go-to tool for planning road trips, vacations, and ensuring you always have accurate travel directions:
1. Seamless Integration within the Google Ecosystem
Your Google account acts as a central hub, connecting you to a suite of powerful tools that work harmoniously to simplify your travel experience. This integration extends to various aspects of trip planning, including travel directions:
- Custom Map Creation & Google Drive Backup: Design a personalized map with all your destinations and travel directions, and effortlessly save a copy to Google Drive for safekeeping and easy access across devices.
- Google Calendar Integration for Daily Agendas: Structure each day’s itinerary in Google Calendar, embedding precise locations and direct map links for quick access to travel directions and location details.
- Budgeting with Google Sheets: Utilize Google Sheets to manage your vacation expenses, keeping track of costs associated with different legs of your journey and ensuring your budget aligns with your planned travel directions.
- Google Photos for Organized Memories: Leverage location tagging in Google Photos, making it simple to organize and revisit your travel photos based on the places you visited and the travel directions you took to get there.
Google’s deep product integration streamlines recreational trip planning, providing a cohesive platform to learn about your destinations and manage your travel directions efficiently.
2. Rich Location Data and User Reviews for Informed Decisions
The Google Maps app on your smartphone and the desktop version work in tandem to provide a wealth of information. Planning your trip on either platform allows you to seamlessly access crucial details to enhance your experience and ensure smooth travel directions:
- Authentic Reviews from Fellow Travelers: Read reviews from other visitors, gaining insights into the best times to visit, hidden gems, and practical tips related to specific locations and travel directions.
- Comprehensive Location Information: Access detailed information about points of interest, including website URLs, opening hours, contact details, and other essential information to plan your visits and travel directions effectively.
- Discover Nearby Attractions and Activities: Explore “things to do nearby” feature to uncover additional points of interest along your planned routes and near your destinations, enriching your itinerary and travel directions.
User reviews often contain invaluable travel tips. For instance, while planning a Florence trip and researching the Uffizi Gallery, reviews highlighted the long queues for same-day tickets, emphasizing the advantage of booking in advance. Such insights, easily accessible through Google Maps, are crucial for optimizing your travel directions and overall trip experience.
3. Effortless Access to Your Trip Itinerary and Travel Directions
While some travelers rely on spreadsheets or documents to manage itineraries, the combination of Google Calendar and Google Maps trip planner offers a superior visual and interactive approach. This integration is particularly beneficial for managing travel directions:
- Visual Itinerary on Google Maps: Visualize your daily plans directly on the map, instantly seeing the geographical context of your itinerary and the relationships between different locations and travel directions.
- Seamless Route Creation and Travel Time Estimation: Google Maps simplifies route creation, making it easy to check travel times between locations whether you plan to walk, drive, use public transport, or take a taxi. This ensures accurate planning of travel directions and efficient time management.
4. Personalized Notes and Labels for Enhanced Organization
Fear of forgetting important details is a common travel planning concern. Google Maps trip planner addresses this by allowing you to add personalized notes and labels directly to your saved locations. This feature is incredibly useful for managing details related to travel directions and bookings:
- Location-Specific Notes: Add reminders directly to specific locations on your map. For example, note down pre-booked tickets, reservation details, or specific entrance points, all linked to the relevant location for easy access when planning your travel directions.
- Google Calendar Reminders: Link locations to Google Calendar events, setting up reminders for bookings, reservations, or even just to prompt you to check travel directions on the day of your visit.
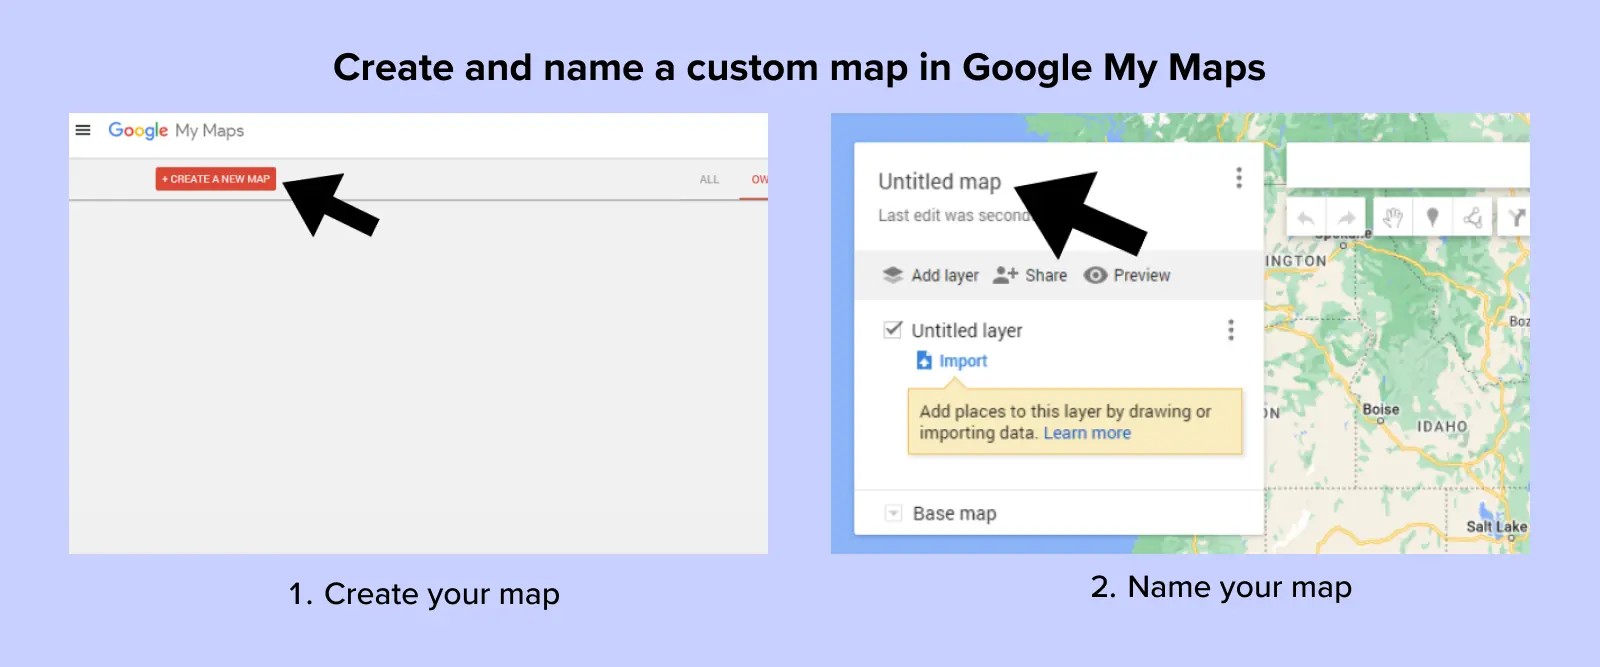 Screenshots of “create a map” button and the map naming screen.
Step-by-Step Guide: Using Google Maps for Trip Planning and Travel Directions
Now for the exciting part – bringing your dream trip to life! Here’s a detailed guide on how to use Google Maps for trip planning and managing travel directions:
1. Create Your Custom Map
To begin, navigate to https://www.google.com/mymaps. On your My Maps dashboard, click the prominent “+ Create a New Map” button.
A new map interface will load, offering a wide range of customization options. Start by naming your map. Click on “Untitled map” in the top left corner. A dialog box will appear where you can input your map’s name and add a descriptive overview.
For this example, we’ll plan a 3-day adventure in Florence, Italy. Let’s name our map “3 Days in Florence.” Once named, you’re ready to populate it with locations and plan your travel directions.
2. Add and Customize Your Locations
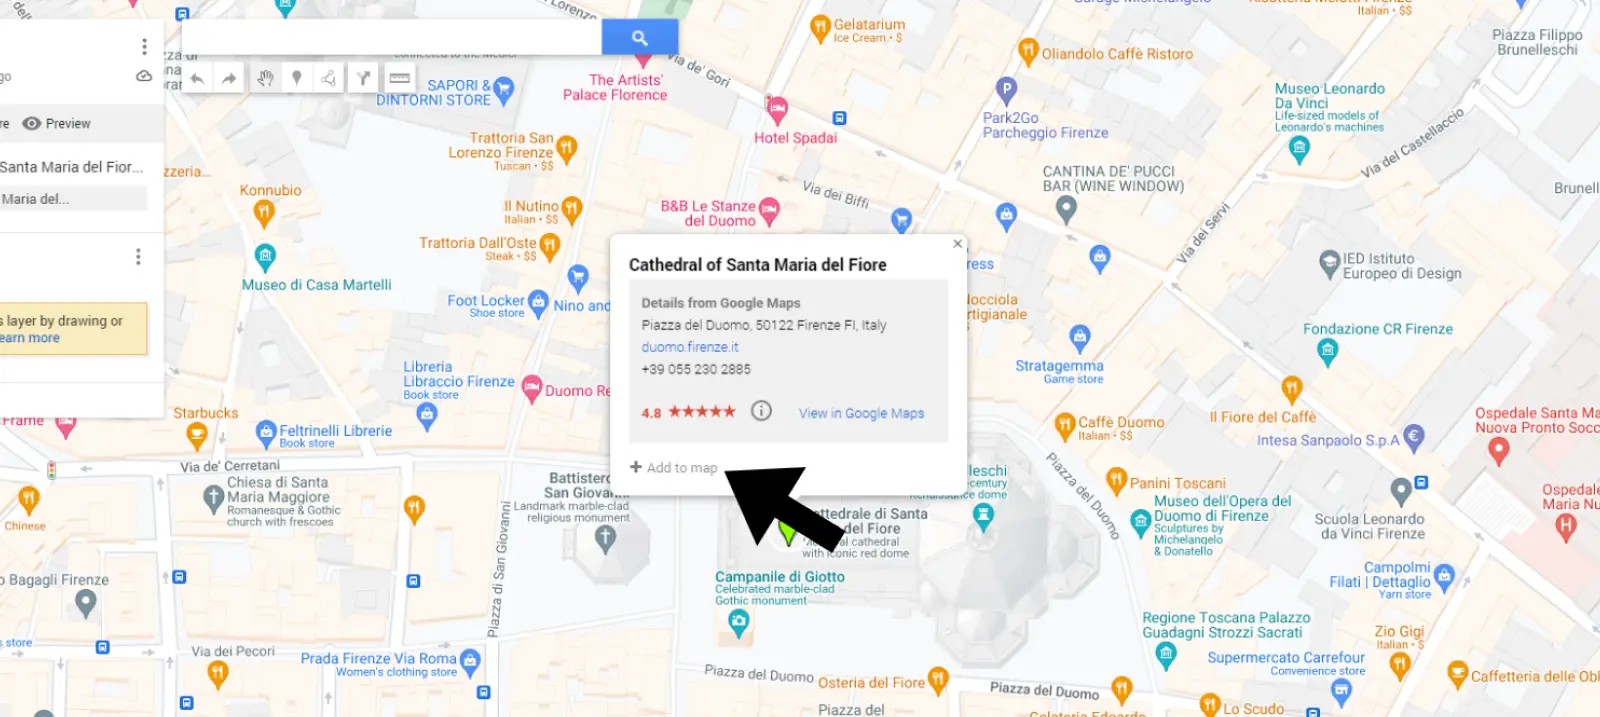 Screenshot of how to add a pin to google maps.
This is where your itinerary starts to take shape. Ideally, you should already have a list of places you want to visit. If not, take some time to research your destination city and compile a list of must-see spots. Having a list beforehand will significantly streamline the planning process, especially when considering travel directions between locations.
In Google Maps, locations are marked as “pins.” To add a pin, use the search bar to find your desired point of interest.
Let’s begin with Florence’s iconic landmark: The Cathedral of Santa Maria del Fiore, famously known as the Duomo.
As you search, Maps will zoom into the location. Click the “Add to map” button that appears. The point of interest will be instantly added as a pin to your map layer, ready for you to plan your travel directions around it.
![]() Screenshots of how to change pin colors and icons in google maps.
Screenshots of how to change pin colors and icons in google maps.
For better organization, customize the color and icon of each pin. Hover over a location pin, and a paint can icon will appear. Click it to access customization options. Google Maps provides a diverse range of icons, including categories for monuments, museums, gardens, and more.
These icons offer a quick visual representation of each destination type, making itinerary planning and travel directions management more intuitive.
3. Organize Your Trip with Layers (Categories)
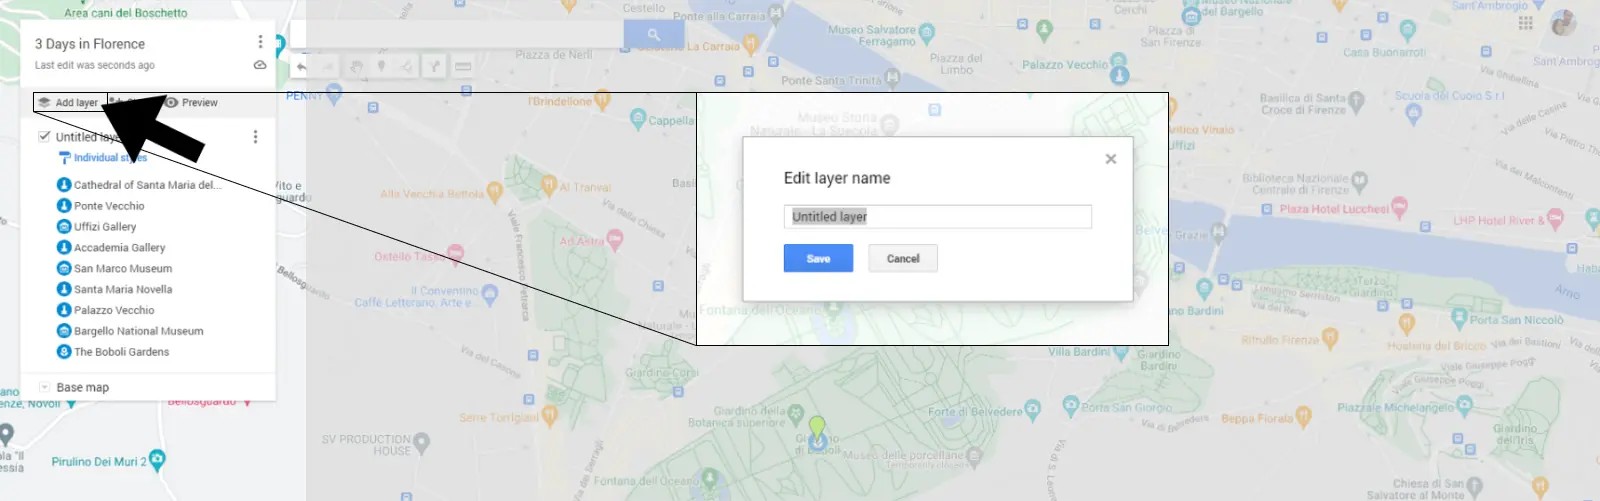 Screenshot of how to add a layer to google maps
Trip planning can become complex if not well-organized. Using layers (or categories) helps maintain clarity and structure, especially when managing multiple destinations and travel directions.
For our 3-day Florence trip, categorizing by day makes perfect sense, allowing you to assign specific points of interest to each day. In this case, each day will be a distinct layer.
To add layers, click on “+ Add layer” in the left-hand panel. Each new layer represents a category.
After clicking “Add layer,” you can rename it. Delete “Untitled layer” and enter your desired name. For our example, we’ll create three layers named “Day 1,” “Day 2,” and “Day 3.”
Once layers are set up, start organizing your points of interest into their respective daily layers. When planning your own trips, create categories relevant to your travel style. Road trips might be categorized by cities, while theme-based trips could use categories like “Food,” “Historical Sites,” or “Outdoor Activities.” The flexibility of Google Maps allows for personalized organization tailored to your needs and travel directions.
Layer Limits in Google Maps
While layers are fantastic for organization, be mindful of the limit. Google Maps allows a maximum of 10 layers per map. For extensive or complex trips, plan your layer structure carefully.
Location Pin Limits Per Layer
Each map in My Maps can accommodate up to 2,000 separate pins per map, providing ample capacity for even the most ambitious itineraries and detailed travel directions planning.
4. Craft Your Detailed Itinerary and Travel Directions Plan
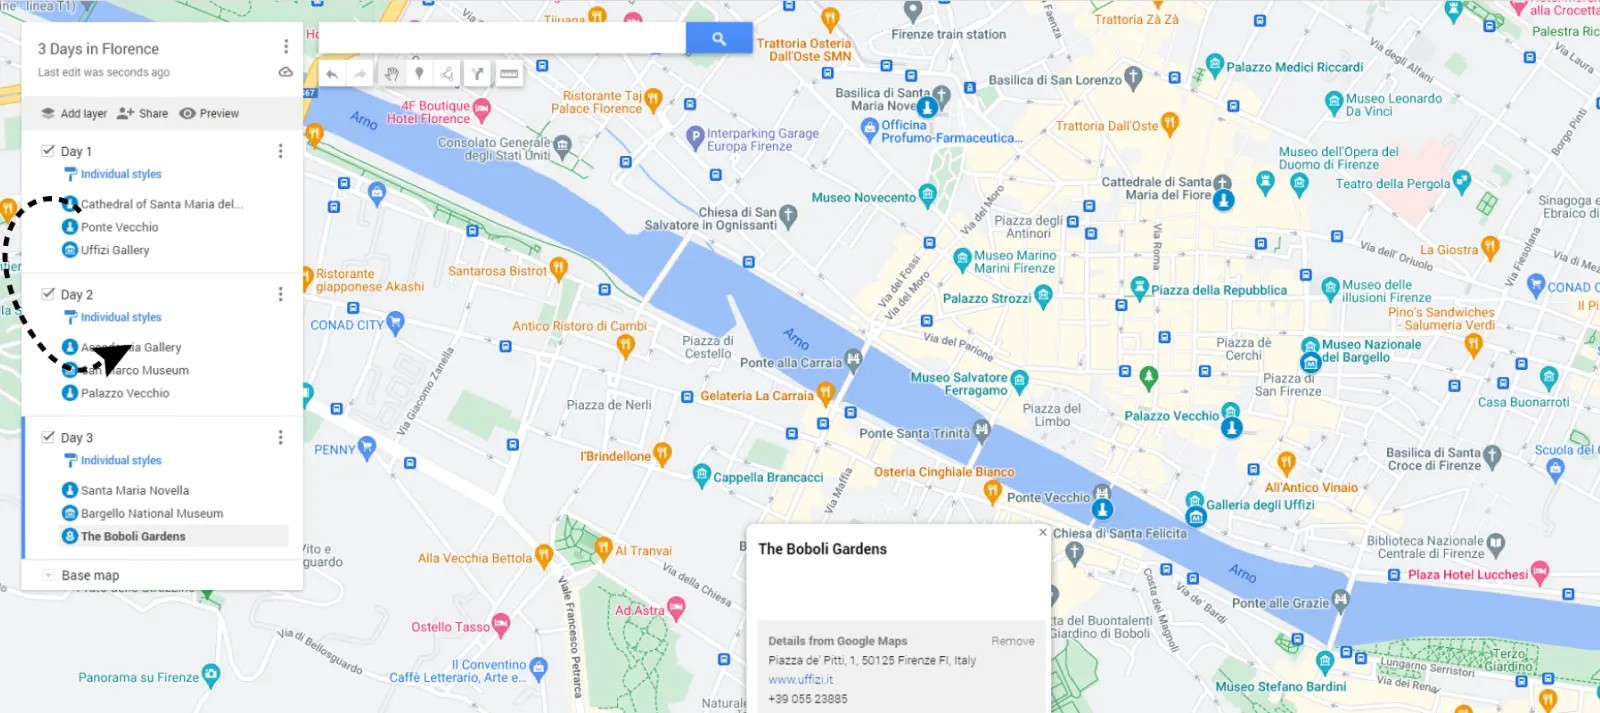 Screenshot of moving layers on maps
With your categories defined, it’s time to build your daily itinerary. Easily move points of interest between layers by simply clicking and dragging pins to their designated layer.
In our Florence example, with “Day 1,” “Day 2,” and “Day 3” layers, drag each point of interest into the appropriate day’s layer to structure your itinerary.
Even if you’re not categorizing by days, the layer system remains versatile. Whether organizing by city, activity type (museums, restaurants), or any other theme, Google My Maps offers a visual overview of your trip. At a glance, you can see the proximity of points of interest, making itinerary creation and efficient travel directions planning much easier, whether you plan on paper or digitally.
5. Secure Your Bookings
With your itinerary laid out, it’s time for bookings:
- Hotel Reservations: Book accommodations strategically located in relation to your planned daily activities and travel directions.
- Car Rentals: Arrange transportation, considering pick-up and drop-off locations relative to your itinerary and planned driving routes.
- Event and Museum Tickets: Reserve tickets for events, museums, or attractions in advance, especially for popular spots, to avoid queues and secure your entry.
Booking in advance is highly recommended, especially during peak seasons, to ensure availability and potentially secure better rates.
6. Share Your Travel Map and Directions
Traveling with companions? Share your meticulously crafted map and itinerary:
- Access the Google My Maps Dashboard: Return to your main Google My Maps dashboard.
- Click the Share Button: Locate and click the share icon (arrow icon) on your newly created map.
Share via Facebook, email, or Twitter. You can also embed your map on a personal website or blog to share your travel directions and plans with a wider audience.
7. Access Your Map and Travel Directions on Your Phone
Your map is created and shared, but for on-the-go access, ensure you have the Google Maps app installed on your phone.
Access your maps on mobile:
- Open Google Maps App: Launch the Google Maps application.
- Tap “Saved”: Tap the “Saved” icon at the bottom of the screen.
- Tap “Maps”: Scroll to the bottom and tap “Maps.”
- Select Your Trip Map: Choose your “3 Days in Florence” map (or your trip map name) from the list.
Mobile Map Creation and Editing Capabilities
While technically possible to create or edit maps on your phone, it’s browser-based, not within the Google Maps app itself. For full functionality, desktop or tablet browser access is recommended for map creation and detailed editing. However, accessing and using your saved maps and travel directions is seamless within the Google Maps app.
Road Trip Planning vs. City Trip Planning: Tailoring Google Maps for Travel Directions
Google Maps is adaptable for both road trips and city explorations, though planning approaches differ slightly, particularly concerning travel directions.
Road trips are inherently more complex, involving multiple destinations and longer travel directions between stops. City trips, especially to a single city, are generally simpler, with concentrated points of interest and often shorter travel directions.
Road Trip Planning Tips for Travel Directions
- Layer per Stop: Create a layer for each major stop on your road trip itinerary.
- Pins at Each Stop: Populate each stop’s layer with points of interest, ensuring you don’t miss attractions along your route or at each destination.
- Include Hotels Strategically: Pin hotels along your route, offering flexibility for impromptu stops and overnight stays, and ensuring easy access to travel directions to your accommodation.
City Trip Planning Tips for Travel Directions
- Daily Layers for Multi-Day Trips: For multi-day city visits, use daily layers (like our Florence example) to organize attractions and plan daily travel directions efficiently.
- Activity-Based Layers for Single-Day Trips: For single-day city explorations, categorize by activity type (e.g., “Morning Activities,” “Lunch Spots,” “Afternoon Museums”) to structure your day and manage travel directions between different types of experiences.
Using Your Google Maps Itinerary and Travel Directions On-the-Go
Your map is ready, shared, and accessible on your phone. Now, how to use it effectively while traveling?
Utilizing your Google Map itinerary and travel directions in real-time:
- Open Google Maps and Your Map: Launch Google Maps and open your saved trip map.
- “View Map Legend” for Pinned Locations: Tap “View map legend” to see a list of all your pinned locations within each layer. This provides a quick overview of your itinerary. Note that direct interaction with pins isn’t available in this view, it’s primarily for itinerary review.
- “Directions” for Navigation: To get travel directions to a specific location, navigate back to the main map view. Tap on a point of interest, then tap the “Directions” button at the bottom.
- Route Planning Screen: The route planning screen will appear. Input your starting point (or let Google Maps use your current location) and your destination (pre-filled from the point of interest you selected). Google Maps will calculate the best route and provide turn-by-turn travel directions.
- Transportation Mode Options: Choose your preferred mode of transport – driving (default), walking, biking, or public transport – at the top of the directions screen. Google Maps will dynamically adjust travel directions based on your selection.
With your personalized Google Map and integrated travel directions, all that remains is to savor your journey!
Start Planning Your Adventures with Google Maps Travel Directions
Eager to test out Google Maps trip planner?
We’ve created a starter map showcasing some of Vancouver’s highlights – our home city – accessible here. Feel free to copy it and experiment with the steps outlined above. Modify icon colors, add your own must-see places, and explore the features.
Here are more fun maps to inspire you:
Once you’re comfortable with Google Maps, begin crafting your own trip maps. Pin your must-visit locations, create maps of your bucket-list cafes, museums, shops, and restaurants. Discover how effortlessly you can plan your next adventure and manage all your travel directions using Google Maps.