Can You Paint Travel Trailer Walls? Absolutely! Painting the walls of your travel trailer is a fantastic way to modernize and personalize your mobile home. TRAVELS.EDU.VN is here to guide you through the process, ensuring a stunning transformation. With proper preparation and the right materials, you can achieve a fresh, new interior. Discover the secrets to successful RV wall painting, from preparation to the perfect finish, and explore the benefits of professional travel planning services for your next adventure.
1. Why Paint Your Travel Trailer Walls?
Painting the walls of your travel trailer can dramatically improve its appearance and feel. According to a study by the RV Industry Association, RV owners often seek ways to personalize and upgrade their spaces. A fresh coat of paint can make a small space feel larger and brighter, transforming a dated interior into a modern, inviting haven.
1.1. Aesthetic Upgrade
A new color scheme can modernize an older RV, making it feel more like a home and less like a relic of the past.
1.2. Increased Value
A well-maintained and aesthetically pleasing interior can increase the resale value of your travel trailer.
1.3. Personalization
Painting allows you to express your personal style and create a space that reflects your taste and preferences.
1.4. Covers Imperfections
Paint can cover up stains, scratches, and other imperfections, giving your walls a fresh, clean look.
2. Key Considerations Before Painting RV Walls
Before diving into the project, it’s crucial to understand the specific challenges and requirements of painting RV walls. Unlike traditional drywall, RV walls are often made of materials like vinyl-covered paneling or lauan plywood.
2.1. Understanding RV Wall Materials
Most RV walls are not made of standard drywall. They are typically constructed from thin wood paneling covered with vinyl or wallpaper. This material requires special preparation to ensure the paint adheres properly.
2.2. Ventilation
Ensure adequate ventilation during the painting process. RVs are small spaces, and paint fumes can quickly become overwhelming. Open windows and use fans to circulate air.
2.3. Temperature and Humidity
Ideal painting conditions involve moderate temperatures and low humidity. Avoid painting on extremely hot or humid days, as this can affect the paint’s drying time and finish.
2.4. Time Commitment
Painting RV walls is more time-consuming than painting a room in a house. Allow ample time for preparation, painting, and drying to achieve the best results.
3. Essential Tools and Materials
Having the right tools and materials is essential for a successful RV wall painting project. Here’s a comprehensive list to get you started:
| Tool/Material | Description | Quantity Suggestion |
|---|---|---|
| TSP or Krud Kutter | Cleaner for removing grease and grime from walls | 1 quart |
| Sandpaper | For lightly sanding surfaces to improve paint adhesion | Assorted grits |
| Wood Filler or Caulk | For repairing holes and filling gaps | 1 tube |
| Painter’s Tape | For masking off areas you don’t want to paint | Several rolls |
| Primer | Bonding primer to help paint adhere to RV walls | 1 gallon |
| Paint | High-quality acrylic latex paint | 1-2 gallons |
| Paint Rollers | With thick nap for textured surfaces | 2-3 |
| Paint Brushes | For edging and detailed areas | Assorted sizes |
| Drop Cloths | To protect flooring and furniture from paint splatters | Several |
| Putty Knife | For applying wood filler and caulk | 1 |
| Razor Blade or Utility Knife | For removing old caulk and imperfections | 1 |
| Screwdriver Set | For removing hardware like outlet covers and light fixtures | 1 set |
| Cleaning Rags | For wiping down surfaces | Plenty |
| Caulk Gun | For applying caulk smoothly and evenly | 1 |
4. Step-by-Step Guide to Painting Travel Trailer Walls
Follow these detailed steps to ensure a professional-looking paint job on your RV walls.
4.1. Preparation: The Key to Success
Proper preparation is crucial for achieving a long-lasting and beautiful finish.
4.1.1. Remove Hardware and Fixtures
Remove all hardware, including outlet covers, light fixtures, window treatments, and any other items attached to the walls. This will prevent paint from getting on these items and ensure a clean, professional finish.
4.1.2. Clean the Walls
Thoroughly clean the walls to remove dirt, grease, and grime. Use a TSP (trisodium phosphate) cleaner or a product like Krud Kutter. Apply the cleaner with a sponge or cloth, and then wipe the walls clean with a damp cloth.
4.1.3. Repair Holes and Imperfections
Inspect the walls for holes, dents, and other imperfections. Use wood filler or caulk to fill these areas. Allow the filler to dry completely, and then sand it smooth with fine-grit sandpaper.
4.1.4. Remove Old Caulk
Carefully remove any old, cracked, or non-paintable caulk. Use a razor blade or utility knife to score along the edges of the caulk, and then peel it away.
4.1.5. Apply New Caulk
Apply a thin, even bead of paintable acrylic caulk to seams and edges. Smooth the caulk with your finger or a caulk smoothing tool. This will create a seamless transition between the walls and trim.
4.1.6. Masking
Use painter’s tape to mask off areas you don’t want to paint, such as trim, windows, and ceilings. Ensure the tape is firmly pressed down to prevent paint from bleeding underneath.
4.2. Priming for Optimal Adhesion
Priming is an essential step, especially when painting RV walls made of vinyl or laminate.
4.2.1. Choose the Right Primer
Use a high-quality bonding primer specifically designed for slick surfaces. These primers create a strong bond between the wall and the paint, preventing peeling and chipping.
4.2.2. Apply the Primer
Apply a thin, even coat of primer to the walls using a paint roller or brush. Allow the primer to dry completely according to the manufacturer’s instructions.
4.2.3. Sand Lightly (Optional)
If the primer creates a rough surface, lightly sand it with fine-grit sandpaper to create a smooth base for the paint.
4.3. Painting: Bringing Your Vision to Life
With the preparation complete, it’s time to apply the paint and transform your RV interior.
4.3.1. Choose the Right Paint
Use a high-quality acrylic latex paint. Acrylic latex paint is durable, easy to clean, and provides excellent coverage. Choose a paint with a built-in primer for added convenience.
4.3.2. Apply the First Coat
Apply the first coat of paint using a paint roller or brush. Work in small sections, and use smooth, even strokes. Allow the first coat to dry completely before applying the second coat.
4.3.3. Apply the Second Coat
Apply a second coat of paint to ensure full coverage and a uniform finish. Again, work in small sections and use smooth, even strokes. Allow the second coat to dry completely.
4.3.4. Touch-Ups
Inspect the walls for any missed spots or imperfections. Use a small brush to touch up these areas.
4.4. Post-Painting Tasks
Once the paint is dry, complete these final steps to finish the project.
4.4.1. Remove Painter’s Tape
Carefully remove the painter’s tape. Pull the tape away at a 45-degree angle to prevent the paint from chipping.
4.4.2. Reinstall Hardware and Fixtures
Reinstall all hardware, including outlet covers, light fixtures, and window treatments.
4.4.3. Clean Up
Clean up any paint splatters or spills. Dispose of used paint cans and materials properly.
5. Choosing the Right Paint and Colors
Selecting the right paint and colors can significantly impact the look and feel of your RV interior.
5.1. Types of Paint
5.1.1. Acrylic Latex Paint
Acrylic latex paint is the most popular choice for RV walls due to its durability, ease of cleaning, and low VOC (volatile organic compounds) content.
5.1.2. Epoxy Paint
Epoxy paint is extremely durable and resistant to scratches and stains, making it a good choice for high-traffic areas like kitchens and bathrooms.
5.1.3. Chalk Paint
Chalk paint provides a matte finish and can be easily distressed for a vintage look. However, it requires a sealant to protect it from damage.
5.2. Color Considerations
5.2.1. Light Colors
Light colors, such as white, cream, and light gray, can make a small space feel larger and brighter. They also reflect light, which can help to conserve energy.
5.2.2. Dark Colors
Dark colors, such as navy, black, and deep gray, can add drama and sophistication to an RV interior. However, they can also make a space feel smaller and darker.
5.2.3. Accent Colors
Use accent colors to add pops of color and personality to your RV interior. Consider using bright colors for pillows, curtains, and other accessories.
5.3. Paint Finishes
5.3.1. Matte Finish
Matte finish paint has a low sheen and is good at hiding imperfections. It is a good choice for walls that have dents or other flaws.
5.3.2. Eggshell Finish
Eggshell finish paint has a slightly higher sheen than matte finish paint and is more durable and easier to clean.
5.3.3. Semi-Gloss Finish
Semi-gloss finish paint is durable and easy to clean, making it a good choice for trim and doors.
5.3.4. Gloss Finish
Gloss finish paint has a high sheen and is very durable and easy to clean. It is a good choice for cabinets and other surfaces that get a lot of wear and tear.
6. Common Mistakes to Avoid
Avoid these common mistakes to ensure a professional-looking paint job on your RV walls.
6.1. Skipping Preparation
Skipping the preparation steps, such as cleaning and priming, can result in poor paint adhesion and a finish that peels or chips easily.
6.2. Using the Wrong Paint
Using the wrong type of paint can also lead to poor results. Be sure to use a high-quality acrylic latex paint or other paint specifically designed for RV walls.
6.3. Not Allowing Enough Drying Time
Not allowing enough drying time between coats of paint can result in a sticky, uneven finish. Be sure to follow the manufacturer’s instructions for drying times.
6.4. Applying Too Much Paint
Applying too much paint can cause drips and runs. Apply thin, even coats of paint, and allow each coat to dry completely before applying the next.
7. Maintenance and Touch-Ups
Proper maintenance can help to keep your painted RV walls looking their best for years to come.
7.1. Cleaning
Clean your painted RV walls regularly with a mild soap and water solution. Avoid using harsh chemicals or abrasive cleaners, as these can damage the paint.
7.2. Touch-Ups
Keep a small container of paint on hand for touch-ups. Use a small brush to touch up any chips or scratches.
7.3. Preventing Damage
Take steps to prevent damage to your painted RV walls. Avoid leaning furniture against the walls, and use padding to protect the walls from scratches.
8. Professional RV Renovation Services
If you’re not comfortable painting your RV walls yourself, consider hiring a professional RV renovation service. Professional renovators have the experience and expertise to ensure a high-quality paint job.
8.1. Benefits of Hiring a Professional
8.1.1. Expertise
Professional renovators have the expertise to properly prepare and paint RV walls.
8.1.2. Time Savings
Hiring a professional can save you time and effort.
8.1.3. Quality Results
Professional renovators can ensure a high-quality, long-lasting paint job.
8.2. Finding a Reputable Service
8.2.1. Check References
Check references and read online reviews before hiring a professional RV renovation service.
8.2.2. Get Multiple Quotes
Get multiple quotes to ensure you’re getting a fair price.
8.2.3. Ask Questions
Ask questions about the renovator’s experience, qualifications, and process.
9. Enhance Your Travel Experience with TRAVELS.EDU.VN
While you’re updating your RV, consider enhancing your overall travel experience with TRAVELS.EDU.VN. We offer a range of services to make your trips more enjoyable and stress-free.
9.1. Personalized Travel Planning
Let TRAVELS.EDU.VN handle the details of your next RV adventure. Our expert travel planners can create a customized itinerary based on your interests and preferences.
9.2. Accommodation Booking
We can book your accommodations, including RV parks, campgrounds, and hotels. We’ll find the best options to fit your budget and needs.
9.3. Activity and Tour Recommendations
Discover the best activities and tours in your destination. We can recommend and book everything from hiking and biking to wine tasting and sightseeing.
9.4. Travel Insurance
Protect your investment with comprehensive travel insurance. We offer a range of plans to cover trip cancellations, medical emergencies, and more.
9.5. 24/7 Support
Our dedicated support team is available 24/7 to assist you with any issues or questions that may arise during your trip.
10. Napa Valley: Your Next RV Destination
Consider Napa Valley as your next RV destination. This world-renowned wine region offers stunning scenery, delicious food, and a variety of activities.
10.1. RV Parks and Campgrounds
Napa Valley offers several RV parks and campgrounds, including:
- Skyline Wilderness Park: Offers full hookups and scenic views.
- Bothe-Napa Valley State Park: Features campsites nestled among redwood trees.
- Napa Valley Expo RV Park: Located close to downtown Napa, offering convenient access to attractions.
10.2. Wineries and Vineyards
Visit some of Napa Valley’s famous wineries and vineyards, such as:
- Domaine Carneros: Known for its sparkling wines and beautiful chateau.
- Robert Mondavi Winery: Offers tours and tastings of its iconic wines.
- Castello di Amorosa: A stunning castle winery with a medieval Italian theme.
10.3. Culinary Experiences
Indulge in Napa Valley’s culinary scene, with options ranging from farm-to-table restaurants to casual cafes.
10.4. Outdoor Activities
Explore Napa Valley’s natural beauty with hiking, biking, and hot air balloon rides.
FAQ: Painting Travel Trailer Walls
1. What kind of paint do you use on RV walls?
Acrylic latex paint is ideal for RV walls due to its durability and ease of cleaning. According to consumer reports, acrylic latex paint bonds well with most RV interior surfaces, ensuring a lasting finish.
2. Do I need to prime RV walls before painting?
Yes, priming is essential, especially if your RV walls have a slick or glossy surface. A bonding primer helps the paint adhere properly.
3. How do I clean RV walls before painting?
Use TSP (trisodium phosphate) cleaner or Krud Kutter to remove dirt, grease, and grime.
4. Can I paint over wallpaper in my RV?
It’s generally best to remove wallpaper before painting. However, if it’s securely attached, you can prime over it with a stain-blocking primer.
5. How long does it take to paint RV walls?
Painting RV walls can take several days, including preparation, priming, painting, and drying time.
6. What tools do I need to paint RV walls?
You’ll need sandpaper, wood filler, painter’s tape, primer, paint, paint rollers, paint brushes, drop cloths, a putty knife, a razor blade, and cleaning rags.
7. How do I fix holes in RV walls before painting?
Use wood filler or caulk to fill holes and imperfections. Allow it to dry completely, and then sand it smooth.
8. Can I paint RV cabinets?
Yes, you can paint RV cabinets. Sand, clean, prime, and then paint them with a high-quality cabinet paint.
9. How do I prevent paint from peeling on RV walls?
Proper preparation, including cleaning, sanding, and priming, is essential to prevent paint from peeling.
10. What colors are best for RV interiors?
Light colors, such as white, cream, and light gray, can make a small space feel larger and brighter.
Updating your travel trailer with a fresh coat of paint can transform your RV into a stylish and comfortable home on wheels. Remember, proper preparation and the right materials are crucial for a successful project. And when you’re ready to hit the road, let TRAVELS.EDU.VN help you plan the perfect RV adventure, whether it’s a wine-tasting tour in Napa Valley or a cross-country road trip. Contact us today at 123 Main St, Napa, CA 94559, United States, or reach us via WhatsApp at +1 (707) 257-5400. Visit our website at travels.edu.vn to start planning your dream vacation now and let us take care of all the details for a truly unforgettable experience.
 RV Interior Transformation
 Repairing Holes in RV Wall
 Caulking Door Jamb in RV
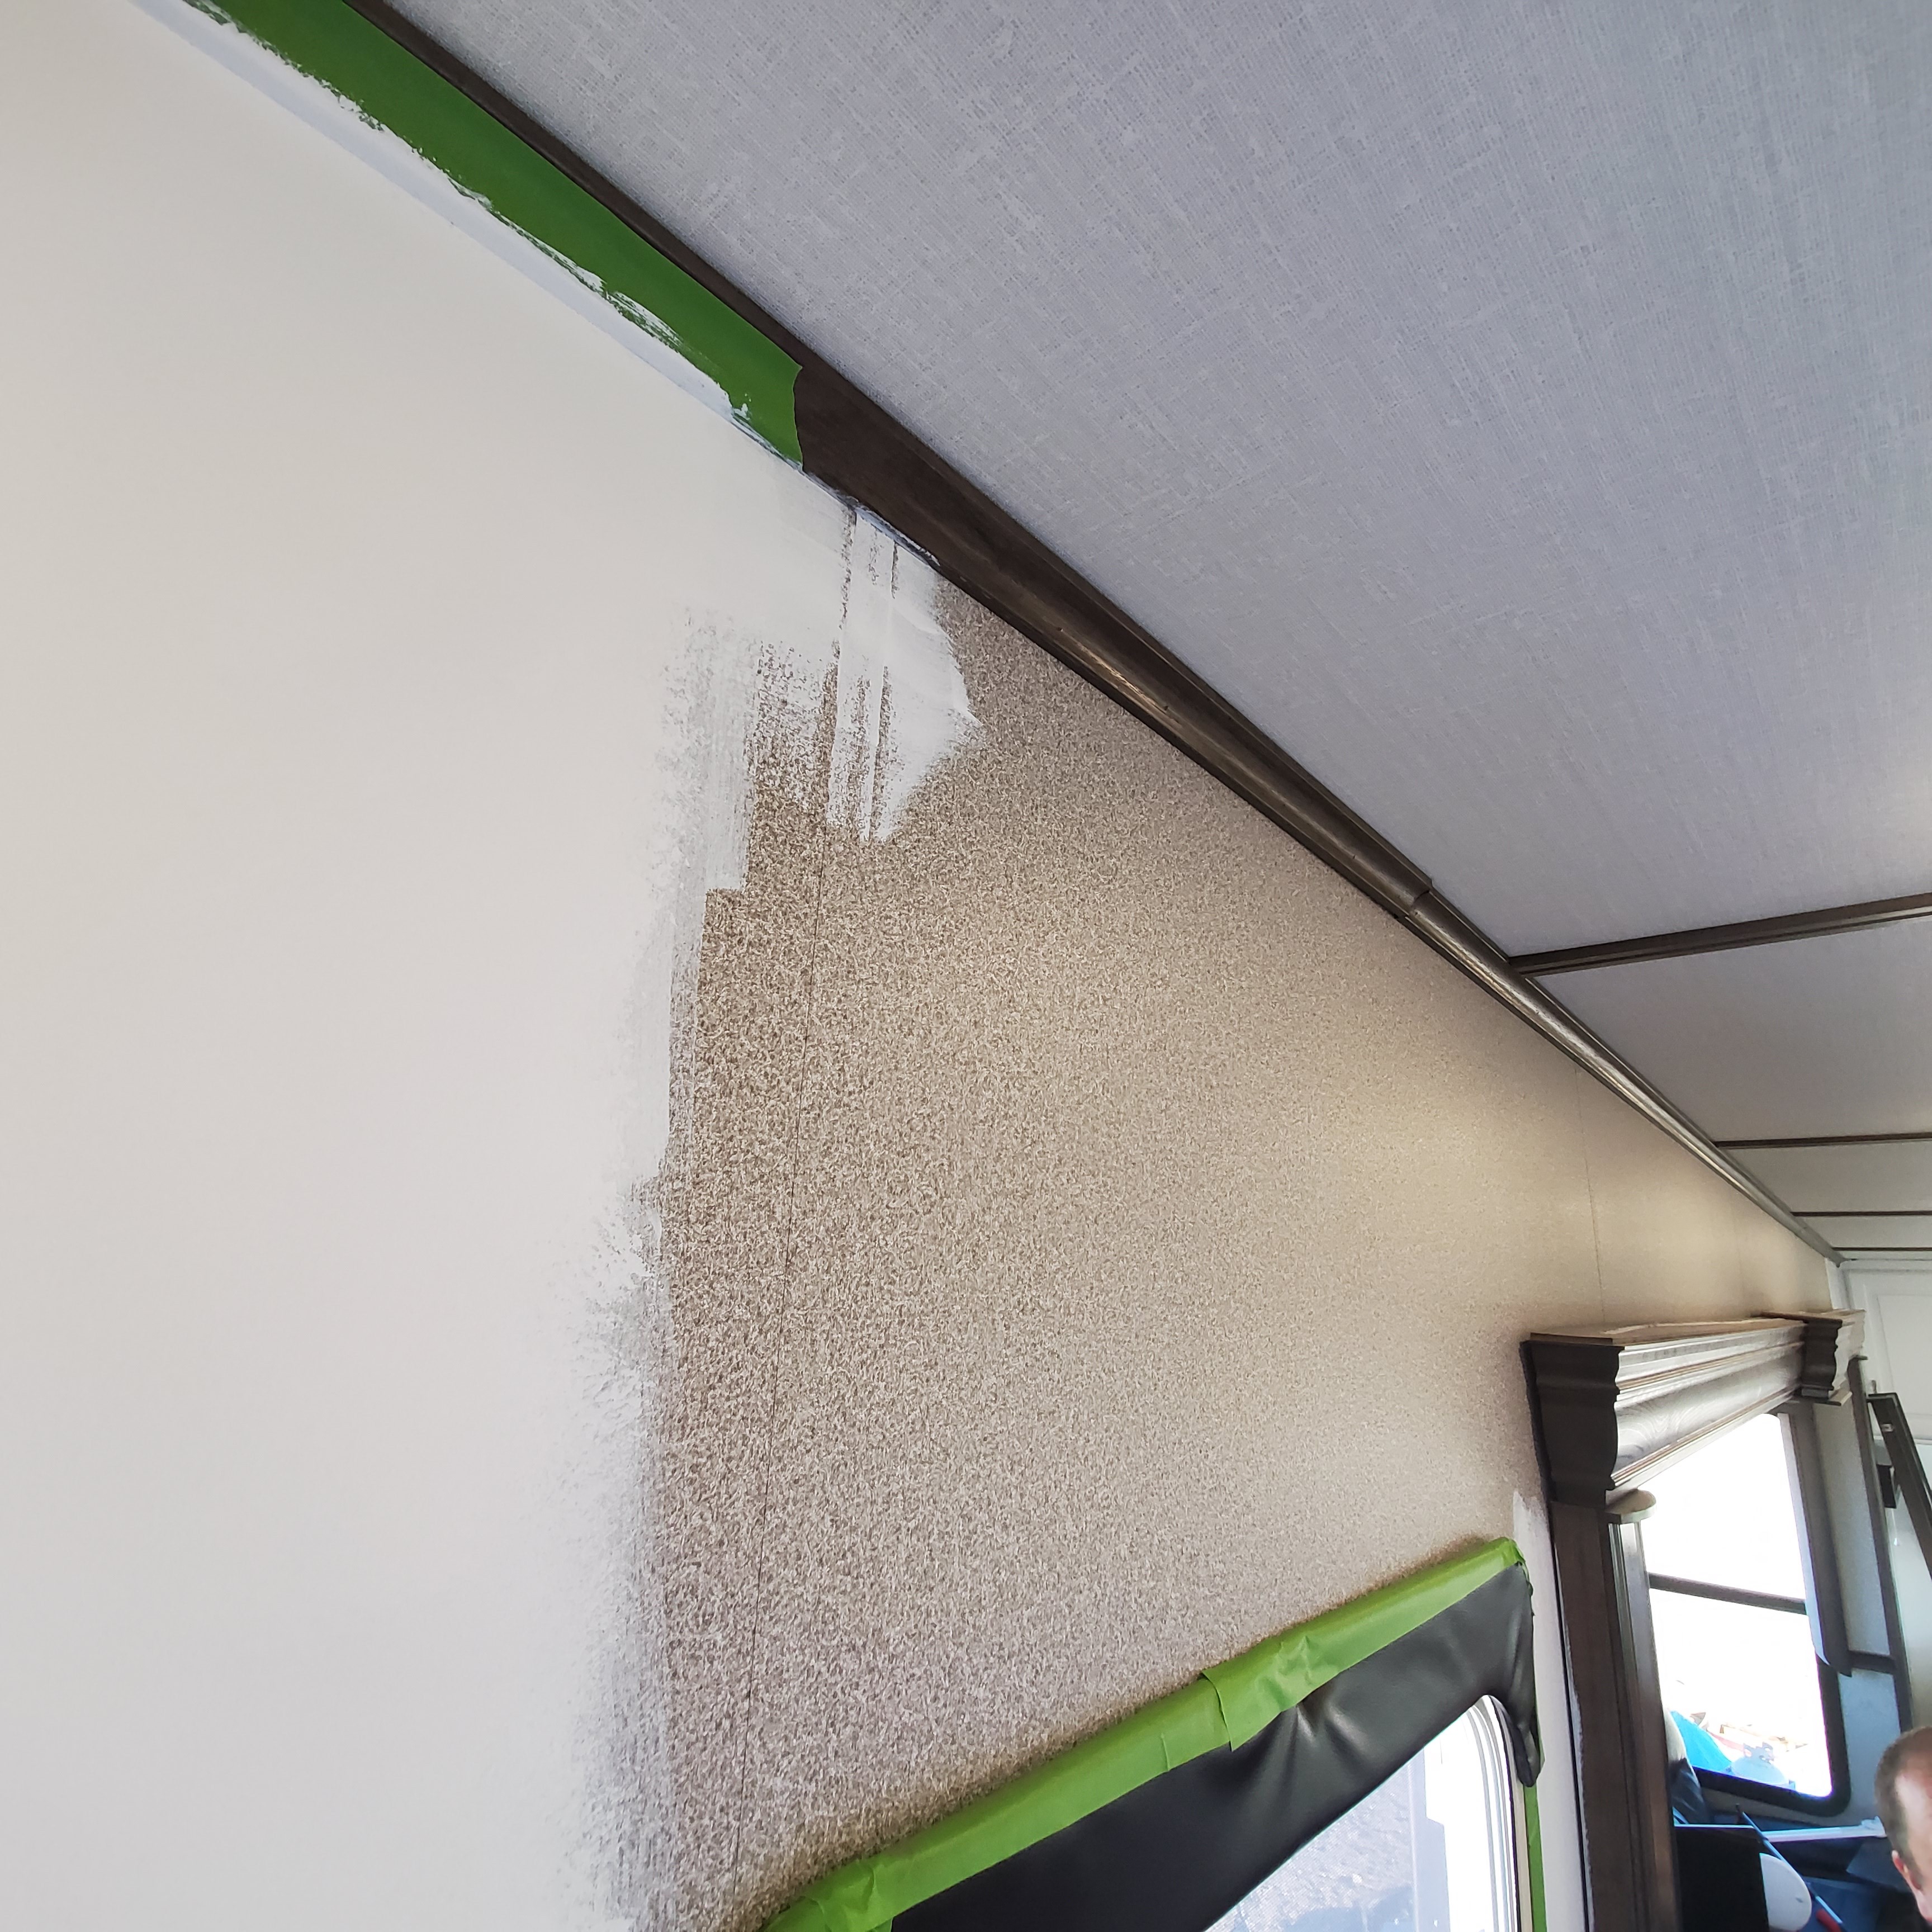
 Primer and Paint Tests on RV Wall
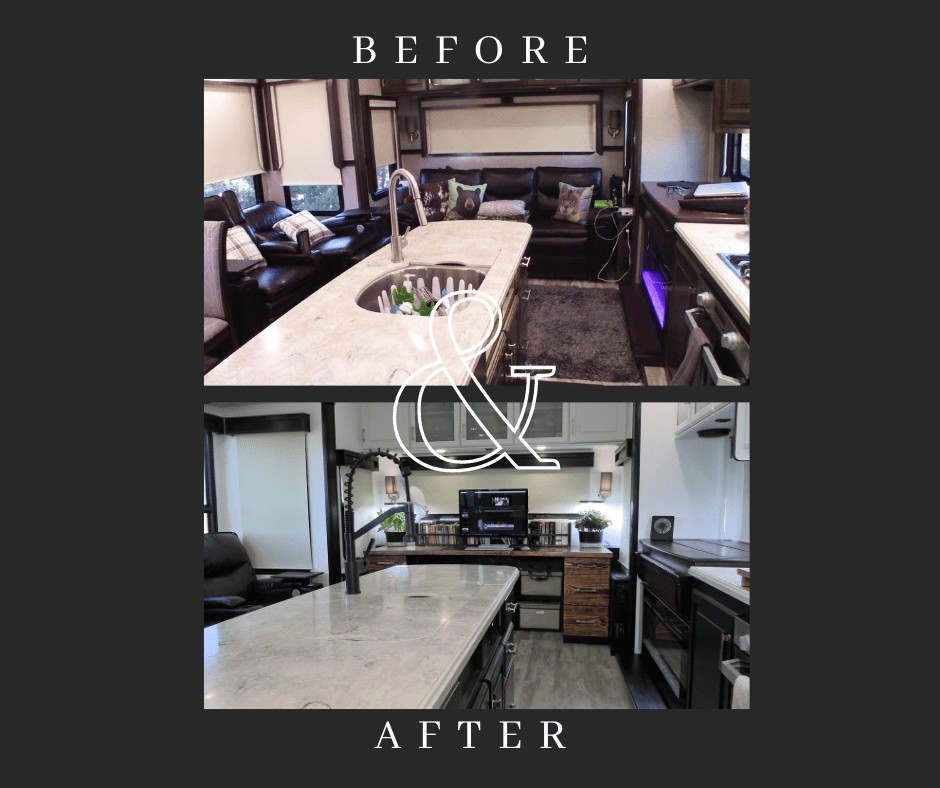 RV Interior Transformation Before and After