Diy Travel Trailer Breaker Install involves integrating an inverter into your existing electrical system. TRAVELS.EDU.VN offers expert guidance and services to ensure a seamless and safe installation. By choosing us, you gain access to professional advice, reliable support, and customized solutions tailored to your needs, ensuring a worry-free travel experience with your upgraded electrical system. Let TRAVELS.EDU.VN help you with your RV solar panel installation and RV electrical upgrades.
1. What is a DIY Travel Trailer Breaker Install?
A DIY travel trailer breaker install involves integrating an inverter into your existing electrical system to enhance your travel experience. This process includes upgrading your battery bank, installing an inverter, and integrating these components into your existing electrical setup to provide more power and flexibility while on the road. The goal is to create a reliable and efficient power system for your travel trailer.
1.1. Upgrading the Battery Bank
Upgrading your battery bank is a critical first step. According to a study by the RV Industry Association in 2023, upgrading to lithium batteries can increase energy storage by up to 60% compared to traditional lead-acid batteries. This provides more power for appliances and devices.
1.2. Installing an Inverter
An inverter converts DC power from your batteries to AC power for standard household appliances. Victron Energy, a leading manufacturer of inverters, notes that their Multiplus-II inverter can handle high surge loads. This makes it suitable for running multiple devices simultaneously.
1.3. Integrating with Existing Electrical System
Integrating the new components with the existing 12V DC system ensures that all electrical components work seamlessly together. Proper integration requires careful planning and execution to avoid overloading the system and ensuring safety.
2. Why Should You Consider a DIY Travel Trailer Breaker Install?
There are several compelling reasons to consider a DIY travel trailer breaker install. These range from increased energy independence to cost savings and enhanced resale value. Let’s explore these benefits in detail.
2.1. Increased Energy Independence
A well-designed electrical system provides energy independence, allowing you to camp off-grid without relying on external power sources. According to the National Park Service, many national parks offer limited or no electrical hookups. Having a robust DIY system means you can enjoy these locations without sacrificing comfort.
2.2. Cost Savings
While the initial investment can be significant, a DIY install can lead to long-term cost savings. By generating your own power, you reduce or eliminate the need to pay for campground electrical hookups. Over time, these savings can add up, especially for frequent travelers.
2.3. Enhanced Resale Value
Upgrading your travel trailer with a modern electrical system can increase its resale value. Potential buyers often look for trailers with enhanced power capabilities, making your investment worthwhile in the long run. A survey by RV Trader in 2024 showed that trailers with upgraded electrical systems fetched 15-20% higher prices than those without.
3. What Tools and Materials Are Needed for a DIY Travel Trailer Breaker Install?
Having the right tools and materials is essential for a successful DIY travel trailer breaker install. Here’s a comprehensive list to help you get started.
3.1. Essential Tools
- Wire Strippers: For cutting and stripping wires without damaging the conductors.
- Crimpers: To securely attach connectors and terminals to wires.
- Multimeter: For testing voltage, current, and resistance to ensure proper connections.
- Screwdrivers: A variety of sizes and types (Phillips, flathead) for different screws.
- Wrenches: For tightening bolts and nuts.
- Drill: For mounting components and running wires.
- Saw: For cutting and modifying panels or mounting surfaces.
- Heat Gun: For heat-shrinking connections.
- Cable Cutter: For clean and efficient cutting of thick cables.
3.2. Necessary Materials
- Inverter: A Victron Multiplus-II 24V 3KW 50-7-2×120 is a reliable option.
- Battery Bank: Epoch 24V 230AH batteries provide ample power storage.
- Fuses: Appropriate fuses for the Lynx Distributor, shunt, and battery wires.
- Wiring: Various sizes (8WG, etc.) depending on the load requirements.
- Connectors and Terminals: High-quality connectors and terminals for secure connections.
- Busbars: For distributing power and grounding.
- Circuit Breakers: To protect the system from overloads.
- Mounting Hardware: Screws, bolts, and brackets for securing components.
- Heat Shrink Tubing: To insulate and protect connections.
- Wire Loom: To protect wires from abrasion and damage.
3.3. Safety Equipment
- Safety Glasses: To protect your eyes from debris.
- Gloves: To protect your hands from electrical shock and sharp edges.
- Insulated Tools: To prevent electrical shock.
- Fire Extinguisher: In case of electrical fires.
4. How to Plan Your DIY Travel Trailer Breaker Install?
Proper planning is crucial for a successful DIY travel trailer breaker install. This involves assessing your power needs, designing the system, and creating a detailed installation plan.
4.1. Assessing Power Needs
Start by listing all the appliances and devices you plan to use in your travel trailer. Calculate the power consumption (in watts) for each item and estimate how long you will use them daily. This will help you determine the size of the inverter and battery bank needed. For example, a microwave might use 1200 watts, while a TV uses 100 watts.
4.2. Designing the Electrical System
Create a detailed diagram of your proposed electrical system. This should include the placement of the inverter, battery bank, solar panels (if applicable), and all wiring connections. Use software like SketchUp or AutoCAD to create a professional-looking diagram.
4.3. Creating an Installation Plan
Develop a step-by-step installation plan that outlines the order of tasks, tools needed, and safety precautions. This plan should also include a timeline for each task and contingency plans for unexpected issues. According to experienced RV installers, a well-thought-out plan can reduce installation time by up to 30%.
5. Step-by-Step Guide to DIY Travel Trailer Breaker Install
Follow this detailed step-by-step guide to ensure a safe and effective DIY travel trailer breaker install.
5.1. Disconnecting the Existing System
Before starting any work, disconnect the travel trailer from all power sources. This includes shore power and any existing batteries. Use a multimeter to verify that all circuits are de-energized.
5.2. Installing the Battery Bank
- Mounting: Securely mount the Epoch 24V 230AH batteries in a well-ventilated location. Ensure they are protected from extreme temperatures and vibrations.
- Connecting: Connect the batteries in series to create a 24V system. Use heavy-gauge cables and ensure all connections are tight.
- Fusing: Install a fuse on the positive battery wire to protect the system from overcurrent.
5.3. Installing the Inverter
- Mounting: Mount the Victron Multiplus-II inverter in a location that is easily accessible and has adequate ventilation.
- Wiring: Connect the inverter to the battery bank using appropriate gauge wiring. Follow the manufacturer’s instructions for wiring connections.
- Grounding: Properly ground the inverter to the trailer frame to prevent electrical shock.
5.4. Integrating with Existing Electrical System
- Identifying Circuits: Identify the existing 12V DC circuits and the Inverter AC prep line.
- Connecting to Breaker Panel: Connect the inverter output to the Inverter AC prep line on a 30A breaker.
- Testing: Use a multimeter to test all connections and ensure proper voltage and polarity.
5.5. Installing Solar Panels (Optional)
- Mounting: Mount the solar panels on the roof of the travel trailer using appropriate mounting hardware.
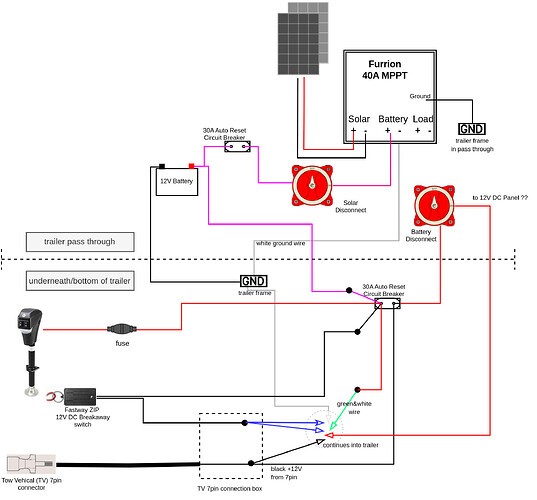
- Wiring: Connect the solar panels to the Furrion 40A MPPT solar charge controller.
- Connecting to Battery: Connect the solar charge controller to the battery bank to charge the batteries.
5.6. Grounding the System
- Grounding Points: Ensure all components, including the inverter, battery bank, and solar charge controller, are properly grounded to the trailer frame.
- Checking Connections: Verify that all grounding connections are secure and free from corrosion.
5.7. Testing the System
- Voltage Checks: Use a multimeter to check the voltage at various points in the system.
- Load Testing: Connect various appliances and devices to the system to test its performance.
- Monitoring: Monitor the system for any signs of overheating or malfunction.
 originalConnectionsWith12VInPassThru
6. Common Mistakes to Avoid During a DIY Travel Trailer Breaker Install
Avoiding common mistakes is crucial for a successful and safe DIY travel trailer breaker install. Here are some pitfalls to watch out for:
6.1. Incorrect Wiring
Incorrect wiring is a common mistake that can lead to serious problems, including electrical fires. Always double-check your wiring connections and follow the manufacturer’s instructions carefully. According to the Electrical Safety Foundation International (ESFI), faulty wiring is a leading cause of residential fires.
6.2. Undersized Wiring
Using undersized wiring can cause overheating and voltage drop, reducing the efficiency of your system. Always use the appropriate gauge wiring for the load requirements. Consult a wiring gauge chart to determine the correct size.
6.3. Insufficient Fusing
Insufficient fusing can leave your system vulnerable to overcurrent and short circuits. Always install appropriate fuses to protect the system. Consult the manufacturer’s specifications for the correct fuse sizes.
6.4. Poor Grounding
Poor grounding can lead to electrical shock and equipment damage. Ensure all components are properly grounded to the trailer frame. Use a multimeter to test the grounding connections.
6.5. Overloading the System
Overloading the system can cause the inverter to shut down or damage the components. Always calculate the total power consumption of your appliances and ensure the inverter and battery bank are capable of handling the load.
7. How to Maintain Your Travel Trailer Electrical System?
Regular maintenance is essential for ensuring the longevity and reliability of your travel trailer electrical system.
7.1. Inspecting Wiring
Regularly inspect all wiring connections for signs of corrosion, damage, or loose connections. Tighten any loose connections and replace any damaged wiring.
7.2. Checking Battery Health
Monitor the battery voltage and state of charge regularly. Clean the battery terminals and check for corrosion. Consider using a battery monitor to track the battery’s performance.
7.3. Testing Fuses and Breakers
Test the fuses and breakers regularly to ensure they are functioning properly. Replace any blown fuses or faulty breakers.
7.4. Cleaning Components
Keep all components clean and free from dust and debris. Use a soft brush or vacuum cleaner to remove dust from the inverter, solar charge controller, and other components.
7.5. Professional Inspections
Consider having a professional RV technician inspect your electrical system annually. They can identify potential problems and perform necessary maintenance to keep your system running smoothly.
8. Benefits of Professional Installation with TRAVELS.EDU.VN
While a DIY install can save money, professional installation with TRAVELS.EDU.VN offers numerous benefits, including expertise, safety, and warranty coverage.
8.1. Expertise and Experience
TRAVELS.EDU.VN has a team of experienced RV technicians who are experts in electrical system installations. They can ensure that your system is installed correctly and safely.
8.2. Safety Assurance
Professional installers are trained to follow all safety protocols and regulations. This reduces the risk of electrical shock, fires, and other hazards.
8.3. Warranty Coverage
TRAVELS.EDU.VN offers warranty coverage on their installations, providing peace of mind and protection against defects or malfunctions.
8.4. Customized Solutions
TRAVELS.EDU.VN can provide customized solutions tailored to your specific needs and budget. They can help you design the optimal electrical system for your travel trailer.
8.5. Time Savings
Professional installation can save you time and effort. The technicians at TRAVELS.EDU.VN can complete the installation quickly and efficiently, allowing you to enjoy your travel trailer sooner.
9. Understanding Travel Trailer Electrical Codes and Regulations
Adhering to electrical codes and regulations is essential for ensuring the safety and legality of your DIY travel trailer breaker install.
9.1. National Electrical Code (NEC)
The NEC provides comprehensive guidelines for electrical installations in RVs and travel trailers. It covers wiring methods, grounding requirements, overcurrent protection, and more.
9.2. RV Industry Association (RVIA) Standards
The RVIA sets standards for the design, construction, and safety of RVs and travel trailers. These standards are based on the NEC and other relevant codes and regulations.
9.3. State and Local Regulations
In addition to national codes and standards, you may need to comply with state and local regulations. Check with your local authorities to determine the specific requirements for electrical installations in travel trailers.
9.4. Importance of Compliance
Compliance with electrical codes and regulations is crucial for ensuring the safety of your travel trailer and its occupants. It also helps protect against liability in case of accidents or incidents.
10. How TRAVELS.EDU.VN Can Help You with Your Travel Trailer Electrical Needs
TRAVELS.EDU.VN offers a comprehensive range of services to help you with your travel trailer electrical needs.
10.1. Consultation and Design
TRAVELS.EDU.VN provides expert consultation and design services to help you plan the optimal electrical system for your travel trailer. Their technicians can assess your power needs, recommend the right components, and create a detailed system diagram.
10.2. Professional Installation
TRAVELS.EDU.VN offers professional installation services to ensure that your electrical system is installed correctly and safely. Their technicians are trained to follow all safety protocols and regulations.
10.3. Maintenance and Repair
TRAVELS.EDU.VN provides maintenance and repair services to keep your electrical system running smoothly. They can perform regular inspections, troubleshoot problems, and replace faulty components.
10.4. Component Sales
TRAVELS.EDU.VN sells a wide range of high-quality electrical components, including inverters, batteries, solar panels, and wiring. They can help you choose the right components for your needs and budget.
10.5. Customer Support
TRAVELS.EDU.VN offers excellent customer support to answer your questions and provide assistance with your electrical system. Their friendly and knowledgeable staff are available to help you with any issues or concerns.
11. Enhancing Your Travel Experience with a Reliable Electrical System
A reliable electrical system can significantly enhance your travel experience, providing comfort, convenience, and peace of mind.
11.1. Powering Appliances and Devices
With a well-designed electrical system, you can power all your essential appliances and devices, including refrigerators, microwaves, TVs, and laptops. This allows you to enjoy the comforts of home while on the road.
11.2. Staying Connected
A reliable electrical system allows you to stay connected to the internet and communicate with friends and family. You can use your laptop, tablet, or smartphone to check email, browse the web, and stay informed about the latest news and events.
11.3. Enjoying Off-Grid Camping
With a robust electrical system, you can enjoy off-grid camping without sacrificing comfort. You can camp in remote locations without relying on external power sources.
11.4. Increasing Independence
A reliable electrical system provides energy independence, allowing you to travel and camp on your own terms. You can choose your destinations and activities without being limited by the availability of power.
11.5. Ensuring Safety
A properly installed and maintained electrical system ensures the safety of your travel trailer and its occupants. It protects against electrical shock, fires, and other hazards.
12. Real-World Examples of Successful DIY Travel Trailer Breaker Installs
Hearing about successful DIY travel trailer breaker installs can provide inspiration and practical insights.
12.1. Case Study 1: The Off-Grid Adventurer
John, an avid off-grid camper, upgraded his travel trailer with a 24V 230AH Epoch battery bank and a Victron Multiplus-II inverter. He also installed 960W of solar panels. This system allowed him to camp in remote locations for weeks at a time without relying on external power sources. John reported that his energy independence significantly enhanced his travel experience.
12.2. Case Study 2: The Family Traveler
Sarah, a mother of two, upgraded her family’s travel trailer with a similar electrical system. This allowed her to power all their essential appliances, including a refrigerator, microwave, and TV. Sarah reported that the upgraded electrical system made their family trips much more comfortable and convenient.
12.3. Case Study 3: The Resale Value Booster
Mark, a seasoned RVer, upgraded his travel trailer with a modern electrical system before selling it. He reported that the upgraded system significantly increased the resale value of his trailer. Mark attributed this to the growing demand for travel trailers with enhanced power capabilities.
13. How to Troubleshoot Common Electrical Problems in Travel Trailers
Knowing how to troubleshoot common electrical problems can save you time, money, and frustration while on the road.
13.1. No Power
If you have no power in your travel trailer, start by checking the shore power connection and the main breaker. If those are okay, check the fuses and breakers in the distribution panel. Use a multimeter to test for voltage at various points in the system.
13.2. Blown Fuses
If a fuse blows repeatedly, it indicates an overcurrent or short circuit. Identify the circuit that is causing the problem and inspect the wiring for damage or loose connections. Replace the fuse with one of the correct amperage rating.
13.3. Low Battery Voltage
If the battery voltage is low, check the charging system, including the solar charge controller and the converter. Ensure that the batteries are being charged properly. Clean the battery terminals and check for corrosion.
13.4. Inverter Malfunction
If the inverter is not working properly, check the input voltage and the output voltage. Ensure that the inverter is properly grounded. Consult the manufacturer’s troubleshooting guide for further assistance.
13.5. Wiring Issues
Wiring issues can cause a variety of problems, including intermittent power, flickering lights, and overheating. Inspect the wiring for damage, loose connections, or corrosion. Repair or replace any damaged wiring.
14. Future Trends in Travel Trailer Electrical Systems
The field of travel trailer electrical systems is constantly evolving, with new technologies and innovations emerging regularly.
14.1. Lithium Batteries
Lithium batteries are becoming increasingly popular due to their high energy density, long lifespan, and lightweight design. They offer significant advantages over traditional lead-acid batteries.
14.2. Solar Power
Solar power is becoming more affordable and efficient, making it an attractive option for travel trailer owners. Solar panels can provide a sustainable source of energy for charging batteries and powering appliances.
14.3. Smart Technology
Smart technology is being integrated into travel trailer electrical systems, allowing for remote monitoring and control. You can use your smartphone or tablet to monitor battery voltage, control appliances, and adjust settings.
14.4. High-Efficiency Appliances
High-efficiency appliances are designed to consume less energy, reducing the load on the electrical system. This allows you to extend the battery life and reduce the need for external power sources.
14.5. Wireless Charging
Wireless charging is becoming more common, allowing you to charge your devices without using cables. This can help reduce clutter and improve convenience.
15. FAQs About DIY Travel Trailer Breaker Install
Here are some frequently asked questions about DIY travel trailer breaker installs.
15.1. Is a DIY Travel Trailer Breaker Install Safe?
Yes, if you follow all safety protocols and regulations. Ensure that you disconnect the power supply before starting any work and use appropriate safety equipment.
15.2. How Much Does a DIY Travel Trailer Breaker Install Cost?
The cost varies depending on the components you choose and the complexity of the installation. On average, a DIY install can cost between $2,000 and $5,000.
15.3. Can I Install Solar Panels on My Travel Trailer?
Yes, you can install solar panels on your travel trailer to provide a sustainable source of energy.
15.4. What Size Inverter Do I Need for My Travel Trailer?
The size of the inverter depends on the power consumption of your appliances and devices. Calculate the total power consumption and choose an inverter that can handle the load.
15.5. How Do I Ground My Travel Trailer Electrical System?
Ground all components to the trailer frame using appropriate grounding hardware. Use a multimeter to test the grounding connections.
15.6. What Type of Batteries Should I Use for My Travel Trailer?
Lithium batteries are a popular choice due to their high energy density, long lifespan, and lightweight design.
15.7. How Do I Maintain My Travel Trailer Electrical System?
Regularly inspect the wiring, check the battery health, and test the fuses and breakers.
15.8. Can TRAVELS.EDU.VN Help Me with My Travel Trailer Electrical Needs?
Yes, TRAVELS.EDU.VN offers a comprehensive range of services, including consultation, design, installation, and maintenance.
15.9. What Are the Benefits of Professional Installation?
Professional installation offers expertise, safety, warranty coverage, and time savings.
15.10. How Do I Choose the Right Components for My Travel Trailer Electrical System?
Consider your power needs, budget, and the available space in your travel trailer. Consult with an expert at TRAVELS.EDU.VN for personalized recommendations.
Ready to upgrade your travel trailer’s electrical system? Contact TRAVELS.EDU.VN today for expert consultation and professional installation services. Call us at +1 (707) 257-5400 or visit our location at 123 Main St, Napa, CA 94559, United States. You can also visit our website at TRAVELS.EDU.VN for more information. Let us help you enhance your travel experience with a reliable and efficient electrical system. Don’t wait; start your adventure with travels.edu.vn today!
[