Installing a window AC unit in your travel trailer is a fantastic way to stay cool and comfortable on your adventures, and TRAVELS.EDU.VN is here to guide you through the process. This article will explore how to install a window AC unit, focusing on key aspects like selecting the right unit, creating a secure installation, and ensuring efficient cooling. By optimizing your cooling system, you’ll enhance your travel experience, making every trip more enjoyable. Explore window air conditioner alternatives, portable air conditioner setups, and RV air conditioning maintenance tips.
1. Why Install a Window AC Unit in a Travel Trailer?
A window AC unit can be a game-changer for travel trailer comfort, offering numerous benefits. Let’s discuss why this upgrade is worthwhile:
- Cost-Effectiveness: Window AC units are generally more affordable than rooftop RV air conditioners. According to a report by the RV Industry Association, the average cost of a new rooftop AC unit can range from $800 to $1500, while a window AC unit suitable for a travel trailer can be found for under $300.
- Ease of Installation: Installing a window AC unit is often simpler than replacing a rooftop unit, which may require professional assistance. DIY installation saves on labor costs.
- Portability: Window AC units can be easily removed and stored when not needed, reducing weight during travel and preventing damage in harsh weather.
- Quiet Operation: Many window AC units operate more quietly than older rooftop models, enhancing the peace and quiet inside your travel trailer. Sound levels can be a significant factor, with some rooftop units producing noise levels of 70-80 decibels, while window units often operate at 50-60 decibels.
- Energy Efficiency: Modern window AC units come with energy-efficient features, helping you conserve power, especially when using a generator or boondocking. Energy Star-certified models can use up to 15% less energy than standard models.
2. Assessing Your Travel Trailer for AC Installation
Before you start the installation, you need to assess your travel trailer to determine the best approach.
2.1. Window Size and Type
- Measure the height and width of the window where you plan to install the AC unit. Common travel trailer window sizes range from 14×21 inches to 24×36 inches.
- Consider the type of window. Sliding windows and crank-out windows require different installation methods. Sliding windows are generally easier to adapt for AC units.
- Check for any obstructions around the window, such as cabinets, curtains, or blinds, that may interfere with the installation.
2.2. Power Requirements
- Determine the power requirements of the AC unit. Most small window AC units for travel trailers require 110-120V AC power and draw between 5 to 10 amps.
- Ensure your travel trailer’s electrical system can handle the additional load. If you plan to run the AC unit off a generator, make sure the generator has sufficient wattage capacity. A 2000-watt generator is typically adequate for a small window AC unit.
- Consider using a surge protector to protect the AC unit from voltage spikes, which are common in RV parks and campgrounds.
2.3. Structural Considerations
- Assess the structural integrity of the window frame and surrounding wall. Ensure they can support the weight of the AC unit, which can range from 40 to 60 pounds.
- Check for any signs of water damage or rot around the window frame. Repair any damage before proceeding with the installation to prevent future problems.
- Plan how you will seal the AC unit to the window frame to prevent air leaks and water intrusion.
3. Selecting the Right Window AC Unit
Choosing the right AC unit is crucial for effective cooling and energy efficiency.
3.1. BTU Rating
- BTU (British Thermal Units) measures the cooling capacity of an AC unit. A higher BTU rating means more cooling power.
- Calculate the appropriate BTU rating for your travel trailer based on its size. A general rule of thumb is 20 BTU per square foot. For example, a 150-square-foot travel trailer would require an AC unit with 3,000 BTU.
- Consider factors such as insulation, climate, and the number of occupants when determining the BTU rating. Trailers with poor insulation or those used in hot climates may require a higher BTU rating.
3.2. Size and Dimensions
- Ensure the AC unit fits the window opening. Measure the window accurately and compare it to the AC unit’s dimensions.
- Choose a compact unit that doesn’t protrude excessively from the window, which could pose a safety hazard or affect the trailer’s aerodynamics.
- Consider the weight of the AC unit, especially if you plan to move it frequently.
3.3. Energy Efficiency
- Look for Energy Star-certified models, which are designed to use less energy. Energy Star-rated AC units can save you money on electricity bills and reduce your carbon footprint.
- Check the Energy Efficiency Ratio (EER) rating. A higher EER indicates better energy efficiency. Aim for an EER of 10 or higher.
- Consider models with features such as programmable timers, sleep modes, and adjustable thermostats to further conserve energy.
3.4. Features and Functions
- Remote Control: Allows you to adjust settings from anywhere in the trailer.
- Multiple Fan Speeds: Provides flexibility in controlling airflow and noise levels.
- Sleep Mode: Automatically adjusts the temperature to conserve energy and provide a comfortable sleeping environment.
- Dehumidification: Removes excess moisture from the air, improving comfort and preventing mold growth.
- Air Filter: Captures dust, pollen, and other allergens, improving air quality.
4. Step-by-Step Installation Guide
Follow these steps to install your window AC unit securely and efficiently:
4.1. Preparing the Window
- Clean the Window Frame: Remove any dirt, dust, or debris from the window frame and surrounding area. Use a mild detergent and water, then dry thoroughly.
- Measure and Cut the Mounting Panel: Cut a piece of plywood or acrylic sheet to fit the window opening. The panel should be thick enough (at least 3/4 inch) to provide a stable mounting surface.
- Cut the AC Unit Opening: Measure the dimensions of the AC unit and cut a corresponding opening in the mounting panel. Use a jigsaw or circular saw for accurate cuts.
- Test Fit the AC Unit: Place the AC unit in the opening to ensure it fits properly. Make any necessary adjustments to the opening size.
- Seal the Panel: Apply weather stripping or foam tape around the edges of the mounting panel to create an airtight seal between the panel and the window frame.
4.2. Mounting the AC Unit
- Position the Mounting Panel: Place the mounting panel in the window opening, ensuring it fits snugly.
- Secure the Panel: Use screws, bolts, or clamps to secure the mounting panel to the window frame. Ensure the panel is firmly attached and cannot be easily dislodged.
- Install Support Brackets: Install support brackets under the AC unit to provide additional stability. The brackets should be attached to the mounting panel and the surrounding wall.
- Slide in the AC Unit: Carefully slide the AC unit into the opening in the mounting panel. Ensure it is properly aligned and seated.
- Secure the AC Unit: Use screws or bolts to secure the AC unit to the mounting panel. Follow the manufacturer’s instructions for proper installation.
4.3. Sealing and Insulating
- Seal Gaps: Apply caulk or sealant around the AC unit and the mounting panel to fill any gaps and prevent air leaks. Use a high-quality sealant that is resistant to weather and UV damage.
- Insulate Around the Unit: Use foam insulation or weather stripping to insulate around the AC unit and the mounting panel. This will help to improve energy efficiency and reduce noise.
- Cover Exposed Areas: Cover any exposed areas of the mounting panel with tape or trim to protect them from the elements and improve the appearance of the installation.
4.4. Electrical Connection
- Plug in the AC Unit: Plug the AC unit into a grounded electrical outlet. Use a heavy-duty extension cord if necessary.
- Test the AC Unit: Turn on the AC unit and test its operation. Ensure it is cooling properly and that all features are working correctly.
- Monitor Power Consumption: Monitor the AC unit’s power consumption to ensure it is within the limits of your travel trailer’s electrical system.
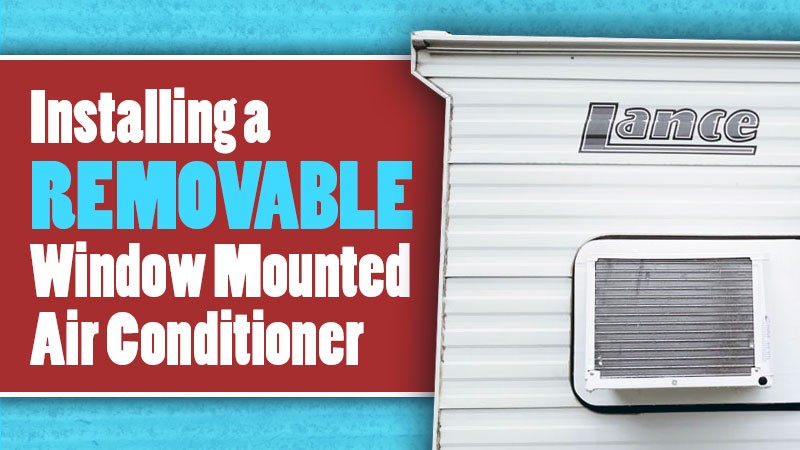 Removable Window Air Conditioner In a Camper Window
An installed removable window AC unit in a camper window shows a practical cooling solution for RV enthusiasts.
5. Alternative Installation Methods
Depending on your travel trailer’s window configuration and your DIY skills, you might consider alternative installation methods.
5.1. Using a Custom-Built Frame
- Design a Frame: Create a custom-built frame from wood or metal to hold the AC unit. The frame should be designed to fit securely in the window opening and support the weight of the AC unit.
- Secure the Frame: Attach the frame to the window frame using screws, bolts, or clamps. Ensure the frame is sturdy and can withstand the vibrations of travel.
- Install the AC Unit: Install the AC unit in the frame and secure it with screws or bolts. Seal any gaps with caulk or sealant.
5.2. Portable AC Units
- Choose a Portable Unit: Select a portable AC unit with a hose that vents to the outside. Portable AC units are easy to install and can be moved from one window to another.
- Vent the Hose: Vent the hose through a window using a window kit, which typically consists of a panel that fits in the window opening and has a hole for the hose.
- Seal the Window: Seal any gaps around the window kit to prevent air leaks.
5.3. Through-the-Wall Installation
- Cut an Opening: Cut an opening in the wall of your travel trailer to accommodate the AC unit. This method requires careful planning and execution to avoid damaging the trailer’s structure.
- Install a Support Frame: Install a support frame around the opening to provide structural support.
- Mount the AC Unit: Mount the AC unit in the opening and secure it with screws or bolts. Seal any gaps with caulk or sealant.
6. Tips for Efficient Cooling
To maximize the cooling efficiency of your window AC unit, consider these tips:
6.1. Insulation
- Improve Insulation: Add insulation to the walls, roof, and floor of your travel trailer to reduce heat transfer. Use fiberglass insulation, foam boards, or spray foam for best results.
- Seal Air Leaks: Seal any air leaks around windows, doors, and other openings. Use caulk, weather stripping, or foam tape to close gaps.
- Use Reflective Window Film: Apply reflective window film to the windows to block sunlight and reduce heat gain.
6.2. Ventilation
- Use Fans: Use fans to circulate air throughout the travel trailer. Ceiling fans, box fans, and portable fans can help to distribute cool air and improve comfort.
- Ventilate the Trailer: Open windows and vents in the morning and evening to allow fresh air to circulate. Close windows and vents during the day to keep out heat.
- Use a Vent Fan: Install a vent fan in the roof of the travel trailer to exhaust hot air.
6.3. Shading
- Park in the Shade: Park your travel trailer in a shaded area to reduce direct sunlight exposure.
- Use Awnings: Use awnings to shade the windows and walls of the travel trailer.
- Install Curtains or Blinds: Install curtains or blinds to block sunlight and reduce heat gain.
6.4. Maintenance
- Clean the Air Filter: Clean the air filter regularly to ensure proper airflow and cooling efficiency. A dirty air filter can reduce the AC unit’s cooling capacity and increase energy consumption.
- Clean the Coils: Clean the AC unit’s coils to remove dirt and debris. Use a soft brush or vacuum cleaner to clean the coils gently.
- Check for Leaks: Check for leaks around the AC unit and repair them promptly. Water leaks can damage the AC unit and lead to mold growth.
7. Safety Considerations
Safety should be a top priority when installing and using a window AC unit in your travel trailer.
7.1. Electrical Safety
- Use a Grounded Outlet: Always plug the AC unit into a grounded electrical outlet.
- Use a Surge Protector: Use a surge protector to protect the AC unit from voltage spikes.
- Avoid Overloading Circuits: Avoid overloading electrical circuits. Do not plug too many appliances into the same circuit.
- Inspect Cords: Inspect electrical cords regularly for damage. Replace any damaged cords immediately.
7.2. Structural Safety
- Ensure Proper Support: Ensure the AC unit is properly supported and secured to prevent it from falling.
- Check for Stability: Check the stability of the installation regularly. Ensure the mounting panel and support brackets are still firmly attached.
- Avoid Obstructing Windows: Avoid obstructing windows or emergency exits with the AC unit.
7.3. Ventilation Safety
- Ensure Proper Ventilation: Ensure the travel trailer is properly ventilated to prevent carbon monoxide buildup.
- Use a Carbon Monoxide Detector: Install a carbon monoxide detector in the travel trailer to alert you to the presence of carbon monoxide.
- Never Use AC Unit in Enclosed Spaces: Never use the AC unit in enclosed spaces without adequate ventilation.
8. Troubleshooting Common Issues
Even with careful installation and maintenance, you may encounter some common issues with your window AC unit.
8.1. AC Unit Not Cooling
- Check the Air Filter: A dirty air filter can restrict airflow and reduce cooling efficiency. Clean or replace the air filter.
- Check the Coils: Dirty coils can also reduce cooling efficiency. Clean the coils with a soft brush or vacuum cleaner.
- Check for Air Leaks: Air leaks can allow warm air to enter the travel trailer, reducing the AC unit’s effectiveness. Seal any air leaks around the AC unit and the mounting panel.
- Check the Thermostat: Ensure the thermostat is set to the correct temperature.
8.2. AC Unit is Noisy
- Check for Loose Parts: Loose parts can cause vibrations and noise. Tighten any loose screws or bolts.
- Check the Fan Blades: Damaged or unbalanced fan blades can also cause noise. Replace any damaged fan blades.
- Insulate the AC Unit: Insulate around the AC unit to reduce noise transmission.
8.3. AC Unit is Leaking Water
- Check the Drain Hose: A clogged drain hose can cause water to leak from the AC unit. Clear any clogs in the drain hose.
- Check the Condensate Pan: A cracked or damaged condensate pan can also cause water to leak. Replace the condensate pan if necessary.
- Ensure Proper Drainage: Ensure the AC unit is properly sloped to allow water to drain properly.
9. Cost Analysis
Installing a window AC unit in your travel trailer can be a cost-effective alternative to rooftop AC units.
9.1. Initial Investment
- AC Unit: The cost of a window AC unit can range from $150 to $400, depending on the BTU rating, features, and brand.
- Mounting Materials: The cost of mounting materials, such as plywood, screws, bolts, caulk, and insulation, can range from $50 to $100.
- Tools: If you don’t already have the necessary tools, you may need to purchase them. The cost of tools, such as a jigsaw, drill, and measuring tape, can range from $50 to $200.
9.2. Ongoing Costs
- Electricity: The cost of electricity to run the AC unit will depend on your usage and the electricity rates in your area. An energy-efficient AC unit can help to reduce your electricity costs.
- Maintenance: The cost of maintenance, such as cleaning the air filter and coils, is relatively low.
9.3. Savings
- Lower Initial Cost: Window AC units are generally less expensive than rooftop AC units.
- DIY Installation: DIY installation can save you money on labor costs.
- Energy Efficiency: Energy-efficient AC units can save you money on electricity bills.
10. Why Choose TRAVELS.EDU.VN for Your Travel Trailer Needs?
At TRAVELS.EDU.VN, we understand the importance of comfort and convenience when you’re on the road. That’s why we offer expert advice and resources to help you make the most of your travel trailer experience.
10.1. Expert Guidance
Our team of experienced RV enthusiasts and technicians can provide you with expert guidance on everything from choosing the right AC unit to installing and maintaining it.
10.2. Comprehensive Resources
We offer a comprehensive library of articles, guides, and videos to help you learn everything you need to know about travel trailer maintenance and upgrades.
10.3. Personalized Recommendations
We can provide you with personalized recommendations based on your specific needs and budget. Whether you’re looking for a cost-effective cooling solution or a high-end AC unit with all the bells and whistles, we can help you find the perfect fit.
10.4. Reliable Support
We are committed to providing reliable support to our customers. If you have any questions or concerns, our customer service team is available to assist you.
FAQ: Installing a Window AC Unit in a Travel Trailer
1. Can I install any window AC unit in my travel trailer?
Not all window AC units are suitable for travel trailers. Consider the size, BTU rating, power requirements, and weight of the unit.
2. What BTU rating do I need for my travel trailer?
A general rule is 20 BTU per square foot. Adjust based on insulation, climate, and occupancy.
3. Is it safe to run a window AC unit on a generator?
Yes, if the generator has sufficient wattage capacity. A 2000-watt generator is typically adequate.
4. How do I seal the AC unit to prevent air leaks?
Use weather stripping, foam tape, and caulk to create an airtight seal between the AC unit and the window frame.
5. What if my travel trailer window is too small for a standard AC unit?
Consider using a portable AC unit with a window venting kit or building a custom frame to fit the window opening.
6. How do I maintain my window AC unit in a travel trailer?
Clean the air filter regularly, clean the coils, and check for leaks to ensure proper operation.
7. What safety precautions should I take when installing a window AC unit?
Use a grounded outlet, a surge protector, and ensure proper support and ventilation.
8. Can I install a window AC unit in a sliding window?
Yes, sliding windows are generally easier to adapt for AC units using a mounting panel.
9. How much does it cost to install a window AC unit in a travel trailer?
The cost ranges from $200 to $500, depending on the AC unit and mounting materials.
10. Is it better to use a window AC unit or a portable AC unit in a travel trailer?
Both have pros and cons. Window units are often more efficient, while portable units are easier to install and move.
Ready to enhance your travel trailer experience with a window AC unit? Contact TRAVELS.EDU.VN today for personalized recommendations and expert guidance. Call us at +1 (707) 257-5400 or visit us at 123 Main St, Napa, CA 94559, United States. Let travels.edu.vn help you stay cool and comfortable on all your adventures. Don’t wait, reach out now and let us help you plan your perfect Napa Valley getaway with reliable cooling solutions! Explore our cooling options and start planning your comfortable travel experience today!