Shutting down your Starlink system for travel is straightforward when you know the right steps. TRAVELS.EDU.VN provides a comprehensive guide on how to safely stow and shut down your Starlink, ensuring it’s protected during transportation and ready for your next adventure. This guide covers everything from using the Starlink app to manual methods, and even what to do if your dish is unresponsive, ensuring you have a hassle-free experience. Learn about Starlink portability and remote access shutdown.
1. What is the Best Way to Shut Down Starlink for Travel?
The best way to shut down your Starlink for travel is by using the Starlink app, as it ensures the dish is properly stowed and protected. This method is ideal because it’s simple, reliable, and minimizes the risk of damage during transport.
Shutting down your Starlink system correctly before traveling ensures the safety and longevity of your equipment. This involves not only powering down the system but also stowing the dish properly to prevent any physical damage during transit. Several methods can be used to achieve this, each with its own set of steps and considerations.
1.1 Using the Starlink App to Stow Your Dish
The Starlink app offers the most convenient and recommended method for stowing your dish. This approach is particularly useful if your Starlink is functioning correctly and you have access to the internet either locally or remotely.
Step-by-Step Guide:
- Open the Starlink App: Launch the Starlink app on your smartphone or tablet.
- Navigate to Settings: Tap on the “Settings” option within the app.
- Find the Stow Option: Scroll down until you find the “Stow Starlink” section.
- Initiate Stow: Slide the toggle to the right to initiate the stowing process.
- Confirmation (Remote Connection): If you are connected remotely (e.g., using cellular data or a different Wi-Fi network), a confirmation prompt will appear. Tap “OK” to confirm and stow the dish.
Important Considerations:
- Remote Connection Warning: Be aware that if you stow the dish through a remote connection, you will not be able to unstow it and restore internet service remotely. You will need local access to the Starlink network to unstow the dish.
- Service Interruption: Stowing the dish will interrupt your Starlink service. The router and Wi-Fi network will remain active, but you won’t have internet access until the dish is unstowed.
- Restoring Service: To unstow the dish and restore service, follow the same steps. The “Stow” option will be replaced with an “Unstow” option in the settings. Note that this option will only appear if you are locally connected to the Starlink network.
- Boot-Up Time: After unstowing the dish, it will take several minutes for Starlink to boot up and re-establish a connection.
Using the app ensures that the dish is correctly oriented for travel, reducing the risk of damage during transport.
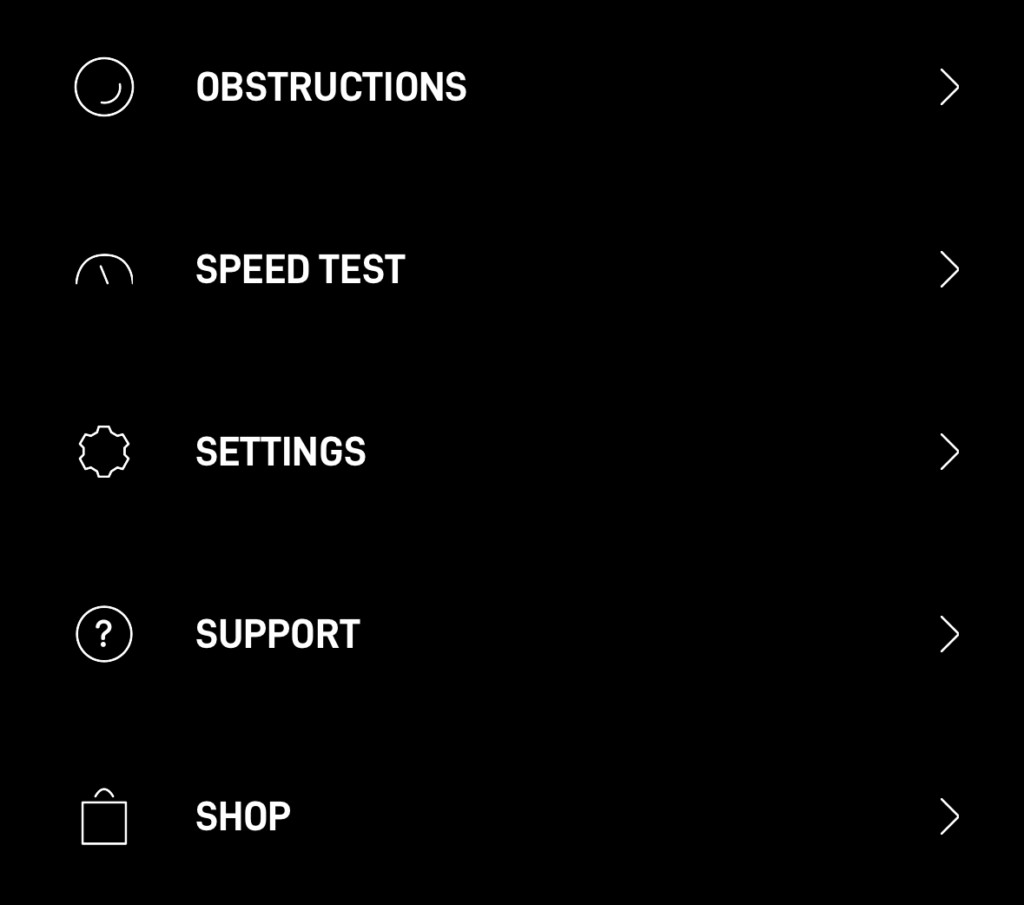 Starlink app settings showing the stow option
1.2 Alternative Method: Stowing Without the App
If you don’t have access to the Starlink app or if you’re unable to connect to your Starlink network, you can use a manual method to stow the dish. This method involves physically manipulating the dish to trigger the stowing process.
Step-by-Step Guide:
- Disconnect and Remove: Ensure the dish is plugged in and turned on. Then, carefully remove it from its mounting base.
- Position the Dish: Place the Starlink dish face down on a flat, stable surface.
- Wait for Automatic Tilt: After about a minute, the dish will automatically tilt into the stow position.
- Unplug Immediately: As soon as the dish is stowed, immediately unplug it (either the Starlink cable or the router power cable) to ensure it remains in the stowed position.
Important Considerations:
- Restoring Service: To restore service after stowing the dish using this method, simply reinstall it back in its mount and reconnect the power. The dish will automatically begin searching for satellites and orient itself after a few minutes.
- Surface Stability: Ensure the surface you place the dish on is flat and stable to prevent any accidental damage during the stowing process.
1.3 Manually Stowing a Broken Starlink Dish
In situations where your Starlink dish is broken or unresponsive, you may need to manually force it into the stowed position. This is particularly relevant if you’re sending the dish back to Starlink for repair or replacement, as they often require it to be stowed for shipping.
Step-by-Step Guide:
- Disconnect and Remove: Remove the dish from its mount and unplug the Starlink cable.
- Position the Dish: Place the dish face down on a flat surface.
- Apply Force: Slowly and gently apply force to the mast part of the dish, pushing it down into the stow position.
Important Considerations:
- Sound Cues: You may hear clicking or grinding sounds during this process. These are typically the sounds of the electric motor and gears being forced to turn.
- Gentle Movement: Move slowly and deliberately. Avoid pushing the mast too far, as this could cause further damage.
- Warranty: Check your warranty before attempting this. Forcing a broken dish into the stowed position might affect your eligibility for repair or replacement.
These methods ensure that whether your Starlink is fully functional, unresponsive, or even broken, you can safely stow it for travel or shipping, preventing additional damage and ensuring it is ready for its next use.
2. What Precautions Should I Take When Shutting Down Starlink for Travel?
When shutting down Starlink for travel, ensure the dish is securely stowed to prevent damage, disconnect all cables properly, and protect the equipment from environmental factors like moisture and extreme temperatures. Doing so can save you from costly repairs and inconvenient service interruptions.
Taking the right precautions when shutting down your Starlink system for travel is essential for maintaining its performance and longevity. These precautions range from properly stowing the dish to protecting the hardware from environmental factors.
2.1 Securing the Starlink Dish
The primary concern when preparing Starlink for travel is securing the dish itself. Whether you are moving it within your property or transporting it across the country, the dish needs to be properly stowed and protected.
- Proper Stowing: Always stow the dish using one of the methods described above (app, manual, or forced stowing for broken units). This ensures that the dish is in its most compact and secure position.
- Protective Case: Consider investing in a protective case or bag specifically designed for Starlink dishes. These cases often come with padding and secure straps to keep the dish from moving around during transport. You can find options at retailers like Amazon or specialized RV and travel stores.
2.2 Disconnecting Cables and Power Supply
Properly disconnecting the cables and power supply is another critical step in preparing your Starlink for travel. This not only protects the equipment but also prevents potential electrical hazards.
- Power Down: Always disconnect the power supply from the main outlet before disconnecting any cables. This prevents electrical surges that could damage the equipment.
- Cable Management: Neatly coil and secure the cables to prevent tangling or damage during transport. Use zip ties, Velcro straps, or cable organizers to keep everything tidy.
- Protect Connectors: Use protective caps or tape to cover the connectors on the cables. This prevents dust, moisture, and other contaminants from entering, which can degrade performance over time.
2.3 Environmental Protection
Protecting your Starlink equipment from environmental factors is crucial, especially when traveling through diverse climates.
- Moisture: Moisture is one of the biggest threats to electronic equipment. Store the Starlink dish and router in a dry, waterproof container. Consider using desiccant packets to absorb any residual moisture.
- Temperature: Extreme temperatures can also damage Starlink equipment. Avoid leaving the dish or router in direct sunlight or in a hot vehicle for extended periods. Similarly, protect it from freezing temperatures, which can cause components to crack or fail.
- Dust and Debris: Dust and debris can clog vents and interfere with the performance of the equipment. Store the dish and router in a sealed container or bag to keep them clean during transport.
2.4 Transport Considerations
How you transport your Starlink equipment can also impact its safety and performance.
- Secure Mounting: If you are transporting the dish in a vehicle, ensure it is securely mounted or packed to prevent it from shifting during transit. Use straps, padding, or a custom-built mount to keep it in place.
- Avoid Rough Handling: Handle the equipment with care to avoid dropping or bumping it. Rough handling can damage the internal components and reduce the lifespan of the system.
- Clear Labeling: Label all components and cables clearly to make reassembly easier. This is especially helpful if you are setting up the Starlink in a new location.
By following these precautions, you can minimize the risk of damage to your Starlink equipment during travel and ensure that it is ready to perform when you reach your destination.
3. How Do I Safely Pack Starlink for Travel?
To safely pack Starlink for travel, stow the dish, disconnect and coil cables, use a protective case with padding, and store it in a temperature-controlled environment. This ensures the system remains intact and functional throughout your journey.
Packing your Starlink system properly for travel is essential to prevent damage and ensure it’s ready to use upon arrival. Whether you’re moving it for a temporary trip or relocating permanently, the following steps will help you pack your Starlink safely and efficiently.
3.1 Stowing the Starlink Dish
Before packing anything, make sure the Starlink dish is properly stowed.
- Using the App: The most reliable method is using the Starlink app. Navigate to the settings and select the stow option. This ensures the dish is in the correct position to minimize potential damage.
- Manual Method: If you can’t use the app, unplug the dish and lay it face down on a flat surface. It will automatically stow itself after a minute. Unplug it immediately to keep it stowed.
- Broken Dish: If the dish is broken, gently force it into the stowed position. Be careful not to apply too much pressure to avoid further damage.
3.2 Disconnecting and Organizing Cables
Properly disconnecting and organizing the cables is crucial for preventing damage and making setup easier at your destination.
- Disconnect Cables: Disconnect all cables from the Starlink dish, router, and power adapter.
- Coil Cables Neatly: Coil each cable neatly and secure it with zip ties or Velcro straps. This prevents tangling and makes it easier to store the cables.
- Label Cables: Label each cable with its purpose (e.g., “Dish Cable,” “Power Cable”) to simplify reassembly.
- Protect Connectors: Use protective caps or tape to cover the connectors on the cables. This prevents dust, moisture, and other contaminants from entering.
 Coiled and labeled Starlink cables
3.3 Using a Protective Case
A protective case is an essential investment for anyone who travels with their Starlink system.
- Choose the Right Case: Look for a case specifically designed for Starlink dishes. These cases typically have custom-fit compartments and padding to protect the dish and other components.
- Padding and Support: Ensure the case has adequate padding to protect the dish from impacts. Look for cases with foam inserts or adjustable dividers to keep everything secure.
- Water Resistance: Consider a water-resistant case to protect the equipment from moisture. This is especially important if you’re traveling in areas with high humidity or rain.
3.4 Packing the Components
Pack all the components carefully into the protective case.
- Dish First: Place the stowed Starlink dish in its designated compartment in the case.
- Router and Power Adapter: Place the router and power adapter in separate compartments or wrap them in bubble wrap for added protection.
- Cables: Store the coiled and labeled cables in a separate compartment or bag to prevent them from scratching the dish or other components.
- Accessories: Include any accessories, such as mounting hardware, tools, or instructions, in a separate bag or compartment.
3.5 Temperature and Environmental Control
Protect your Starlink system from extreme temperatures and environmental factors.
- Avoid Extreme Temperatures: Do not leave the packed Starlink system in direct sunlight or in a hot vehicle for extended periods. Extreme heat can damage the electronic components.
- Store in a Cool, Dry Place: Store the packed system in a cool, dry place to prevent moisture damage.
- Use Desiccant Packets: Include desiccant packets in the case to absorb any residual moisture.
3.6 Final Checks
Before you start your journey, make sure everything is packed securely.
- Secure the Case: Ensure the protective case is securely closed and latched.
- Test the Case: Gently shake the case to make sure nothing is moving around inside. If you hear rattling, add more padding or adjust the components until everything is secure.
- Label the Case: Label the case with your name and contact information in case it gets lost or misplaced.
By following these steps, you can pack your Starlink system safely and efficiently for travel, ensuring it arrives at your destination in perfect condition.
4. Can I Remotely Shut Down My Starlink System?
Yes, you can remotely shut down your Starlink system using the Starlink app, but you will need local access to the Starlink network to unstow it and restore internet service. This is a useful feature for managing your system while traveling, but it requires careful planning.
Remotely managing your Starlink system can be convenient, especially when you’re traveling. However, there are limitations and considerations to keep in mind when shutting down or stowing your Starlink remotely.
4.1 Using the Starlink App for Remote Shutdown
The Starlink app provides the primary method for remotely managing your system.
- Stowing the Dish Remotely: You can use the Starlink app to stow the dish from a remote location, as long as you have an internet connection (e.g., cellular data or another Wi-Fi network). Simply navigate to the settings and select the stow option.
- Confirmation Prompt: If you are connected remotely, the app will display a confirmation prompt. Tap “OK” to confirm and stow the dish.
4.2 Limitations of Remote Shutdown
While stowing the dish remotely is possible, there are significant limitations to consider.
- Cannot Unstow Remotely: Once the dish is stowed remotely, you cannot unstow it and restore internet service unless you have local access to the Starlink network. This means you need to be physically present at the location of the Starlink system and connected to its Wi-Fi network.
- Service Interruption: Stowing the dish will interrupt your Starlink service. The router and Wi-Fi network will remain active, but you won’t have internet access until the dish is unstowed locally.
4.3 Why the Limitation?
This limitation is in place to prevent unauthorized access and ensure the security of your Starlink system. If anyone could unstow the dish remotely, it would create a potential security risk.
4.4 Alternative Solutions for Remote Management
If you need to manage your Starlink system remotely without the limitation of local access, consider the following solutions.
- Remote Access via VPN: Set up a Virtual Private Network (VPN) to access your home network remotely. This allows you to connect to your Starlink router as if you were physically present at the location. You can then use the Starlink app or a web browser to manage the system.
- Smart Home Integration: Integrate your Starlink router with a smart home platform, such as Google Home or Amazon Alexa. This allows you to control the router remotely using voice commands or a mobile app.
- Remote Power Control: Use a smart power strip or a remote power switch to turn the Starlink router on and off remotely. This can be useful for troubleshooting or resetting the system.
4.5 Step-by-Step Guide to Setting Up Remote Access via VPN
- Choose a VPN Provider: Select a reputable VPN provider, such as NordVPN, ExpressVPN, or Surfshark.
- Install VPN Software: Install the VPN software on your router and on your mobile device or computer.
- Configure VPN Settings: Configure the VPN settings to connect to your home network.
- Test the Connection: Test the VPN connection to make sure you can access your home network remotely.
- Access Starlink Router: Once the VPN connection is established, you can access your Starlink router using a web browser or the Starlink app.
By understanding the limitations of remote shutdown and exploring alternative solutions, you can effectively manage your Starlink system from anywhere in the world.
5. How Does Temperature Affect Starlink When Traveling?
Temperature significantly affects Starlink performance; extreme heat can cause overheating and reduced speeds, while extreme cold can affect the dish’s ability to orient itself. Always store Starlink within its operating temperature range to ensure optimal functionality.
Temperature can significantly impact the performance and lifespan of your Starlink equipment, especially when traveling. Understanding how temperature affects different components of the system and taking appropriate precautions can help ensure optimal functionality.
5.1 Operating Temperature Range
Starlink equipment is designed to operate within a specific temperature range.
- Dish: The Starlink dish is typically designed to operate in temperatures ranging from -22°F to 122°F (-30°C to 50°C).
- Router: The Starlink router is designed to operate in temperatures ranging from 32°F to 104°F (0°C to 40°C).
Operating the equipment outside of these temperature ranges can lead to performance issues, damage, or even failure.
5.2 Effects of Extreme Heat
High temperatures can have several negative effects on Starlink equipment.
- Overheating: The Starlink dish and router can overheat in direct sunlight or in a hot vehicle. Overheating can cause the equipment to malfunction or shut down completely.
- Reduced Performance: High temperatures can also reduce the performance of the equipment. The dish may have difficulty acquiring a signal, and the router may experience slower speeds or dropped connections.
- Damage to Components: Prolonged exposure to high temperatures can damage the internal components of the equipment, such as the circuit boards, capacitors, and processors.
5.3 Effects of Extreme Cold
Low temperatures can also have negative effects on Starlink equipment.
- Reduced Performance: Cold temperatures can reduce the performance of the equipment. The dish may have difficulty orienting itself, and the router may experience slower speeds or dropped connections.
- Damage to Components: Prolonged exposure to cold temperatures can damage the internal components of the equipment, such as the batteries, LCD screens, and connectors.
- Condensation: When the equipment is moved from a cold environment to a warm environment, condensation can form inside the components. Condensation can cause corrosion, short circuits, and other damage.
5.4 Precautions to Take
To protect your Starlink equipment from extreme temperatures, take the following precautions.
- Store in a Temperature-Controlled Environment: When traveling, store the Starlink dish and router in a temperature-controlled environment, such as the passenger compartment of a vehicle or a climate-controlled storage unit.
- Avoid Direct Sunlight: Do not leave the equipment in direct sunlight for extended periods. If you must leave it in sunlight, cover it with a reflective material to reduce heat absorption.
- Ventilation: Ensure adequate ventilation around the equipment to prevent overheating. Do not block the vents on the dish or router.
- Insulation: In cold environments, insulate the equipment to protect it from freezing temperatures. Use insulated blankets or wraps to keep the equipment warm.
- Desiccant Packets: Include desiccant packets in the storage container to absorb any residual moisture.
- Allow to Acclimate: When moving the equipment from a cold environment to a warm environment, allow it to acclimate to the new temperature gradually to prevent condensation.
5.5 Additional Tips for Extreme Weather
- Heat Waves: During heat waves, set up the Starlink dish in a shaded area and use a fan to circulate air around the equipment.
- Cold Snaps: During cold snaps, insulate the Starlink dish with a weatherproof cover and use a space heater to keep the equipment warm.
- Humidity: In humid environments, use a dehumidifier to reduce moisture levels and prevent condensation.
By understanding the effects of temperature on Starlink equipment and taking appropriate precautions, you can ensure optimal performance and prolong the lifespan of your system.
6. What is the Best Way to Transport Starlink While Traveling?
The best way to transport Starlink while traveling is in a padded, waterproof case, with all components securely stowed and cables neatly organized. This method protects against physical damage and environmental factors, ensuring the system is ready for use upon arrival.
Transporting your Starlink system safely requires careful planning and the right equipment. Whether you’re traveling by car, RV, or plane, the following guidelines will help you transport your Starlink system without damage.
6.1 Choosing the Right Transportation Method
The best transportation method depends on the type of travel you’re undertaking.
- Car: When traveling by car, the Starlink system can be transported in the trunk or backseat. Ensure the system is secured to prevent it from shifting during transit.
- RV: When traveling by RV, the Starlink system can be stored in a storage compartment or mounted on the roof. If mounting on the roof, use a secure mounting system and protect the dish from the elements.
- Plane: When traveling by plane, the Starlink system should be transported as checked baggage. Pack the system in a hard-sided case with plenty of padding to protect it from damage.
6.2 Securing the Starlink Dish
The Starlink dish is the most delicate component of the system, so it’s important to secure it properly during transport.
- Stow the Dish: Always stow the dish using one of the methods described above (app, manual, or forced stowing for broken units).
- Protective Case: Use a protective case specifically designed for Starlink dishes. These cases often come with padding and secure straps to keep the dish from moving around during transport.
- Padding: Add extra padding around the dish to protect it from impacts. Use bubble wrap, foam inserts, or blankets to cushion the dish.
6.3 Organizing Cables and Accessories
Properly organizing the cables and accessories is crucial for preventing damage and making setup easier at your destination.
- Coil Cables Neatly: Coil each cable neatly and secure it with zip ties or Velcro straps.
- Label Cables: Label each cable with its purpose to simplify reassembly.
- Protect Connectors: Use protective caps or tape to cover the connectors on the cables.
- Accessory Bag: Store all the accessories, such as mounting hardware, tools, and instructions, in a separate bag or compartment.
6.4 Protecting from Environmental Factors
Protecting your Starlink system from environmental factors is crucial, especially when traveling through diverse climates.
- Waterproof Case: Use a waterproof case to protect the system from moisture.
- Desiccant Packets: Include desiccant packets in the case to absorb any residual moisture.
- Temperature Control: Store the system in a temperature-controlled environment to prevent overheating or freezing.
6.5 Additional Tips for Air Travel
- Check Baggage Regulations: Check the airline’s baggage regulations before traveling to ensure that the Starlink system meets the size and weight restrictions.
- Declare the Equipment: Declare the equipment at the airport security checkpoint to avoid any delays or issues.
- Insurance: Consider purchasing travel insurance to cover any potential damage or loss of the equipment.
By following these guidelines, you can transport your Starlink system safely and efficiently, ensuring it arrives at your destination in perfect condition.
7. How Much Does It Cost to Move Starlink to a New Location?
Moving Starlink to a new location incurs a one-time portability fee, if applicable, and may involve purchasing additional accessories for mounting or protection. Contact TRAVELS.EDU.VN for personalized advice on cost-effective solutions for your travel needs.
The cost of moving Starlink to a new location can vary depending on several factors, including whether you’re moving temporarily or permanently, the distance of the move, and whether you need to purchase any additional equipment or services.
7.1 Portability Fee
Starlink offers a portability feature that allows you to use your Starlink service at a different location than your registered service address.
- Activating Portability: To activate portability, you’ll need to log in to your Starlink account and enable the portability option.
- Portability Fee: Starlink may charge a one-time portability fee to activate this feature. The fee can vary depending on your location and the terms of your service agreement.
7.2 Additional Equipment
You may need to purchase additional equipment to set up your Starlink system at a new location.
- Mounting Hardware: Depending on the new location, you may need to purchase a different mounting system to install the Starlink dish.
- Cables: You may need to purchase longer cables to connect the dish to the router if the new location is farther from the router.
- Protective Case: If you’re traveling with your Starlink system, you may want to purchase a protective case to protect the equipment from damage.
7.3 Installation Services
If you’re not comfortable setting up the Starlink system yourself, you may want to hire a professional installer.
- Installation Fees: Installation fees can vary depending on the complexity of the installation and the location of the new service address.
- Finding an Installer: You can find a Starlink installer by searching online or by contacting Starlink customer support.
7.4 Shipping Costs
If you’re moving your Starlink system to a new country, you may need to pay shipping costs to transport the equipment.
- Shipping Fees: Shipping fees can vary depending on the distance of the move and the shipping method.
- Customs Duties and Taxes: You may also need to pay customs duties and taxes when importing the equipment into a new country.
7.5 Temporary vs. Permanent Move
The cost of moving Starlink can also depend on whether you’re moving temporarily or permanently.
- Temporary Move: If you’re moving temporarily, you may only need to pay the portability fee and purchase any necessary mounting hardware or cables.
- Permanent Move: If you’re moving permanently, you may need to transfer your Starlink service to the new address and pay any applicable fees.
7.6 Example Costs
Here are some example costs associated with moving Starlink to a new location:
- Portability Fee: $25 – $50
- Mounting Hardware: $50 – $150
- Cables: $20 – $50
- Protective Case: $50 – $200
- Installation Services: $100 – $300
- Shipping Costs: Varies depending on the distance and shipping method
By considering these factors, you can estimate the cost of moving your Starlink system to a new location and plan accordingly.
8. What Do I Do if My Starlink Doesn’t Shut Down Properly?
If your Starlink doesn’t shut down properly, try using the app to stow it, manually stow the dish, or, as a last resort, manually force it into the stowed position. If issues persist, contact Starlink support or TRAVELS.EDU.VN for assistance.
If your Starlink system is not shutting down properly, there are several troubleshooting steps you can take to resolve the issue.
8.1 Using the Starlink App
The first step is to try using the Starlink app to shut down the system.
- Open the App: Open the Starlink app on your smartphone or tablet.
- Navigate to Settings: Tap on the “Settings” option within the app.
- Find the Stow Option: Scroll down until you find the “Stow Starlink” section.
- Initiate Stow: Slide the toggle to the right to initiate the stowing process.
- Confirmation (Remote Connection): If you are connected remotely, a confirmation prompt will appear. Tap “OK” to confirm and stow the dish.
If the app is able to successfully stow the dish, the issue may be resolved.
8.2 Manual Shutdown
If the app is not working, you can try a manual shutdown.
- Disconnect Power: Disconnect the power supply from the main outlet.
- Disconnect Cables: Disconnect all cables from the Starlink dish, router, and power adapter.
- Wait for 20 Minutes: Wait for 20 minutes to allow the system to fully power down.
- Reconnect Power: Reconnect the power supply to the main outlet.
- Reconnect Cables: Reconnect all cables to the Starlink dish, router, and power adapter.
If the system still does not shut down properly, move on to the next troubleshooting step.
8.3 Resetting the Router
If the router is not shutting down properly, you can try resetting it.
- Locate Reset Button: Locate the reset button on the back of the router.
- Press and Hold: Press and hold the reset button for 10 seconds.
- Release Button: Release the reset button.
- Wait for Reboot: Wait for the router to reboot.
If the router still does not shut down properly, move on to the next troubleshooting step.
8.4 Checking for Firmware Updates
Outdated firmware can cause issues with the Starlink system. Check for firmware updates and install them if available.
- Open the App: Open the Starlink app on your smartphone or tablet.
- Navigate to Settings: Tap on the “Settings” option within the app.
- Check for Updates: Look for a “Check for Updates” option.
- Install Updates: If updates are available, install them.
8.5 Contacting Starlink Support
If none of the above troubleshooting steps resolve the issue, contact Starlink support for assistance.
- Visit the Website: Visit the Starlink website.
- Find Support: Find the support section.
- Submit a Ticket: Submit a support ticket describing the issue you’re experiencing.
- Call Support: Call Starlink support if you prefer to speak with a representative.
8.6 Additional Tips
- Check Cables: Make sure all cables are properly connected and not damaged.
- Check Power Supply: Make sure the power supply is working properly.
- Check Temperature: Make sure the equipment is not overheating or freezing.
- Check for Obstructions: Make sure there are no obstructions blocking the Starlink dish.
By following these troubleshooting steps, you can resolve most issues with the Starlink system not shutting down properly.
9. What Are the Benefits of Shutting Down Starlink When Not in Use?
Shutting down Starlink when not in use saves energy, extends the lifespan of the equipment, and protects against potential electrical surges. This proactive approach ensures efficiency and reliability.
Shutting down your Starlink system when it’s not in use can offer several benefits, ranging from energy savings to extending the lifespan of your equipment. Here’s a detailed look at the advantages:
9.1 Energy Conservation
One of the most significant benefits of shutting down Starlink when not in use is energy conservation.
- Reduced Electricity Consumption: Even when idle, electronic devices consume electricity. By turning off your Starlink system, you can reduce your overall electricity consumption and lower your energy bills.
- Environmental Impact: Reducing energy consumption also has a positive impact on the environment by decreasing the demand for electricity generated from fossil fuels.
9.2 Extended Equipment Lifespan
Leaving electronic devices running continuously can shorten their lifespan due to wear and tear.
- Reduced Wear and Tear: Shutting down the Starlink system when not in use reduces the amount of time the components are active, which can help extend their lifespan.
- Prevent Overheating: Continuous operation can lead to overheating, which can damage sensitive electronic components. Shutting down the system allows it to cool down and prevents potential damage.
9.3 Protection Against Electrical Surges
Electrical surges can damage electronic devices, especially during thunderstorms or other electrical events.
- Prevent Damage: Shutting down the Starlink system and unplugging it from the power outlet can protect it from electrical surges that could damage the equipment.
- Surge Protectors: While surge protectors can offer some protection, they are not foolproof. The best way to protect your equipment is to disconnect it from the power source when it’s not in use.
9.4 Security Benefits
Although Starlink has security measures in place, shutting down the system can offer an extra layer of protection.
- Prevent Unauthorized Access: Shutting down the system can prevent unauthorized access to your network, especially if you’re away from home for an extended period.
- Reduce Vulnerability: Reducing the amount of time the system is online can reduce its vulnerability to cyberattacks.
9.5 Reduced Light Pollution
For some users, the light emitted by the Starlink dish can be a nuisance.
- Minimize Light Emission: Shutting down the system when not in use can minimize light emission and reduce light pollution, especially in rural areas.
9.6 Convenience and Control
Shutting down the Starlink system when not in use can offer greater convenience and control over your network.
- Scheduled Shutdowns: You can schedule shutdowns using a smart power strip or a remote power switch to automatically turn off the system at certain times.
- Remote Control: You can use a smart home platform to control the system remotely, allowing you to turn it off when you’re away from home.
9.7 Potential Drawbacks
While there are many benefits to shutting down Starlink when not in use, there are also some potential drawbacks to consider.
- Reboot Time: It takes several minutes for the Starlink system to reboot after being turned off, which can be inconvenient if you need to use it quickly.
- Firmware Updates: The system may miss firmware updates if it’s turned off for extended periods. Make sure to check for updates regularly.
By weighing the benefits and drawbacks, you can decide whether shutting down your Starlink system when not in use is the right choice for you.
10. What Should I Do After Setting Up Starlink in a New Location?
After setting up Starlink in a new location, test the internet speed, update the service address, and ensure all connections are secure to guarantee optimal performance and billing accuracy. Contact travels.edu.vn for troubleshooting tips and support.
Once you’ve set up your Starlink system in a new location, there are several steps you should take to ensure that it’s working properly and that your service is configured correctly.
10.1 Testing the Internet Connection
The first step is to test the internet connection to make sure that it’s working properly.
- Connect to the Network: Connect your devices to the Starlink Wi-Fi network.
- Run a Speed Test: Run a speed test using a website or app to measure the download and upload speeds.
- Check Latency: Check the latency (ping time) to make sure that it’s acceptable for your needs.
- Browse the Web: Browse the web to make sure that you can access websites and online services.
- Stream Video: Stream video to make sure that the connection is stable and that you can watch videos without buffering.
If you’re experiencing issues with the internet connection, troubleshoot the problem using the Starlink app or contact Starlink support.
10.2 Updating the Service Address
It’s important to update your service address in your Starlink account to ensure that you’re receiving the correct service and that you’re being